
Typing those words into a search engine can result in hilarious articles and blog posts.
Most of them point to the idea that building flat box furniture like that from IKEA can be addicting. Responses range from “You need a twelve-step program” to “That’s all right, you can always sell them.”
They point to something that must be considered before purchasing said furniture type. Before purchasing build-it-yourself furniture, do all the home. Here are a few tips.
“Help! I accidentally built a shelf.” IKEA Assembly Mistakes
Skill level
What level are your tool skills? How dexterous are your hands? You may be in trouble if you don’t know a flat-blade screwdriver from Phillip’s head.
In this case, IKEA has a plan for you. They have people in the store who will build it for you.
Instructions
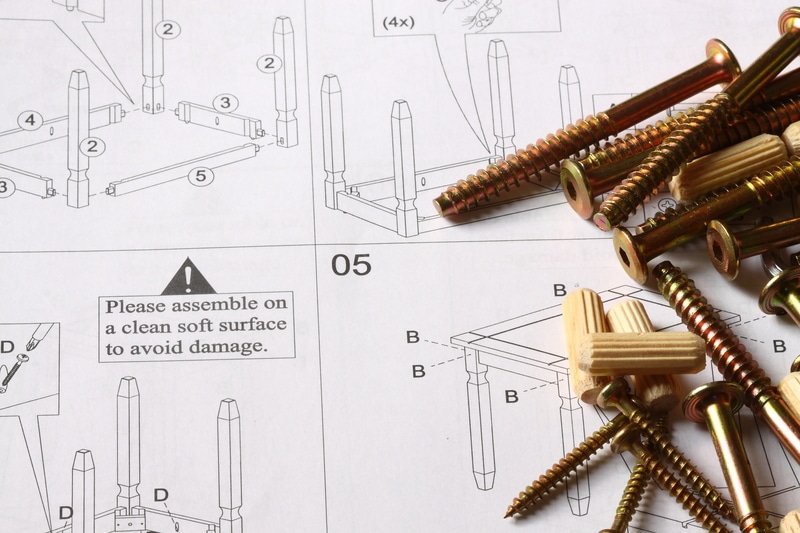
Please look them over. They can’t be read, as they are wordless, but they can still be looked at. If they need to be clarified, many youtube videos will help show how to put the piece together.
Doing this before starting will greatly increase the odds of having a viable piece of furniture when you’re done.
1. Lay it out
You will need a clean surface to lay out the pieces. Use the same orientation found in the instructions, showing which piece goes where and in what direction.
The furniture veneer can be scratched or chipped during assembly, so you can use a clean rug, a canvas drop cloth, or the box the furniture came in.
2. Check the pieces
Is any of it broken? Do you have everything? If you still need to, contact IKEA. They can either refund or replace.
Getting halfway through the project and discovering a lack of key screws will be a problem, and broken furniture isn’t just ugly; it’s dangerous.

3. Tools
You will probably want some, even if it says none are needed. Hours of hand-cranking screws into the furniture will result in sore fingers and wrists.
A drill can screw them in a lot faster. To ensure the furniture is level, you will need a laser or bubble level to check it.
A slanting dinner table could be better for keeping dishes on the table. A hammer will also be useful.
4. Forcing a fit
That is not a good idea. First, make sure the pieces are meant to go together. It’s nearly impossible to remove those little wooden pins once they’re in place.
A slight variation in the construction of the pieces may exist, but it is wise to ensure things are being put together correctly.
5. Have help
Yes, one person can do it, but it goes better and faster if there are at least two people, especially for more complicated projects.

For example, when putting together a chest of drawers, one person can do the chest, and another can do the drawers.
It can be a two-person project if something heavy needs to be lifted.
Tips for IKEA DIY furniture
- Read the assembly instructions– Take the time to read your IKEA furniture’s assembly instructions thoroughly before starting to ensure you understand each step and have all the necessary tools and parts needed for completing the task.
- Gather All Parts– Before diving into an assembly project, take a few minutes to ensure you have all of the necessary parts. If something is missing, you will need to return or order another part, which can add time and frustration to your assembly project.
- Follow Directions– Follow each step carefully as outlined in the instructions when assembling IKEA furniture. Also, be aware that some pieces may be marked differently from the instructions, so use your best judgment to identify them.
- 4. Use the Right Tools– Make sure you have the proper tools for assembly and that they are in good condition. If necessary, purchase additional tools specifically designed for working with IKEA furniture.
- Double-Check Connections – Before tightening all screws and fasteners, take a few minutes to double-check all connections to make sure everything is lined up correctly. This will save you time and hassle if something needs to be adjusted or fixed.
- Secure All Parts– Make sure every part of your IKEA furniture is securely tightened before use. Loose screws, bolts, or nuts can cause instability and damage the furniture.
- Don’t Force Parts– If a part fits easily into place, don’t force it. Instead, take some time to ensure everything is lined up correctly and that all the necessary components are present before continuing.
- Test Stability– After assembling your furniture, test its stability. Wobbling or shaking can indicate a problem and should be fixed immediately to avoid further damage or accidents.
- Enjoy Your Piece – After you have completed the IKEA furniture assembly, take some time to appreciate the new addition to your home and get ready to enjoy its use for years to come.
- Contact IKEA Support– If you have questions or problems during the assembly process, don’t hesitate to contact IKEA customer service for help and advice.
Is IKEA DIY furniture easy to assemble for beginners?
Generally speaking, IKEA furniture is designed to be relatively simple to assemble, even for beginners.
However, reading the instructions carefully and gathering all the necessary tools before beginning can still be helpful.
Double-checking connections and tightening screws will ensure a successful assembly and sturdy furniture when finished.
Contacting IKEA customer service is also an option if you have any problems or questions during the assembly process.
What tools are required for an IKEA DIY project?
The tools required for an IKEA DIY project will vary depending on the item you want to assemble.
Generally, a Philips head screwdriver is necessary for most projects. You may also need a hammer, wire cutters, level, adjustable wrench, and pliers if applicable.
Power tools such as a drill or jigsaw may also be needed for more complex projects.
Most importantly, you may need accessories such as screws, nails, washers, and bolts to complete the project.
Be sure to read through the instructions carefully before starting any IKEA DIY project to ensure that you have all the necessary tools and materials.
Once you have gathered the necessary tools and materials, it’s time to start.
Go through the instructions thoroughly before beginning assembly- this will help ensure that you assemble the item correctly and safely.

Good luck with your IKEA DIY project! Enjoy creating a one-of-a-kind piece for your home.
Is building an IKEA DIY shelf hard?
The answer to this question depends on your skill level and experience. Generally speaking, IKEA DIY shelves are relatively easy to assemble if you know how to use tools and follow instructions.
Even if you don’t have any prior experience building furniture, the detailed assembly instructions that come with the product will guide you through the process.
Moreover, IKEA also provides helpful video tutorials to show you how to assemble the shelves.
Thus, if you have access to all the necessary tools and some patience, it’s possible to build an IKEA DIY shelf without any major difficulties.
Building an IKEA DIY shelf is not hard, as long as you have the necessary tools and are willing to follow the instructions.
As with any furniture assembly project, it’s important to take time and ensure that all parts are securely attached before proceeding.
With practice, you’ll be able to assemble IKEA shelves like a pro in no time.
Do’s and Don’ts of IKEA DIY shelves
Do’s:
- Read the instructions thoroughly and plan before beginning your IKEA DIY shelf project.
- Take into account the space where you will place your shelf and measure accordingly.
- Stock up on all necessary materials, such as screws, nails, and other hardware that may be required.
- Ask for help from a friend or family member with some DIY experience when assembling your shelf.
- Ensure all screws, bolts, and nails are tightened properly before using the shelves to prevent accidents or injuries.
- Have fun! DIY projects can be an enjoyable experience.
Don’ts:
- Take your time with the process and follow the instructions step-by-step.
- Only attempt complex modifications after consulting a professional first.
- Use materials or tools, as this could make your shelf stable and safe.
- Don’t put too much weight on the shelves as this could cause them to collapse or become unstable.
- Remember safety precautions, such as wearing gloves and goggles when drilling, sawing, and hammering.
- Enjoy the process and take pride in your finished product!
- Don’t forget to show off your work to friends and family, as they will surely be impressed by your prowess with DIY projects.
- Remember to take pictures of your creations to share them online or with others who may be interested!
- Remember to keep IKEA shelf assembly instructions handy in case you need a refresher or quick reminder of how to assemble and maintain them.

oh god i’ve done it again