Worktop Cutout Size Calculator
Estimate sink, hob, tap, and socket openings from the visible fitting size or a manufacturer cutout, then check edge margin, radius, and support notes before marking the worktop.
Cutout Planning Results
| Fitting type | Common visible size | Typical cutout opening | Corner or hole detail |
|---|---|---|---|
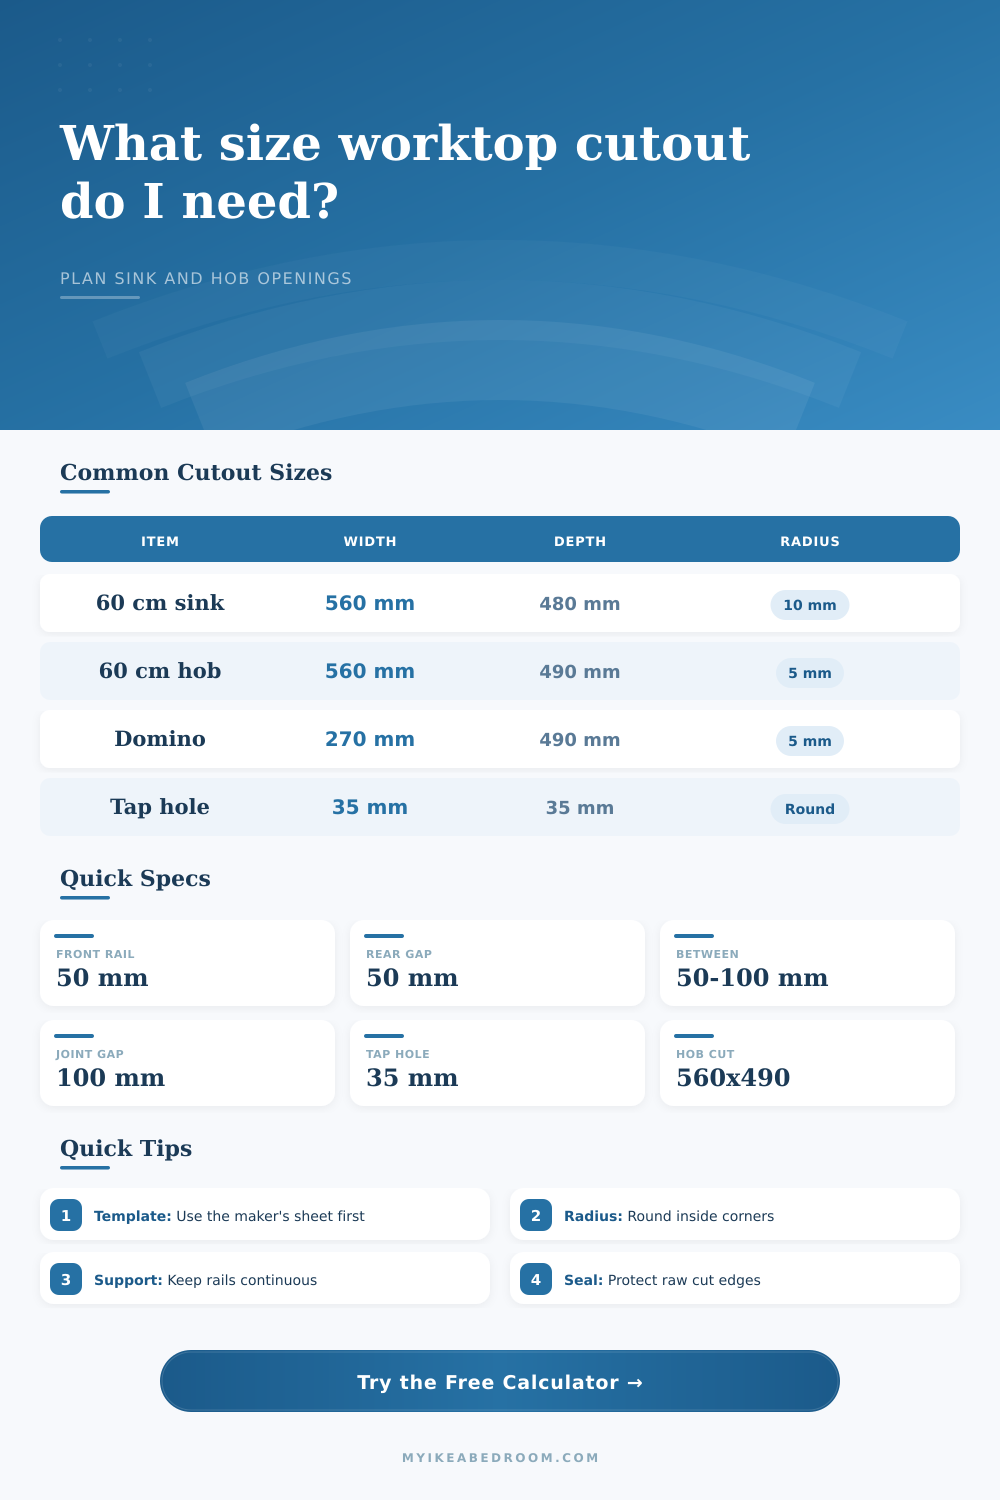
| Single-bowl inset sink | 600×500 mm overall | About 560×480 mm when the template confirms it | 10 mm internal radius is common for laminate tops |
| Large double-bowl inset sink | 780×500 mm overall | About 760×480 mm depending on rim and clips | 10 mm radius; keep clip positions clear below |
| Undermount sink bowl | 755×455 mm bowl assembly | Template opening often near 735×435 mm | Radius follows bowl corner and reveal setting |
| 60 cm induction hob | 590×520 mm glass | 560×490 mm is a common manufacturer cutout | 5 mm to 10 mm radius; ventilation space still applies |
| Gas hob around 75 cm | 740×510 mm top plate | 560×480 mm appears on many wide gas hobs | Check burner box depth and service clearances |
| Domino hob module | 300×520 mm glass | 270×490 mm is a common narrow module cutout | 5 mm radius; bridge kits can change spacing |
| Clearance location | Typical minimum | Better planning target | Why it matters |
|---|---|---|---|
| Front edge to sink or hob cutout | 50 mm solid rail | 60 mm to 70 mm where cabinet layout allows | Leaves strength for the front strip and clips |
| Rear edge, wall, or upstand to cutout | 50 mm solid rail | 60 mm plus appliance ventilation clearance | Allows sealing, splashback, and rear fixing space |
| Between sink and hob cutouts | 50 mm solid bridge | 100 mm or more for heavy-use worktops | Reduces cracking risk and improves wipe-down space |
| From a worktop joint or seam | 100 mm away | 150 mm away for stone or compact laminate | Keeps the joint out of a weakened or wet zone |
| From cabinet side panel or end | 50 mm solid side rail | 70 mm when fasteners or clips sit near the side | Prevents clip conflict with the carcass below |
| Tap hole behind sink bowl | 35 mm diameter hole | 45 mm to 70 mm clear behind bowl if possible | Leaves room for washer, nut, and hose bend radius |
| Worktop material | Common thickness | Cutout support note | Moisture or heat note |
|---|---|---|---|
| Laminate worktop | 28 mm to 38 mm | Keep 50 mm rails; seal exposed particleboard edges | Raw edges need full water protection around sinks |
| Solid wood worktop | 27 mm to 40 mm | Use generous radii and avoid narrow bridges | Oil or seal cut edges before the fitting is clamped |
| Compact laminate | 12 mm to 13 mm | Follow maker tooling data; small radii can chip | Edge finish and sink compatibility are material-specific |
| Quartz or engineered stone | 20 mm or 30 mm | Usually templated and cut by the fabricator | Hobs and sinks need manufacturer heat and support rules |
| Acrylic solid surface | 12 mm plus substrate | Cutouts often need reinforcement blocks or rails below | Inside corners should be radiused and sanded smooth |
| Opening detail | Typical size | Planning tolerance | Use this when |
|---|---|---|---|
| Sink internal corner radius | 10 mm radius | Do not leave a sharp square corner | Inset sinks in laminate or timber worktops |
| Hob internal corner radius | 5 mm to 10 mm radius | Match the appliance instruction sheet | Induction, ceramic, gas, and domino hob openings |
| Mixer tap hole | 35 mm diameter | Keep washer and backnut clear below | Most single-lever kitchen mixer taps |
| Soap dispenser hole | 25 mm to 35 mm diameter | Check shank size before drilling | Accessory holes beside a sink cutout |
| Pop-up socket hole | 80 mm to 102 mm diameter | Check body depth below the worktop | Round power modules behind or beside a prep zone |
I know the feeling: panic when faced with template and jigsaw on a worktop and a job that looks smaller than you anticipated. The sink has a brushed finish and a deep bowl, and you have just bought it. Now you need to cut, but you don’t need design skills; you need geometry. Too tight a fit, and the sink won’t sit flat, or even worse you ruin the structure of worktop by making a mistake.
How do you cut out a bit of something, then deal with what’s left? You might wonder about the maths; how does the gap come into it? This page has a calculator which will do the number crunching for you if you input dimensions of your fittings. But knowing the numbers isn’t enough. You should of know what they mean too.
How to Cut Your Kitchen Worktop
There is always some discrepancy between the size of each hob or sink as shown in the calculator and reference tables and its cut out. Don’t worry… It’s not a mistake! That clearance allows for the rim of the item to sit, for the clips to snap onto top and for the sealant to take hold. To make things clear: cutting right to edge of the sink isn’t going to fit. Knowing why there’s a gap means you can trust the figure the calculator provides you.
Next think about the front rail (the bit of solid surface between the cut out in the work top and the edge). Most manufacturers demand a minimum of fifty millimeters, though some will accept forty. If you have room in your cabinetry plan go for 60. Again this isn’t just squandered material. It’s there to give the structure support. A wafer-thin front rail will bow as the sink loads up. And when it bows, laminate or stone tops can crack and peel apart.
Adjusting the margin with the tool shows how much the opening changes at the end, but the main message here is don’t stretch it! I know it’s tempting to slide the sink forward and free up some countertop space, but you lose steadiness for the sake of surface.
Another issue are corners: A ninety degree angle is the weakest part of any worktop material. Because of this, the calculator recommend a radius (typically between 10mm for sinks and 5mm for hobs) as a drilled hole is more robust different than a routed out corner. It’s not about looks; it is about physics. A sharper corner create more stress concentration. Rounding it off helps spread the load more evenly. If you don’t follow this advice, it will create a weak spot that might break when you set a full pan on it.
But you’d be surprised by how much your material choice makes a difference. Water will cause laminate to swell up from its soft particle board core. Wood responds to changing humidity, which makes it move. Stone is hard, but also brittle. All of this means one thing: Depending on the material you’re cutting out, you’ll need to adjust your cutout plan accordingly.
For instance, if you cut out a sink in quartz, you’ll want to make sure you have precise cuts, since those edges can’t easily be chipped back into place. Cut out a sink in oak, and you’ll need to oil seal it right away so it doesn’t stain.
And then there are those gaps between cut-outs. You don’t make a single hole, do you? Behind the sink, there’s a tap hole. Next to it, there’s maybe a soap dispenser. A little farther along, there’s probably a hob. Clustering all of these holes compromises the strength of the whole slab. Fifty-millimetres between the hob and a sink is the bare minimum but a more comfortabley gap is one hundred.
The calculator doesn’t comment on the arrangement you’ve made; it only displays the size of the hole that has been taken out, which shows how much the structural strength have decreased.
Plan for your space; don’t panic. Measure twice, cut once; respect the margin. Give yourself space for the rail, the radius, and the rim, not just the hole. You’re being smart, not conservative.