Workbench Height Calculator
Find a practical bench height from your body height, elbow height, work mode, task type, shoe sole, floor mat, bench top thickness, vise jaw height, and shared-user range.
Choose a starting setup, then fine-tune the body measurements, task intensity, top build-up, and shared-user range.
Height breakdown
Precision and model work
Higher surface: usually elbow height to 3 in above elbow.
Keeps small details close to eye line and reduces neck flexion.
General assembly
Middle surface: often 2 to 3 in below elbow.
Gives room for clamps, boxes, flat panels, and moderate pressure.
Hand-tool force work
Lower surface: often 4 to 6 in below elbow.
Lets shoulders stay down while planing, chopping, sanding, or filing.
Shared maker bench
Compromise surface: midpoint of users, then adjust tools.
Use vises, riser boards, step platforms, or adjustable stools for the edges.
| Task type | Starting offset from elbow | Typical bench feel | Best use |
|---|---|---|---|
| Fine precision, carving, model work | 0 to +3 in | High and close | Small parts, inspection, steady hand work. |
| Electronics and small assembly | 0 to +2 in | High-medium | Soldering, small fasteners, instrument work. |
| Sewing, craft, and layout | -1 to +1 in | Neutral | Fabric feed, cutting mats, paper craft, light tools. |
| General mixed bench work | -2 to -3 in | Middle | Repair, household projects, mixed clamp and hand tasks. |
| Assembly table | -3 to -4 in | Mid-low | Panels, glue-up, boxes, wide objects. |
| Force work and planing | -4 to -6 in | Low | Planing, sanding, chopping, heavy filing. |
| User height | Approx standing elbow | General bench start | Force bench start |
|---|---|---|---|
| 5 ft 0 in / 152 cm | 38 in / 97 cm | 36 in / 91 cm | 33 in / 84 cm |
| 5 ft 4 in / 163 cm | 40.5 in / 103 cm | 38.5 in / 98 cm | 35.5 in / 90 cm |
| 5 ft 8 in / 173 cm | 43 in / 109 cm | 41 in / 104 cm | 38 in / 97 cm |
| 6 ft 0 in / 183 cm | 45.5 in / 116 cm | 43.5 in / 110 cm | 40.5 in / 103 cm |
| 6 ft 4 in / 193 cm | 48 in / 122 cm | 46 in / 117 cm | 43 in / 109 cm |
| Mode or add-on | What it changes | Calculator treatment | Practical check |
|---|---|---|---|
| Standing shoes | Raises elbow above floor | Add sole height to measured elbow | Measure in the shoes used most often. |
| Anti-fatigue mat | Raises worker, not bench | Add mat height when only the worker stands on it | If the bench also sits on the mat, do not count it twice. |
| Bench top thickness | Affects legs and frame | Subtract from final top height | Use actual finished slab plus any leveling feet. |
| Vise jaw height | Raises clamped work | Add jaw height to top surface | Jaw line can become too high for planing pressure. |
| Seated mode | Depends on chair and knee space | Uses measured seated elbow from floor | Check knees, armrests, and pedal or footrest clearance. |
| Workbench style | Common finished height | Why it lands there | Adjustment idea |
|---|---|---|---|
| Hand-tool woodworking bench | 32 to 36 in | Low enough for body weight over tools. | Raise detail work with a Moxon vise or riser board. |
| Garage repair bench | 36 to 40 in | Comfortable for mixed household repairs. | Add a mat before finalizing leg height. |
| Electronics bench | 38 to 44 in | Small parts benefit from a higher close work zone. | Use chair height and arm support for long sessions. |
| Kitchen island worktop | 36 to 42 in | Prep can range from standard counter to standing bar height. | Choose lower for kneading, higher for plating or detail. |
| Kids maker bench | 22 to 32 in | Height follows age, stature, and supervision style. | Use removable risers as children grow. |
A workbench is a tool that a person use to perform different task. The height of the workbench is a critical factor in determining in what way a person use the workbench. If a person’s workbench is of the wrong height, the person may experience issues like shoulder pain and poor posture.
The correct height of a workbench is important because it functions as the reference point for every movement that the person make when using the workbench tools and clamps. In order to determine the height of the workbench that a person should use, the person should measure their elbow height. In order to accurately determine this measurement, the person should stand or sit in the position that they will use the workbench, with their shoulders relax.
How to Set the Right Workbench Height
The person should measure the height of the workbench from the floor to the bottom of the persons elbow. This particular measurement is the most important measurement for setting the height of the workbench, the workbench should be constructed to land at this measurement. Furthermore, the calculator that can be used to determine this height will assist the person in performing the math if they input the persons elbow height, their type of tasks that they will perform at the workbench, their type of footwear, and whether or not they will use a mat at the workbench.
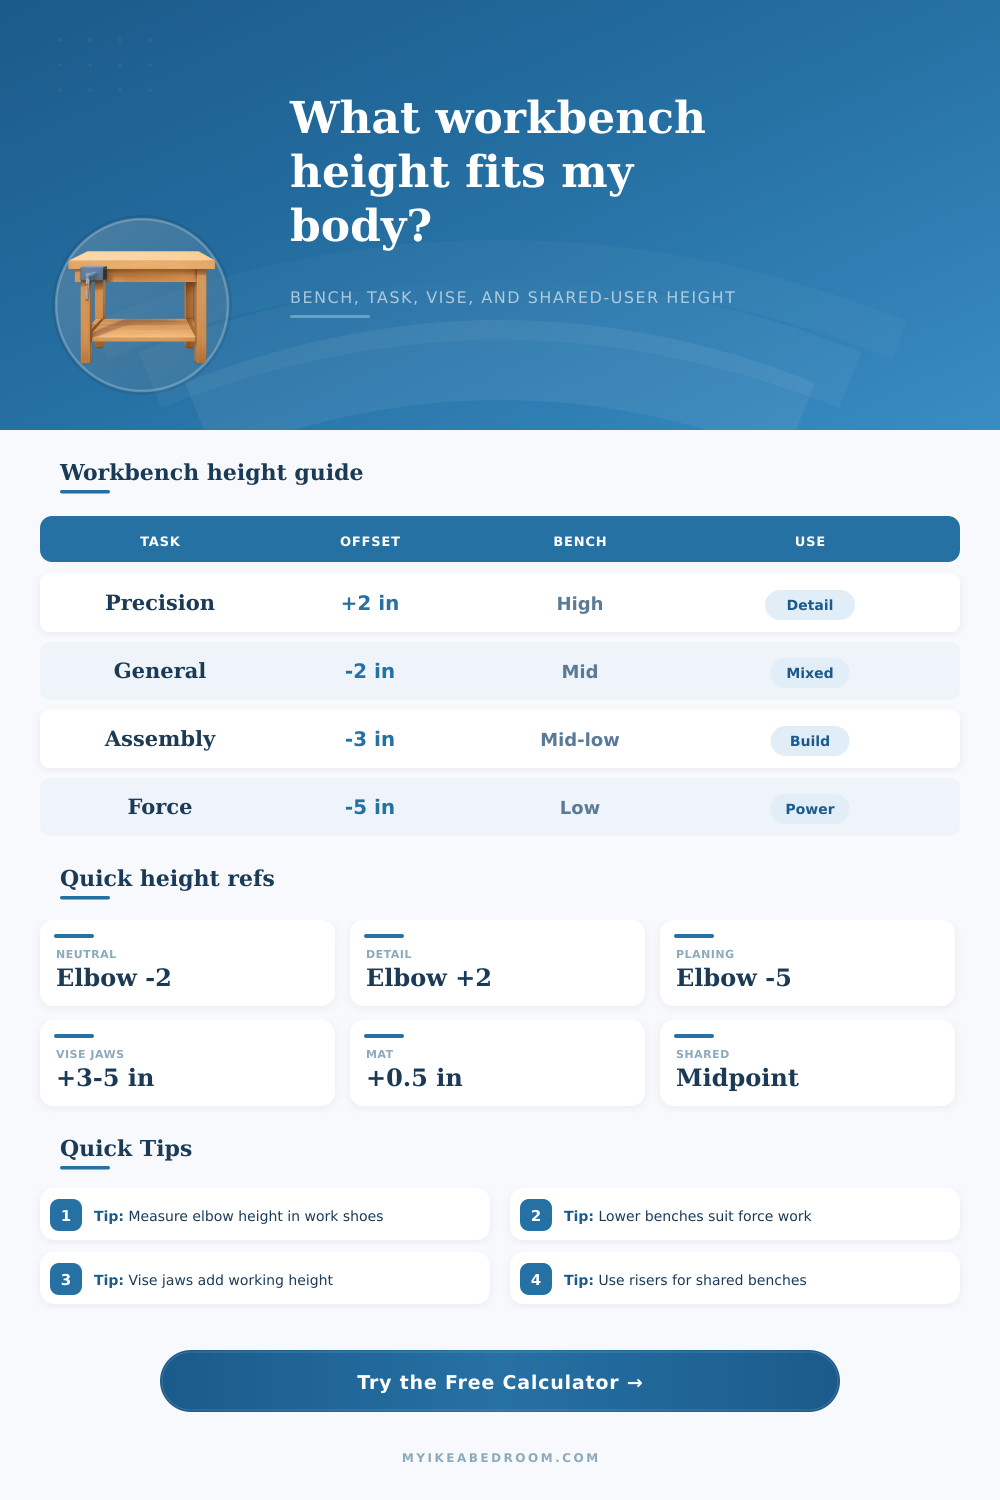
The type of tasks that are to be performed is one variable that will impact the height of the workbench that should be used. Tasks that require precision from the person will require the workbench to be at or very slightly above the elbow level of the person. Tasks that require the person to forcefully work with the tools at the workbench will require the workbench to be constructed such that it is lower than the elbow level of the person.
Tasks that contain element of both precision and force will require a workbench height that is somewhere between those two extremes. Regardless of the type of tasks that are to be performed at the workbench, the person should set the workbench height to match the type of tasks to be performed. In addition to the tasks that are to be performed at the workbench, there are also additional variables regarding the person and the workbench that can have an impact upon the height of that workbench.
For instance, the type of footwear that the person will use at the workbench can impact the height of the workbench. If the person will be wearing work boots at the workbench, the boots will increase there height, and their elbow measurements will be too low for the height of the workbench. An anti-fatigue mat will also raise the height of the person.
However, if both the person and the workbench are to be sitting upon the same anti-fatigue mat, the distance between the person and the workbench will be the same. Therefore, the person should always take measurements in the same conditions in which they will be utilizing the workbench, wearing their same shoes and standing on the same mat if they will be using the workbench. In addition to the height of the workbench, the thickness of the workbench top and the height of the vise jaw will also affect the height of the workbenchs working surface.
A thick workbench top will raise the finished work surface, so the workbench legs will have to be cut shorter. The vise jaws will raise the workpiece above the top of the workbench, making the workbench feel high if a person is applying much pressure to the workpiece. The person should calculate the height of both the workbench top and the vise jaws to ensure the vise line is at a usable height for the work that must be performed on the workbench.
Workbenches that are shared by several people must often be of a height that is a compromise between the individuals. In the case of two individuals of different heights using the same bench, the height should be selected so that it is approximately at the height of the elbows of both individuals. If the workbench is set to the height of one individual, the other individual may have to bend their neck to view the workpiece.
Thus, stools, risers, or even auxiliary workbench tops may be necessary for individuals of different heights sharing a workbench. Many individuals make mistakes in calculating the height of their workbench. One common mistake is measuring the height of an individuals elbows while the individual is standing and with their shoulders shrug into their neck.
In this case, the resulting workbench will be too tall for the individual. Another common mistake is to forget that an individuals elbows will be higher when they are seated than when they are standing. Finally, another mistake that many individuals make is to measure the legs of the workbench as the height of the workbench; this will make the top of the workbench too high once it is assembled.
Reference tables can help to an individual to determine their elbow height, but there will always be at least one variable that the table cannot account for. For instance, an individual may have longer forearms than the average person, or the shop in which the workbench will be built may have uneven flooring. Thus, the measurements from the reference tables are only a direction to the individual regarding the proper height of the workbench; the actual test will be whether the workbench allows the individual to perform their tasks without having to think about their posture.
By understanding the role that a workbench will play in a workshop, an individual can change the way that they use an existing workbench. For instance, a person can use a temporary work platform to raise a workbench for precision tasks, and an auxiliary top can be used to lower the height of a workbench to allow for forceful tasks. Thus, one workbench can perform multiple roles in a workshop.
An individual can use the workbench height calculator to determine how much to raise or lower the workbench for each of these tasks. As such, there are a few different variables that must be accounted for in determining the height of the workbench. The height of an individuals elbows when performing work must be measured in the actual work environment; the height of the workbench must be offset according to the tasks that will be performed; the thickness of the workbench top and the height of the vise must be accounted for in the measurement.
If these variables are accounted for, the workbench will be a functional tool for the individual who owns the workbench.