Furniture screw sizing planner
Wood Screw Length Calculator
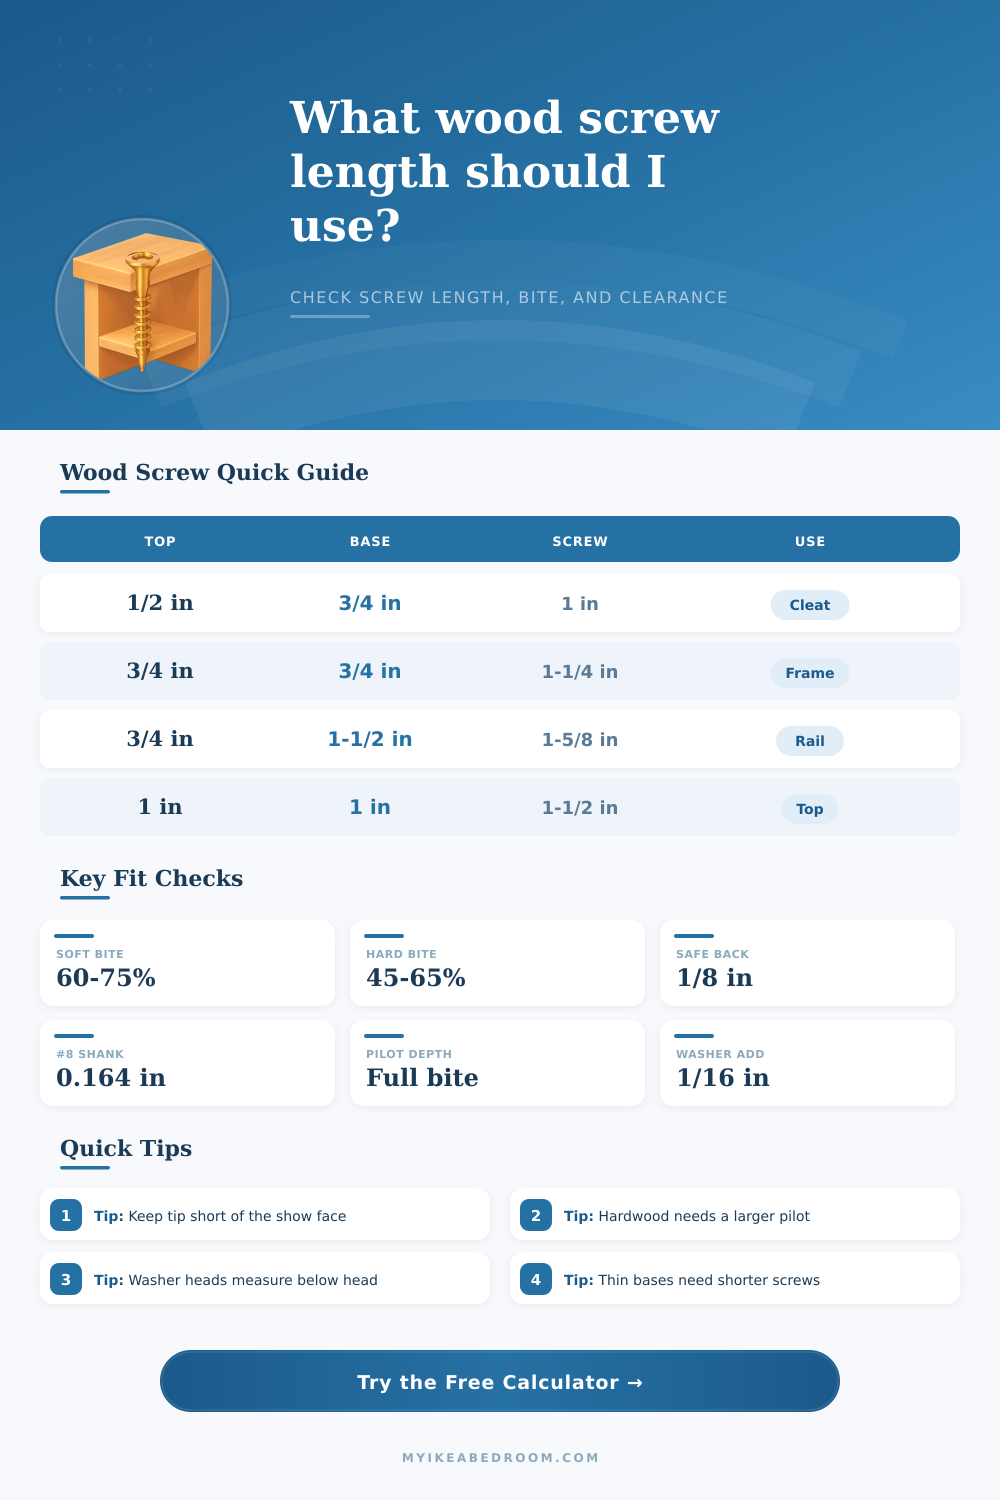
Choose a standard wood screw length from board thickness, countersink depth, pilot depth, screw gauge, wood hardness, joint style, load type, head style, and target penetration.
Sizing breakdown
Geometry
Pilot and fit
| Nominal length | Decimal inches | Approx mm | Typical furniture use |
|---|---|---|---|
| 5/8 in | 0.625 | 15.9 mm | Thin hardware plates and hinge plates |
| 3/4 in | 0.750 | 19.1 mm | 1/2 in fronts into thin base material |
| 1 in | 1.000 | 25.4 mm | 1/2 in plywood to 3/4 in cleats |
| 1-1/4 in | 1.250 | 31.8 mm | 3/4 in stock into 3/4 in stock |
| 1-1/2 in | 1.500 | 38.1 mm | Tabletop clips and stronger rails |
| 1-5/8 in | 1.625 | 41.3 mm | Thicker rails and cleats |
| 2 in | 2.000 | 50.8 mm | Heavy face screws into 2x material |
| Gauge | Shank diameter | Softwood pilot | Hardwood pilot | Clearance hole |
|---|---|---|---|---|
| #4 | 0.112 in | 1/16 in | 5/64 in | 7/64 in |
| #6 | 0.138 in | 5/64 in | 7/64 in | 9/64 in |
| #8 | 0.164 in | 7/64 in | 1/8 in | 11/64 in |
| #10 | 0.190 in | 1/8 in | 9/64 in | 13/64 in |
| #12 | 0.216 in | 9/64 in | 5/32 in | 7/32 in |
| #14 | 0.242 in | 5/32 in | 11/64 in | 1/4 in |
| Material / load | Usual bite ratio | Clearance goal | Why it matters |
|---|---|---|---|
| Softwood, medium furniture load | 60% to 75% | 1/8 in minimum | Soft fibers tolerate deeper thread bite |
| Hardwood, cabinet or frame joint | 45% to 65% | 1/8 in minimum | Hard fibers split sooner near edges |
| MDF, melamine, particleboard | 40% to 58% | 5/32 in minimum | Sheet goods swell or blow out if overdriven |
| Heavy rail or cleat support | 65% to 85% | 1/8 in minimum | More thread bite helps shear and pull-out load |
| Tabletop fastener with movement | 35% to 55% | 3/16 in minimum | Shorter bite reduces risk in moving tops |
| Screw length | Penetration | Protrusion margin | Fit score | Fit note |
|---|---|---|---|---|
| 1-1/4 in | 0.50 in | 0.25 in | 92/100 | Recommended |
Measure the screw the same way it seats: flat-head screws are usually counted from the top of the head, while pan and washer heads are effectively measured from under the head.
Drill the pilot to the bite depth: in hardwood, melamine, and MDF, a short pilot can make a correctly sized screw split or swell the receiving board.
Choosing the correct length for screws is part of the process of joining pieces of material together. Choosing the correct length for screws will prevent a person from damaging the finished surface of you’re project. If a person chooses the length of the screw too long for the project, then the tip of the screw will poke through the far side of the wood.
If a person chooses the length of the screw too short for the project, then the screw will not provide enough holding power for the joint of the project. Before choosing the length of screws to use in a project, a person must consider the thickness of the top board of the project, the thickness of the base material of the project, the depth of the countersink to be used in the project, and the style of the screw head to be use. The calculator provide a recommendation of the length of the screw that should be used in a project based off several specific inputs for the project.
How to Choose the Right Screw Length
Each of these inputs is necessary to provide an accurate recommendation of the screw length that should be used in the project. For instance, the thickness of the top board that will be joined to the base material is a necessary input for the calculator because this will help to determine how much of the screw will be used up in the top board, and how much of the screw must engage with the base material. The depth of the countersink is another necessary input because this will impact how much of the screw will be in the base material.
The style of the screw head is another necessary input because different styles of screw heads will impact where the length of the screw is measured from. For instance, if someone is to use flat head screws instead of pan head screws, then the measurement of the length of the screw will begin at the top of the screw head; however, pan head screws will allow for more of the screw to be within the top board. Material type is another factor that can impact the length of the screw that should be used in a project.
For instance, hardwoods are a type of material that is more difficult to drill into than some other types of wood; therefore, using a screw that goes deeper into the hardwood will increase the chance of splitting the hardwood. Softwoods are softer than hardwoods, but softwoods can still split if too much force is used when inserting the screw. Sheet goods, such as MDF and particleboard, are sheet materials that can blow out if too much force is used when inserting the screw.
Because of these differences in materials, the screw length recommended by the calculator changes according to the material that is to be screwed into; thus, the calculator will help to ensure that the screw will not split the base material of the project. Finally, the style in which the pieces of material are to be joined together (joint style), as well as the type of load that will act upon the joint (load type) are additional factors that can impact the length of screws that is to be used in the project. A joint that must resist a heavy load will require the screw to travel deeper into the base material due to the need for more thread engagement.
Conversely, a joint that is only required to keep the two pieces of wood aligned does not require a screw that goes as deep into the base material as will be required for a joint that must resist heavy loads. The type of joint that is being made will also impact the length of screw that is required since some types of joints allow for the screw to have a deeper bite into the base material than others. Another variable that will impact the length of the screw that is to be driven into a joint is the depth of the pilot hole that will be drilled into the wood.
The pilot hole depth must be deep enough to accommodate the length of the screw that will be driven into the joint. If the pilot hole is too shallow for the screw length, the screw may split the wood or the screw may not effectively seat into the joint. Thus, the depth of the pilot hole must allow for the screw to have its intended bite into the wood while also leaving enough room for a safety margin for the screw to not come too close to the far side of the joint.
This safety margin is the amount of wood that must remain on the far side of the joint relative to the screw hole. The screw bit must not break through the far side of the joint. The most common mistake in determining the length of screws to use in a project are simply not considering all of the variables related to screw length.
For instance, many people will reach for a screw that is longer than they think they need. If the screw is too long, it will damage the finished face of the wood. Additionally, some people may not take into account the differences between head styles, as well as the way that these differences may impact the bite of the screw relative to the length of the screw.
Thus, it is necessary to use the screw length calculator to ensure that the screw length will have the bite that is needed into the joint, while also ensuring that there is a sufficient safety margin on the far side of the joint. One last way of determining the length of screw that should be used in a joint is to make a test block of the same type of wood that will be used in the project. Test blocks of wood can be screwed in the same way that the screws will be driven into the project.
By testing the screw lengths on these blocks of wood, it is possible to determine whether or not the actual length of the screw matches that which is printed on the box. Thus, using test blocks is one of the best ways to ensure that the screw length that is being selected for the project will match the length that is actualy available for installation. In choosing the proper length screw, the goal is to find the shortest screw that provides enough bite into the joint while leaving a safety margin of wood on the far side of the joint.