Wall Sconce Hanging Height Calculator
Calculate a wall sconce center height, electrical box height, fixture top and bottom edges, glare band, and clearance status for bedside, hallway, vanity, console, stair, and accent lighting.
Start with a real placement scenario, then adjust eye line, ceiling height, fixture body, reference furniture, and glare sensitivity.
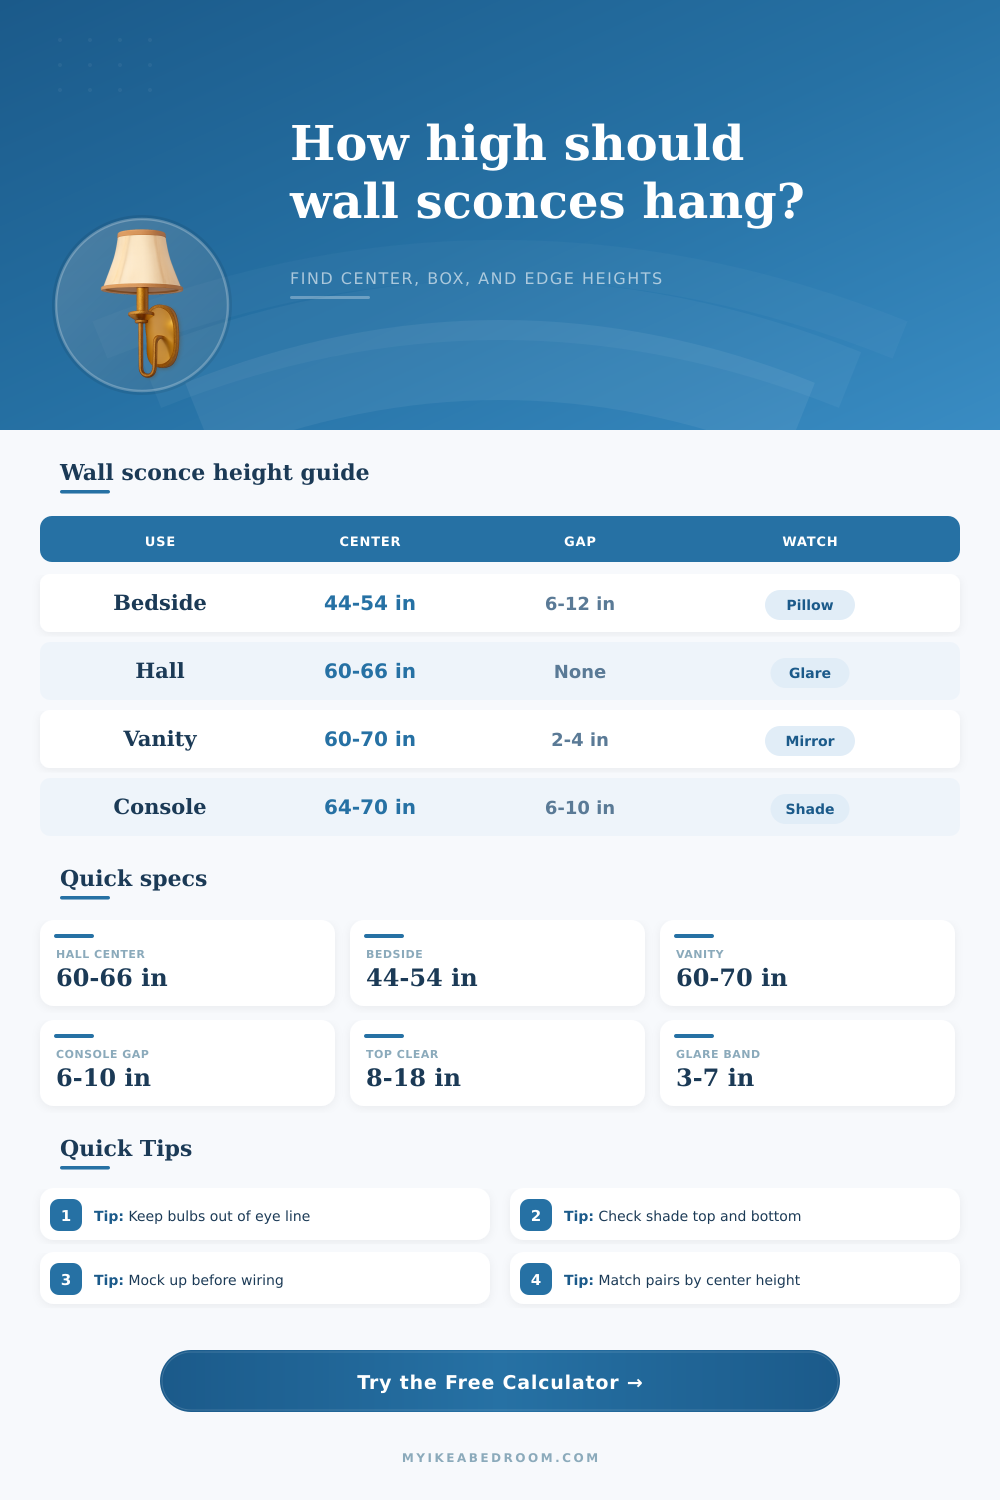
| Placement | Typical center height | Metric center | Best starting point |
|---|---|---|---|
| Bedside reading sconce | 44 to 54 in above finished floor | 112 to 137 cm | Use seated eye height, mattress height, and nightstand clearance. |
| Hallway or passage sconce | 60 to 66 in above finished floor | 152 to 168 cm | Use standing eye height and keep bright bulbs out of the direct sight line. |
| Bathroom vanity side sconce | 60 to 70 in above finished floor | 152 to 178 cm | Align near face height and keep the shade clear of mirror frames. |
| Entry console or sideboard pair | 64 to 70 in above finished floor | 163 to 178 cm | Use the console top plus shade height to preserve an intentional gap. |
| Stair landing or tall foyer sconce | 66 to 72 in above finished floor | 168 to 183 cm | Raise slightly for tall ceilings, landings, and long views. |
| Reference below | Common top height | Minimum gap | Why it matters |
|---|---|---|---|
| Nightstand or bed rail | 24 to 32 in | 6 to 12 in | Keeps the shade above bedding, pillows, books, and bedside objects. |
| Tall headboard | 42 to 58 in | 4 to 8 in | May force the sconce higher or call for a shorter fixture body. |
| Console or sideboard | 30 to 36 in | 6 to 10 in | Creates breathing room between the tabletop vignette and fixture bottom. |
| Mirror or medicine cabinet edge | 36 to 72 in | 2 to 4 in | Prevents overlap with frames, doors, and mirrored cabinet swing. |
| Stair rail or wainscot cap | 34 to 42 in | 8 to 14 in | Keeps light above hands, trim caps, and rail shadows. |
| Shade style | Glare band used | Adjustment tendency | Best use |
|---|---|---|---|
| Diffused glass or fabric shade | Moderate band around eye height | Small shifts are usually enough | Bedrooms, hallways, and soft living areas. |
| Open bulb or clear glass | Wider band around eye height | Often needs higher center or dimmer bulb | Accent walls where direct view is limited. |
| Up/down cylinder | Moderate band but tighter beam | Check wall scallop height and top clearance | Hallways, stair landings, and modern entries. |
| Downward shade | Lower direct-view risk | Can sit slightly lower for tasks | Reading chairs, bedsides, and vanity task light. |
| Swing-arm shade | Task-sensitive band | Mount for seated use, then aim the shade | Bedside and chair reading zones. |
| Scenario | Fixture height | Useful inputs | Likely result |
|---|---|---|---|
| 12 in bedside cylinder above 26 in nightstand | 12 in | Seated eye 44 in, 8 in gap | About 46 to 52 in center depending on shade. |
| 14 in hallway diffused sconce on 8 ft ceiling | 14 in | Standing eye 62 in, 12 in top clear | About 62 to 66 in center with comfortable edges. |
| 18 in console sconce under 9 ft ceiling | 18 in | Console top 34 in, 8 in gap | About 65 to 70 in center for balanced proportions. |
| 16 in vanity pair beside mirror | 16 in | Standing eye 61 in, mirror conflict check | About 64 to 68 in center, adjusted for frame clearance. |
Priority: seated comfort and reachable switching.
The calculator lets the lower reference pull the fixture up when bedding or a headboard needs clearance.
Priority: glare control at standing eye height.
Projection and open-bulb inputs matter more here because people pass close to the wall.
Priority: face-height light and mirror clearance.
Use the mirror or cabinet edge as the reference so the shade does not overlap the frame.
Priority: visual balance above furniture.
The result weighs the furniture gap and the room eye line, then reports whether either constraint is controlling.
Mock up the whole fixture, not only the box. Tape the top, center, bottom, and bright-source height on the wall. A junction box can be centered correctly while a tall shade still feels too high or too low.
Use pairs by centerline. For two sconces around a bed, mirror, console, or doorway, match the fixture centers first. Then confirm that each side has the same bottom edge, top edge, and visible gap.
Determining the correct mounting heights for a wall sconce is necesary due to how the height of a wall sconce impact how the light enter the eyes of a person walking past the sconce. If the wall sconce are mounted too low, the light will enter the eyes of the person walking by. If, however, the sconce is mounted too high, the light will not reach the area that is to be use by the individual.
Each area within a home has a different requirement for lighting than other areas. For instance, the hallway require the sconce to provide enough light for the individual not to trip, but the light should not enter the eyes of the individual walking by that hallway. A wall sconce that is installed beside the bed, in contrast, must provide light for the individual who is lie down in the bed.
How to Choose the Right Height for a Wall Sconce
Thus, the required angle and brightness of the wall sconce beside the bed is different than that required for the hallway sconce. Finally, a wall sconce that is installed as a vanity sconce must provide even illumination on the face of the individual who is utilizing the mirror; therefore, this type of sconce will be mounted in a different way than the wall sconce beside the bed or in the hallway. To determine the mounting height of the wall sconce, several different type of inputs are required for the calculator tool.
The ceiling height, the eye level of the individual, the size of the sconce, and the height of the objects that will be located below the sconce are all inputs that is required. The eye level will help to determine at what height mounting the sconce will cause glare on the eyes of the individual. The size of the sconce will help to determine at what height the top and bottom edges of the sconce will be mounted.
The height of the objects located beneath the sconce is another of the critical inputs for the calculator tool; the objects will set the minimum height of the sconce so that the shade of the sconce does not land upon the objects. Thus, without these specific inputs, the calculator tool will be unable to determine the mounting height for the sconce. Many individuals will attempt to guess the mounting height for a sconce by referring to various photographs online.
However, the guesses these individuals make will likely not be accurate; the height of the ceiling or the shade of the sconce may not be as depicted in the photographs. Additionally, the calculator tool will help to prevent these inaccurate guesses by considering each of the constraint for the mounting height of the sconce at the same time. For instance, the calculator tool will account for where the electrical box is located; this can have an impact upon the mounting height of the sconce due to the possibility of offset the mounting plate from the sconce itself.
Furthermore, the style of the shade of the sconce will also impact the mounting height of the sconce. For instance, the sconce may have a diffused fabric shade that hides the source of the light; in this instance, the sconce can be mounted at any height. In contrast, if the shade is made of clear glass or if the shade is open to allow the bulbs to be visible, the mounting height of the sconce will be more restrictively in its requirement for the height of mounting.
Another of the factors to consider when determining the mounting height for the sconce is the depth of the sconce itself. Deep sconce can potentially interfere with the movement of the individual who is walking by the sconce. Therefore, the calculator tool includes a “traffic” setting to ensure that the depth of the sconce will not interfere with the movement of the individuals who use the area.
In addition to the depth of the sconce, the reference tables that are provided alongside the calculator tool are also helpful in determining the mounting height of the sconce. These reference tables provide context for the different measurements of the objects in the house and the calculated mounting height for the sconce; the tables will help the individual to make a determination of whether or not the calculated height is an appropriate height for the sconce in its specific area. Finally, the individual should also ensure that the pair of sconces appear to be balance when installed on the ceiling.
Due to the fact that the depth of the ceiling and the placement of the electrical outlets may not be even throughout the ceiling, the two sconces may not be even with each other. Thus, the individual should check the depth of each sconce to ensure that they is level with each other. Furthermore, after calculating the mounting height of the sconce, the individual should tap the sconce to the wall at each calculated height.
Standing in the area in which the sconce will be used, the individual should check to ensure that the light from the sconce performs in the desired manner; this is the final way in which the mounting height for the sconce should be verified.