Tongue and Groove Ceiling Calculator
Estimate T&G ceiling board count, exposed linear feet, row layout, cut pattern, staggered end joints, perimeter gap, cutout allowance, and waste from one planning form.
Choose a ceiling type, then fine tune board face width, stock length, tongue waste, end stagger, joist direction, expansion gap, cutouts, and waste.
- Row 1: calculating
- Row 2: calculating
- Row 3: calculating
- Row 4: calculating
- Row 5: calculating
- Row 6: calculating
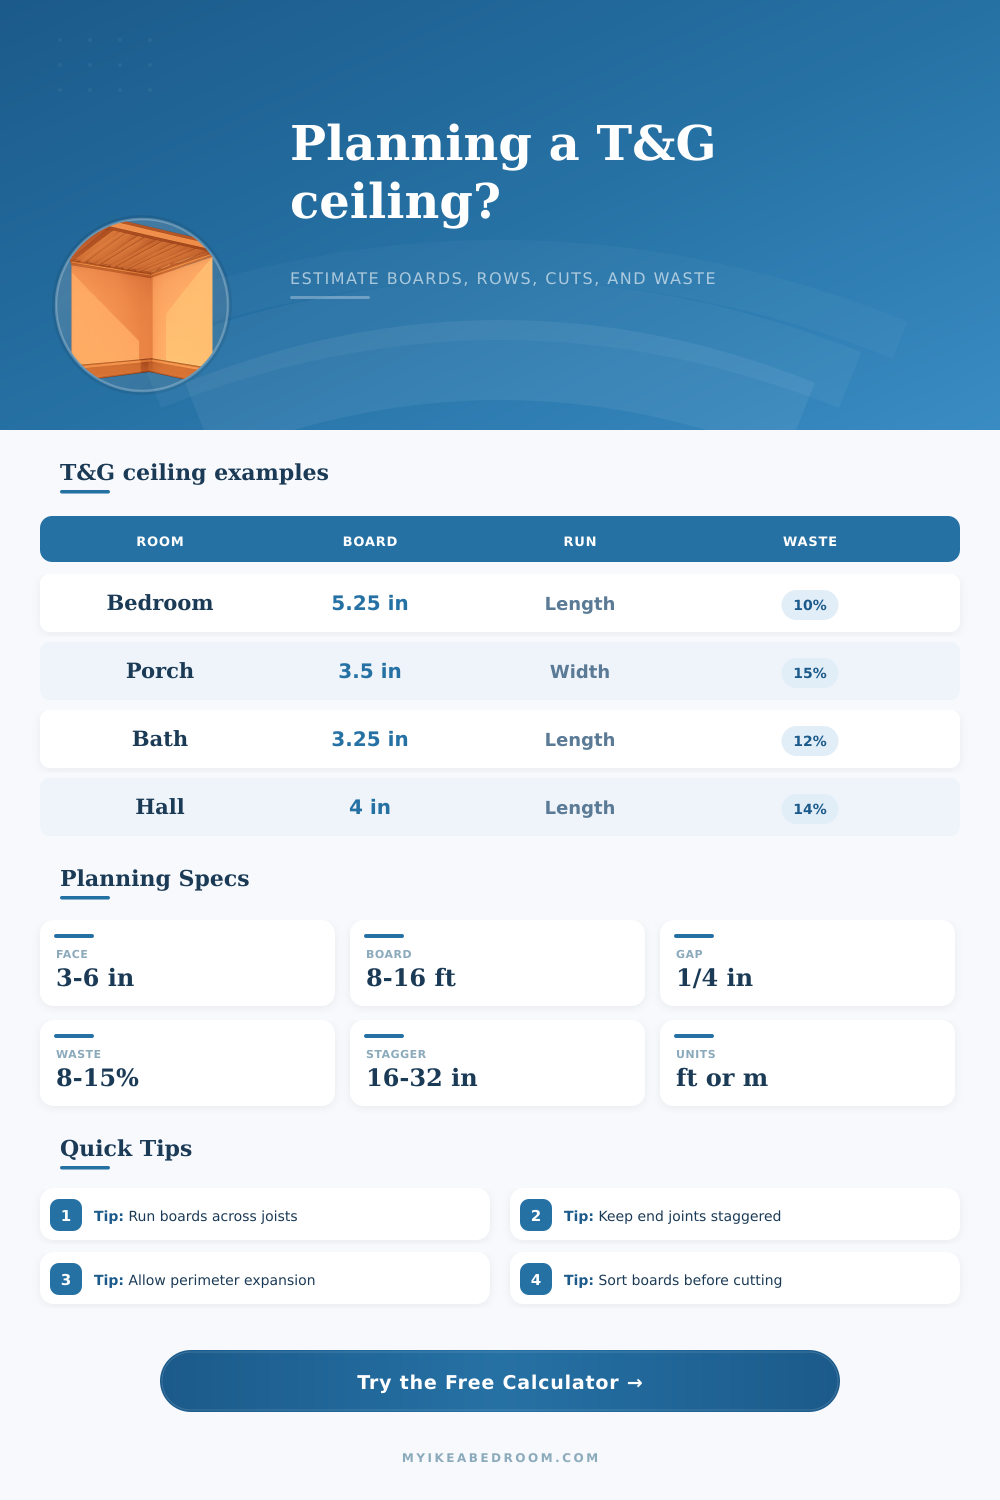
| Board description | Typical exposed face | Use in calculator | Layout note |
|---|---|---|---|
| Narrow beadboard or V-groove | 3 in to 3.5 in | Enter 3.25 or 3.5 in | More rows, more fastener passes, tighter visual lines |
| Classic pine T&G plank | 5 in to 5.5 in | Enter 5.25 in if measured face is close | Balanced for bedrooms, porches, and basements |
| Wide nickel-gap board | 6 in to 7 in | Enter the exposed face after the gap | Fewer rows but offcuts can be larger |
| Metric panel board | 90 mm to 140 mm | Use metric mode and enter millimeters | Calculator converts to feet internally |
| Stock length | Best ceiling fit | Common cut behavior | Calculator treatment |
|---|---|---|---|
| 8 ft boards | Closets, bathrooms, hallways | Many joints in larger rooms | Counts multiple pieces per row and offcuts |
| 10 ft boards | Small bedrooms and offices | Useful where room width is near 10 ft | Flags low offcut when run is close to stock |
| 12 ft boards | Bedrooms, porches, basements | Good compromise for staggered starts | Default length for most presets |
| 16 ft boards | Great rooms and long porch spans | Fewer joints but harder handling | Reduces piece count when rows are under length |
| Ceiling condition | General waste | Tongue waste | When to increase |
|---|---|---|---|
| Simple rectangle | 8% to 10% | 2% to 3% | Few openings and straight, square walls |
| Bathroom or utility ceiling | 10% to 14% | 3% to 5% | Fan, light, pipe, hatch, or small ripped rows |
| Porch or exterior ceiling | 12% to 16% | 4% to 6% | Sorting, moisture movement, exposed trim details |
| Sloped attic ceiling | 14% to 20% | 4% to 7% | Angled end cuts, knee walls, and tight access |
| Input | Typical range | Planning purpose | Calculator note |
|---|---|---|---|
| End stagger | 16 in to 32 in | Keeps adjacent end joints separated | Builds the six-row starter pattern |
| Perimeter gap | 1/8 in to 1/2 in | Allows expansion under trim | Subtracts from field length and width |
| Cutout area | 0 to project-specific | Reduces covered surface but adds cutting waste | Credited by area, then complexity is added back |
| Joist direction | Length or width | Sets board run perpendicular to framing | Changes rows, pieces, and linear feet |
0 boards
Usually used when joists run along the ceiling length.
0 boards
Usually used when joists run along the ceiling width.
0 rows
More rows and fastener passes, with finer ceiling lines.
0 rows
Fewer rows, but check that the final rip remains usable.
Measure the exposed face: Tongue and groove boards cover less than their full blank width. Enter the visible face width so row count and linear feet reflect the finished ceiling.
Use the cut pattern as a starter: The six-row plan rotates end joints by the stagger input, but real board defects, lights, and vents may change individual row cuts.
When you look at a ceiling, it can have either a finished or unfinished surface. Tongue and groove boards provides a finished look for the ceiling as the tongues and grooves of the boards hide the joints between the boards. Before cutting the boards, you have to figure out how many boards you need to purchase to cover the area.
The calculator does the math for you based on the dimensions of the ceiling and the boards you choose, removing the guesswork involved in covering a ceiling with wooden board. You have to make several decision before you can start using the calculator. First, you have to decide in what direction the boards will run in relation to the joists in the ceiling.
How to Calculate How Many Ceiling Boards You Need
If you run the boards perpendicular to the joists, you create an installation that is strong and stable. However, if you choose the direction of the boards incorrectly, you could end up with a situation in which a long and narrow room require many short board pieces to cover the ceiling. Many short board pieces will affect the number of boards you have to purchase.
You must also decide the face width of the boards. The face width of the boards is the width of the boards that are visible when the boards are installed. The tongues is hidden within the next board.
If you enter the width of the boards that are visible, the calculator will accurately calculate in how many rows the boards will go across the ceiling. Using narrower boards will create more rows and more fastener passes through the boards than will wider boards. However, wider boards will result in fewer rows.
The problem with using wide boards is that the last row will be ripped to a noticeable width. The calculator will show the width of the last ripped cut in the boards so that you can adjust the layout of the boards or accept the fact that the last row will be a narrow strip of wood. The length of the boards also introduces several other factors.
Using long boards will result in fewer end joints between the boards. However, the longer the boards, the more difficult it will be to move the boards into position. Shorter boards will result in more end joints to stagger the ends of the boards.
However, they will be easier to move into position. The stagger feature in the calculator will rotate the end joints of the boards so that the ceiling will not have any straight lines across the ceiling. Another factor is in the length of the boards.
The calculator can calculate for you the number of boards needed if the ceiling have any vents or lights in it. Waste is another factor that will introduce errors when covering the ceiling with wooden boards. Obvious waste occurs with the cutting of the boards and the offcuts of the boards that are too short to be used in another location in the ceiling.
Less obvious waste occurs if there are damages to the tongues of the boards or if there are knots in the boards in locations that are to be visible. Additionally, if you cut a board incorrectly on the first attempt, you will lose that board. The calculator accounts for the waste of the milling of the boards and the sorting of the boards.
Additionally, the calculator accounts for all other types of waste. The percentage of waste is especially important in rooms that contain many vent or lights as you will need extra cuts in those locations and there will be an increased chance for errors in cutting the boards. The last factor is in the perimeter of the ceiling.
Because wood can expand and contract based on the humidity in the air, gaps have to be left at the perimeter of the ceiling to allow for this movement. Thus, the ceiling cannot be pinned to the walls. A small gap will be left at the perimeter of the ceiling and this gap will be covered in the trim of the ceiling.
The calculator takes this gap into account as it will subtract the width of the gap from both the length and the width of the ceiling before it calculates the number of rows of the boards and the number of linear feet of the boards. Cutouts for the installation of the lights in the ceiling will also impact the installation of the boards. Each cutout will require that you cut a board to that size to accommodate the light fixture.
Additionally, offcuts will be produced from each cutout. The complexity setting in the calculator allows for extra linear feet to be accounted for these extra cuts in the boards. This factor allows for the understanding that removing square footage from the ceiling will not save you that same amount of lumber and labor.
Most people pay close attention to the number of boards that are calculated. However, the relationship between the row count and the piece count is more important. If the number of pieces is higher than the number of rows, you will have to make more cuts with your saw.
You will also be working with more short lengths of boards. This will happen in a situation in which one of the dimensions of the room is close to the length of the boards but not an exact multiple of that length. Thus, you may have to change the direction of the boards or the face width of the boards to avoid this situation.
Another factor that relates to the boards that will be used to cover the ceiling is in the width of the last ripped cut. If the last row of boards is of a noticeably narrow width, it may look out of scale with the remainder of the ceiling. You can either accept this or adjust the layout for which the boards will be ripped so that the narrow width of the last row is placed somewhere other than the last row of the ceiling.
For instance, the pattern in which the boards will be laid in the first six rows will display the way that the end joints will be staggered across the ceiling so that no lines of the joints is directly visible across the ceiling in straight lines. The reference tables that are on the calculator provide information about the types of wood that are common in certain types of rooms in the house. For instance, narrow beadboard is often used in bathrooms and wider planks is used in porches.
Additionally, metric panels are common in apartments. Each type of wood has different percentages of waste when installing the wood panels and different expectations of the way that the boards should be staggered. By looking at the different types of wood and their typical uses, the calculator allows you to determine if your estimates are in the normal range or if you are underestimating the number of boards that you will need.
The way that the ceiling will appear once the trim is installed is important to consider. A small gap at the perimeter of the ceiling will be covered with trim and will be invisible once the trim is installed in the ceiling. However, the last row of boards may look like a mistake if the width of the last row is narrower than the remaining rows of the ceiling.
You should check the width of the ripped boards prior to purchasing the boards. Additionally, another factor to consider is in the access to the ceiling. If you are the only individual that will install the ceiling, the long boards will be difficult to move into position.
The shorter the boards, the easier it will be to move the boards into place. The shorter the boards, the more that you will have to purchase in order to complete the job. Thus, although the calculator will show you the number of boards that is needed, it will also show the differences in lengths of boards that is available.
You will have to consider the cost of the boards relative to your personal situation and tasks. A ceiling is a single plane that everyone sees in the room at the same time. Thus, getting the right number of boards will ensure that you do not run out of lumber.
Additionally, getting the layout just right will ensure that the ceiling looks good and intentional when the boards are installed. The calculator will provide you the numbers but you must decide for yourself in what direction the boards will go, of what width the boards will be and what percentage of waste is appropriate for the job.