Trowel, coverage, and build-up planning
Tile Adhesive Thickness Calculator
Dial in finished mortar bed thickness for mosaics, backsplashes, shower floors, large-format porcelain, glass accents, stone, and exterior tile without guessing from notch size alone.
Formula used here: finished bed = collapsed notch + format lift + material lift + coverage lift + flatness correction + 70% of back-butter, then clamped to the chosen mortar family.
Thickness math
Quantity and spec
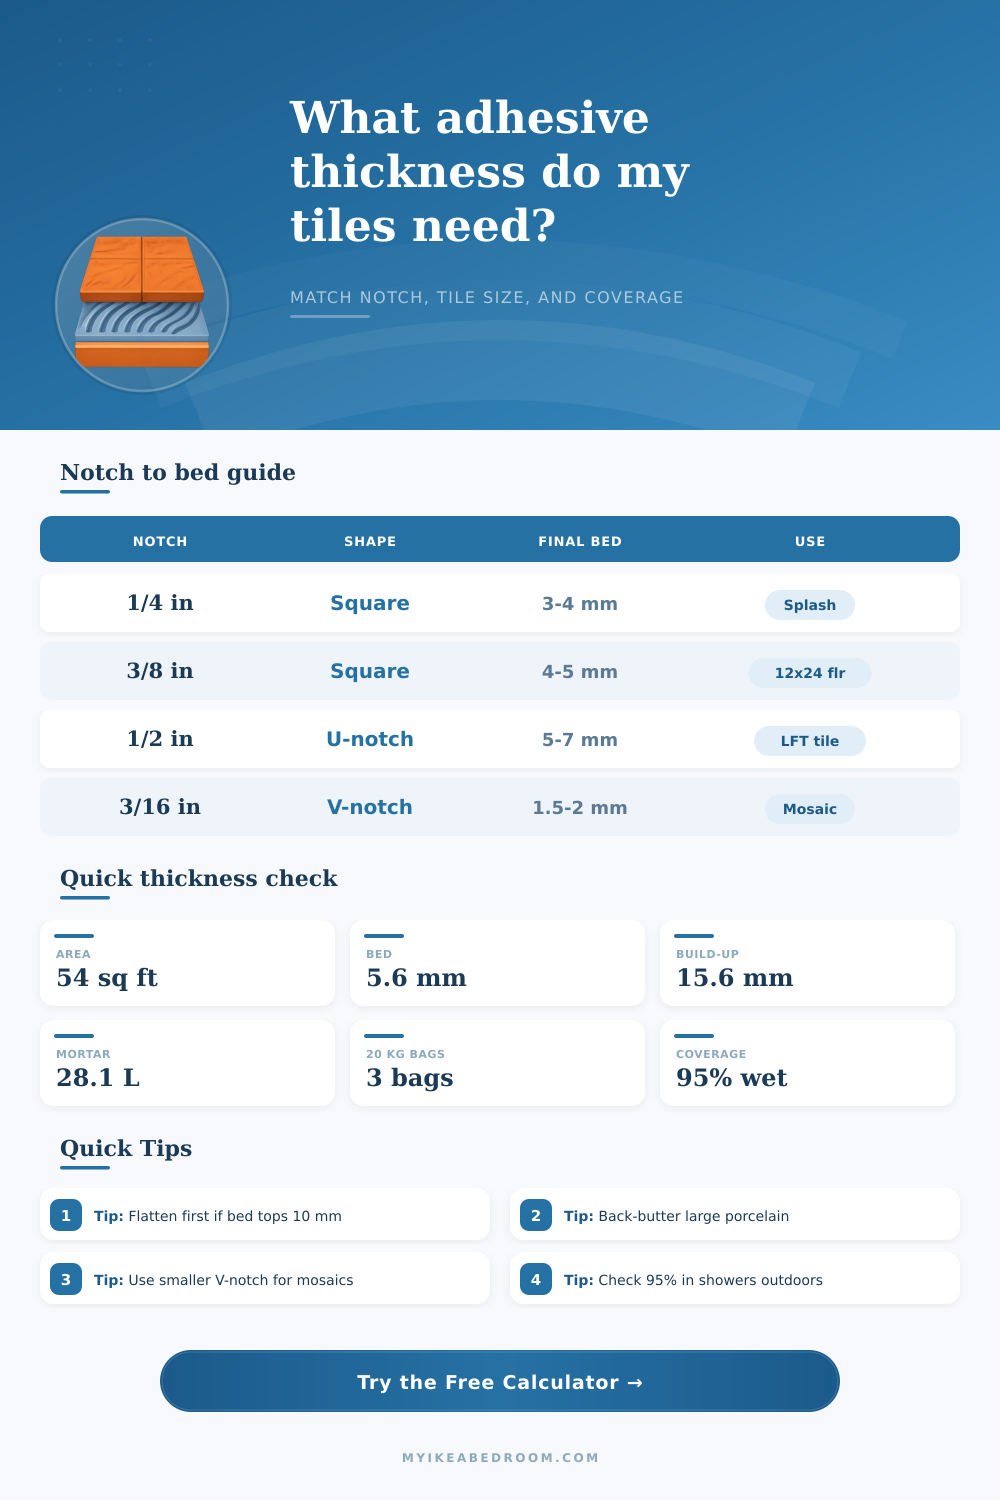
| Notch size | Square notch bed | U-notch bed | Typical tile use |
|---|---|---|---|
| 3/16 in or 5 mm | 2 to 3 mm | 2 to 2.5 mm | Glass mosaics, 1 x 1 sheets, slim accents |
| 1/4 in or 6 mm | 3 to 4 mm | 2.5 to 3.5 mm | Backsplashes, 3 x 6 and 3 x 12 wall tile |
| 3/8 in or 10 mm | 4 to 5 mm | 4 to 5.5 mm | 12 x 24 porcelain, standard floor tile |
| 1/2 in or 12 mm | 5 to 7 mm | 5.5 to 7 mm | Large-format floors, exterior planks, stone |
| Zone | Min coverage | Pressure factor | What changes thickness |
|---|---|---|---|
| Dry interior wall | 80% | Low | Usually the lightest bed if the wall is flat. |
| Dry interior floor | 85% | Medium | Needs more collapse for support under foot traffic. |
| Wet wall or shower wall | 95% | High | Requires tighter beat-in and more even mortar transfer. |
| Wet floor or exterior | 95% | Highest | Void control matters most, so beds often grow or flattening becomes mandatory. |
| Deviation | Condition | Calculator effect | Best response |
|---|---|---|---|
| 0 to 1 mm | Very flat | No correction | Keep the planned notch and focus on coverage. |
| 1 to 2 mm | Acceptable | Small lift | Fine for many ceramic and porcelain jobs. |
| 2 to 4 mm | Needs help | Moderate lift | Expect more mortar or flatten selected low spots first. |
| Over 4 mm | Out of plane | Heavy lift | Flatten before setting instead of stacking adhesive too deep. |
| Final bed | Area per 20 kg bag | Area per 50 lb bag | Best fit |
|---|---|---|---|
| 3 mm | 46 to 50 sq ft | 52 to 56 sq ft | Small wall tile and many splashes |
| 5 mm | 28 to 32 sq ft | 32 to 36 sq ft | 12 x 24 floors and wet areas |
| 7 mm | 20 to 23 sq ft | 22 to 26 sq ft | Large-format or mild substrate correction |
| 10 mm | 14 to 16 sq ft | 16 to 18 sq ft | Deep beds that usually point toward prep work first |
Standard
Non-sag
LFT mortar
Glass mortar
When installing tile, the thickness of the mortar bed are important for the adhesion of the tile to a substrate. The thickness of the mortar bed will change during installation, however, due to the way that the weight of the tiles cause the ridges of mortar to collapse. If the installer do not account for the collapse of those mortar ridges in the installation process, problems can result.
For instance, if the mortar bed beneath the tile become voids of air beneath the tile, those tiles can crack beneath the weight of those that walk on the tiles. Additionally, if the individual mortar bed do not even to one another, this lippage is usualy due to an uneven mortar bed. The size of the trowel notch that you use will impact the initial thickness of the mortar bed, but the thickness of the finished mortar bed is what is important.
How Thick Should the Mortar Bed Be
For instance, if a 3/8 inch square-notch trowel is used, the mortar bed may be 10 millimeters in thickness. However, that thickness will collapse to 5 millimeters once you place the tiles into the mortar. The different types of notch will have different impacts on the mortar bed.
For instance, mortar beds with square notches will contain more ridges of mortar than those with U-notches or V-notches. If the mortar bed does not provide complete coverage of the tile with mortar, the tile will not be secure to the substrate. The size and type of the tile will impact the thickness of mortar that is required for installation.
For instance, mosaic tiles will require a thinner mortar bed than large format tiles. Additionally, the installer requires thicker mortar for large format tiles due to the need for support of such large tiles. Additionally, the material of the tile will have an impact on the thickness of the required mortar bed.
For instance, marble tiles are more denser than porcelain tiles, thus requiring more thickness to the mortar bed for support. However, porcelain tiles are a slick material and will shed mortar more easy than other materials. Finally, the tiles may have uneven surfaces, like handmade zellige or cement tiles, in which case the mortar bed thickness should of been adjusted to ensure that the grout line remain level.
The installation zone will impact the amount of mortar that is required. For instance, in dry areas, such as walls, 80% coverage of the mortar bed is required. In wet areas, such as showers or exterior flooring areas, 95% coverage is required.
The rationale for the higher percentage in wet areas is to avoid allowing water to become trapped within the voids beneath the tiles. Water within those voids can cause the tiles to detach from the substrate due to freeze-thaw cycle. In cases where the substrate is not flat, the thickness of the mortar bed may need to be increased.
If the substrate features deviations greater than 4 millimeters, the substrate must be flattened prior to installing the tiles. The use of mortar to even a wavy substrate is inefficient and will increase the cost of the tiling project. Back-buttering is the process of applying mortar to the back of the tile.
The purpose of back-buttering the tiles is to ensure that the tiles are covered with mortar. For instance, when back-buttering large tiles, the back-buttered layer of mortar will collapse in the same manner as the remaining mortar into the substrate. Thus, back-buttering of porcelain slab may be needed for coverage of the tile, but back-buttering of small ceramic tiles may not be necessary.
Finally, 10% waste of the mortar can be expected, thus impacting the number of bag of mortar that are purchased for a project. In order to ensure that the mortar bed is created properly, tests can be performed using a single tile. Remove the tile from the mortar bed, comb the mortar bed, and place mortar on the back of the tile through back-buttering.
Place the tile into the mortar bed with a rubber mallet held at a 45-degree angle to the mortar bed. Lift the tile after placing into the mortar bed. The mortar should cover the tile with 95% coverage.
If not, increase the thickness of the mortar bed or flatten the substrate prior to placement. By testing a single tile, you can determine the collapse rate of the mortar. The collapse rate of the mortar will allow for planning of the mortar bed during the tiling project.
Additionally, if the installer prepares the mortar bed in a way to ensure that each tile is the same thickness and coverage to the substrate, the result will be even grout lines between the tiles.