Swag Valance Fabric Calculator
Estimate decorator fabric, lining, interlining, cut panels, seams, pattern repeats, jabots, cascades, and waste for a custom swag valance before you cut into fabric.
Choose a window treatment setup, then adjust the mounted width, drop, fabric width, repeats, and side pieces to match your room.
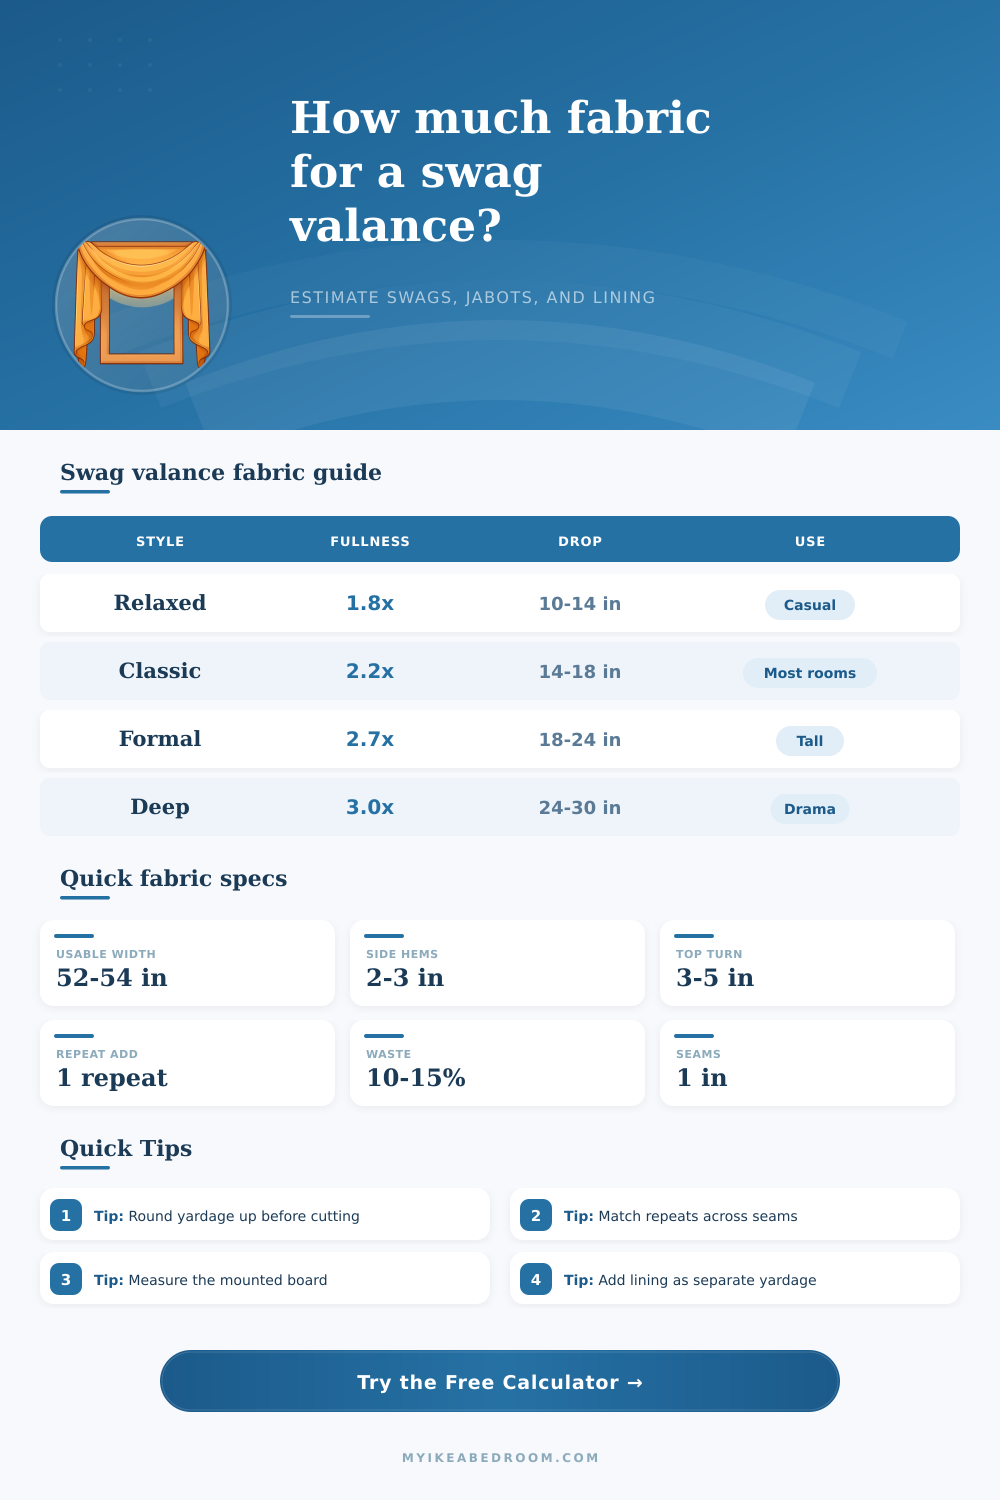
| Style | Top fullness | Drop factor | Typical use |
|---|---|---|---|
| Shallow tailored swag | 1.6x to 1.9x | 1.35 | Small windows, kitchens, slim boards, and low ceilings. |
| Classic pleated swag | 2.0x to 2.4x | 1.60 | Bedrooms, living rooms, and most balanced window treatments. |
| Waterfall cascade swag | 2.2x to 2.6x | 1.75 | Layered swags with more visible folds and longer side pieces. |
| Formal deep swag | 2.6x to 3.0x | 1.85 | Tall windows, dining rooms, and structured decorative boards. |
| Fabric type | Nominal width | Usable width | Planning note |
|---|---|---|---|
| Standard drapery fabric | 54 in | 52 to 53 in | Expect joined widths on wider swag valances. |
| Narrow printed cotton | 44 to 45 in | 42 to 44 in | Add seams and more repeat allowance for wide faces. |
| Extra-wide sheer | 108 to 118 in | 106 to 116 in | Good for railroaded swags if the drop fits the bolt width. |
| Heavy upholstery cloth | 54 to 56 in | 51 to 54 in | Use deeper seams and a larger cutting buffer. |
| Repeat size | Suggested buffer | Join risk | Best practice |
|---|---|---|---|
| No repeat or texture | 5% to 10% | Low | Square the grain and round yardage up after the cut list. |
| Small repeat under 6 in | 10% | Moderate | Add one repeat for each joined width when motifs must align. |
| Medium repeat 6 to 14 in | 10% to 15% | High | Round each cut length to the next full repeat before summing. |
| Large repeat over 14 in | 15% to 20% | Very high | Lay out the center swag first, then mirror the side swags. |
| Project | Face span | Swags | Typical drop |
|---|---|---|---|
| Small kitchen window | 36 to 44 in | 1 swag | 10 to 13 in |
| Bedroom double window | 60 to 76 in | 2 swags | 14 to 18 in |
| Wide living room window | 84 to 108 in | 3 swags | 16 to 22 in |
| Formal tall window | 96 to 144 in | 3 to 5 swags | 20 to 30 in |
Match before trimming: For patterned fabric, mark the center of each swag and match across panel seams before cutting shaped curves or trimming lower hems.
Separate lining math: Lining and interlining often use the same cut lengths but may not need repeat matching, so this calculator reports them separately.
In design magazines, swag valances seem so easy: just drape some big piece of cloth over the window. But they’re realy precision, architectural sculptures of fabric. The difference between a cheap curtain and a custom look is not always the fabric, often, it’s the fullness. If you don’t take into account right amount of fullness when you go to cut out your curtains, well, there’s no fixing that at the cutting table.
Material consumption is disguised in pretty shapes: Swags is curved, which hides how much fabric is being consumed. If I had 2 inches of material on a straight panel, I’d have to allow twice as much (4 inches) for reasonable looking pleats. With a swag, the fabric are gathered up into deep pockets to give shape to what would otherwise be a plain old flat panel. Once that bulk is draped over, it vanishes from sight. The DIYer massively underestimates this. He or she buys enough fabric for the flat width plus a little extra for hemming. Then, he or she is frustrated when attempting to make the swag, only to discover the fabric seem stretched and thin. Before you even consider cutting, plan for the fullness. By using set pleating ratios and drop factors based off how swags curve into three dimensions, the calculator above does just that.
Why You Need More Fabric Than You Think
The swags are framed by side pieces or jabots. Cascading panels provides a nice dramatic effect, as well as a lot more complexity. A jabot isn’t just a rectangle that hangs down. It needs enough fullness on its own so it doesn’t hang flat against the wall, but it also needs to flow well. Otherwise, you’re going to end up with valance that looks like a stiff shirt collar. Not flowing drapes. The tool breaks out the math for these guys so that you don’t accidentally combine them in the calculation for the main panel, throwing off all measurements beyond.
Pattern matching is where good intentions meet expensive reality. And if it’s a vertically repeating motif, then you can’t simply cut to length. You have to have sufficient extra yardage to ensure motifs match from seam to seam (and between the jabot bodies and the swags). With a big repeat, this could result in wasting almost two feet per panel. That adds up fast. How does the size of your repeat affect your buffer? The table on the page shows you how to visualize it. Better to know now you’ll need twenty percent extra waste than discover when you’re about to cut that you’re three inches short.
Finally, there’s the railroading fabric issue which messes with people’s heads. This refers to having the fabric run horizontally (across the width) instead of vertically (down the drop). It looks sleek and reduces seams on wide windows. But it alters all the measurements! Now you have to find a piece whose usable width can fit the drop of your window. So let’s say your window has a drop of twenty inches and the fabric you like is fifty-four inches wide…you’re good. But what if your drop is thirty inches? You’d want to use the railroaded look, but you may end up needing to join panels vertically anyway. The calculator accounts for this layout and makes sure you don’t order yardage based on faulty assumptions about fabric layout.
Don’t skip the lining. The valance will hang better and stay in shape longer. It will also have finished look of an expensive valance because no raw edges show how it is made. Plus, no light shines through the seams! There’s one more piece of fabric to purchase and that’s the liner. It doesn’t require pattern matching (saving you money), but it does require seam buffer allowance and hem allowance. You can buy a less expensive lining material if you like, which is broken out separately in the estimate. Or, you can use exact same decorative fabric to match.
Always buy more than you need. There are ALWAYS small differences in patterns lining up correctly, or fabric being slightly wider or narrower towards the end of a bolt. Cutting goes wrong sometimes too. If you leave 10% on top, that will cover most of these mishaps and things not coming out square. At minimum, round up to the next quarter yard. Having half a yard spare never hurts, it could of come in handy for other projects down the line, or patches, cushions, etc. Running out of matching fabric six months after a button falls off a swag tie is a huge blow to your confidence.
Measure, measure, measure. You need accurate measures for your rod or board. If the fabric turns around on itself and wraps back to the wall, add that into your measurement. Enter those values into this equation and let math do the rest. Math doesn’t lie, and neither does a good valance. A good valance begins way before any sewing ever happens. It begins when you know exactly how much cloth will be required to create an illusion of simplicity.