Skylight Quantity for Room Calculator
Estimate recommended skylight area, skylight count, effective daylight ratio, shaft loss, spacing, and glare risk from room area, ceiling height, glazing size, roof slope, reflectance, and shaft depth.
Fixed Deck-Mount
Best for: simple roof planes and steady daylight.
Count effect: efficient visible area when the shaft is short and wide.
Use the entered visible area percent to reflect frame thickness and glazing edge loss.
Vented Skylight
Best for: kitchens, baths, lofts, and rooms needing exhaust relief.
Count effect: slightly lower visible glass because sash hardware uses frame area.
Use 68% to 78% visible area for many planning estimates.
Tubular Daylight
Best for: hallways, closets, small baths, and roof-framing conflicts.
Count effect: lower footprint but often high shaft efficiency in compact runs.
Use a smaller footprint with a higher shaft factor for reflective tubes.
Roof Window
Best for: attic bedrooms, lofts, and reachable sloped ceilings.
Count effect: large visible area can increase glare if concentrated.
Use spacing and glare checks before placing one large unit over a bed or desk.
| Room Type | Common Target | Typical Feel | Count Strategy | Glare Watch |
|---|---|---|---|---|
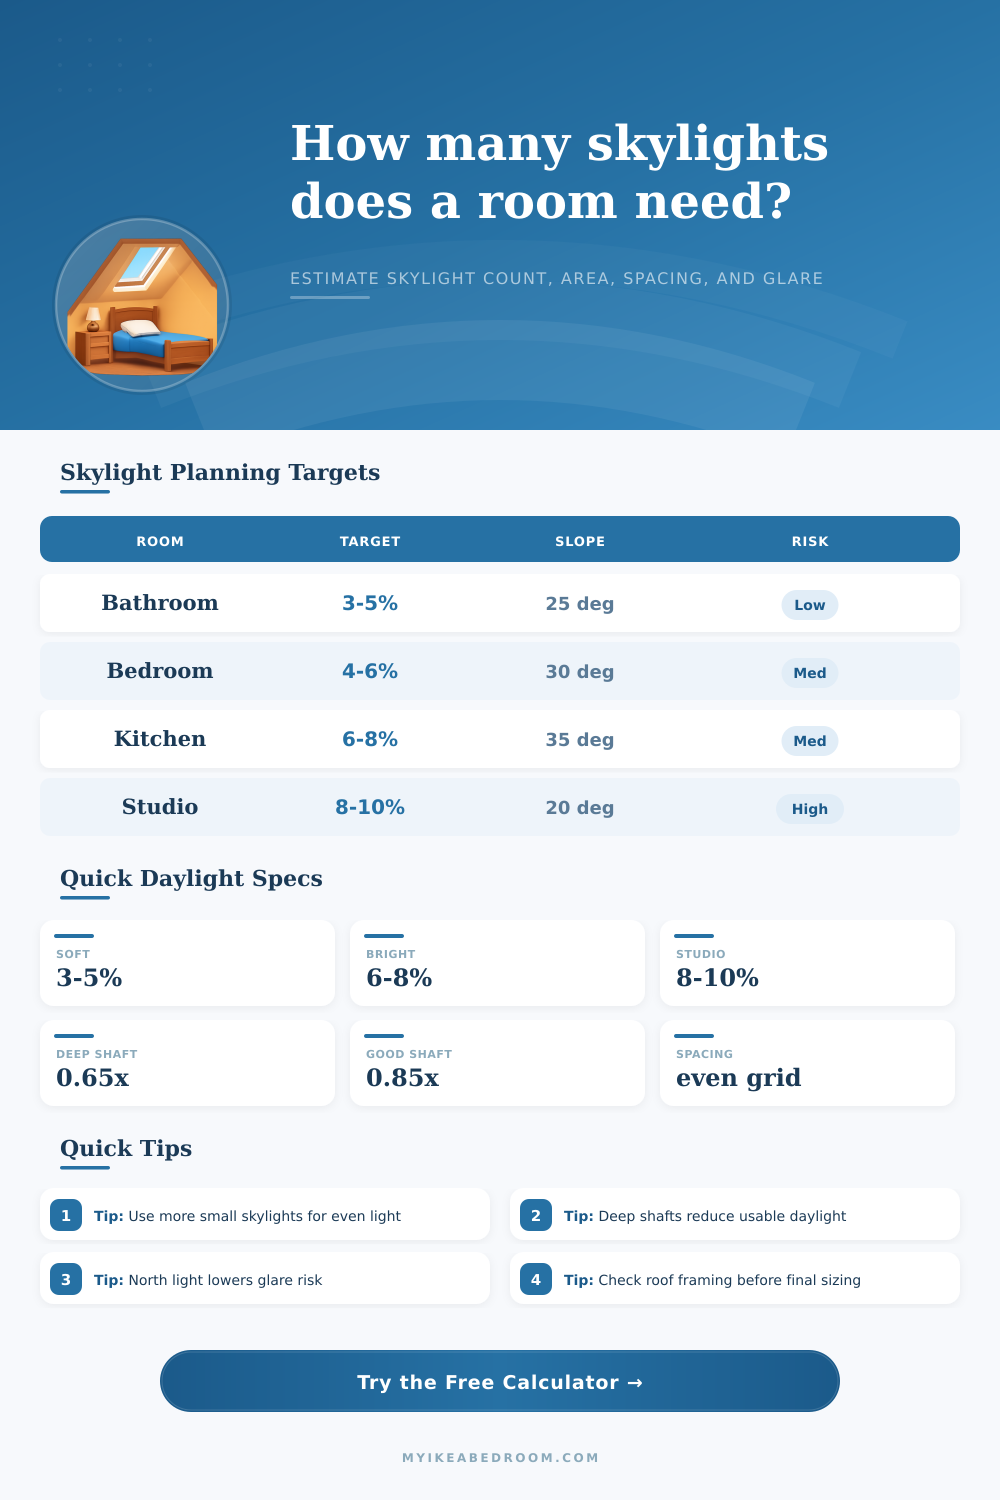
| Bathroom or powder room | 3% to 5% | Soft daylight without over-bright surfaces | One compact skylight or tube | Use privacy glazing where needed. |
| Bedroom or attic room | 4% to 6% | Comfortable ambient light | One medium unit or two smaller units | Avoid direct bed placement if glare score is high. |
| Kitchen or breakfast area | 6% to 8% | Brighter task daylight | Two smaller units often spread light better | Check worktop glare and heat gain. |
| Hallway or stair | 3% to 6% | Navigation daylight | Multiple compact tubes along the run | Spacing matters more than one large opening. |
| Studio, loft, or craft room | 8% to 10% | Strong daylight for detailed tasks | Distributed units with shade planning | Glare and contrast become important. |
| Shaft Condition | Planning Factor | Typical Depth | Reflectance Assumption | Calculator Cue |
|---|---|---|---|---|
| Flush or roof-window style | 0.95 to 1.00x | 0 to 0.5 ft | Minimal shaft surface | Use shallow shaft depth. |
| Short white shaft | 0.82 to 0.92x | 0.5 to 2 ft | Light finish, simple shape | Reflectance near 60% to 75%. |
| Medium shaft | 0.70 to 0.82x | 2 to 4 ft | Some sidewall absorption | May need one extra unit. |
| Deep or angled shaft | 0.55 to 0.70x | 4 ft plus | Long path or dark finishes | Improve finish or widen shaft. |
| Reflective daylight tube | 0.75 to 0.90x | varies | Specular tube lining | Use product data when available. |
| Count | Best Layout | Spacing Rule | Room Shape Fit | Planning Note |
|---|---|---|---|---|
| 1 unit | Center or task-focused | Place near room center or key surface | Small square rooms | One large unit may create stronger contrast. |
| 2 units | Even pair | Separate by about one-third room length | Bedrooms, kitchens, living rooms | Often smoother than one larger opening. |
| 3 units | Linear row or triangle | Equal spacing along the long axis | Hallways, lofts, open rooms | Keep edge distance consistent. |
| 4 units | Two-by-two grid | Use quarter-point placement | Large square or open plan rooms | Good daylight balance, higher framing coordination. |
| 5 units plus | Repeating grid | Use calculated bay spacing | Studios and large open rooms | Coordinate with rafters, shades, and heat control. |
| Roof Slope | Daylight Behavior | Glare Tendency | Good Use | Calculator Response |
|---|---|---|---|---|
| 0 to 15 degrees | High overhead exposure | Moderate to high | Diffuse glazing and shades | Slope factor increases risk slightly. |
| 15 to 35 degrees | Balanced roof exposure | Moderate | Most residential rooms | Neutral daylight planning zone. |
| 35 to 55 degrees | More directional daylight | Depends on orientation | Attics and steep roof rooms | Slope factor softens overhead concentration. |
| 55 degrees plus | Closer to roof-window behavior | Lower overhead glare, more view glare | Reachable roof windows | Spacing advice prioritizes wall-like placement. |
It’s lit up in there, but it feels like a flat room. And while architects point fingers at bad windows, most of the time it’s bad skylight math. Too much glass create blinding glare spots that force you to keep the blinds drawn. The glare is blinding. There isn’t enough to fill corners, where they remain a gloomy mess.
How do you get the number right? Not by guessing size of opening. It’s about finding that balance between comfort and light distribution. You want enough light to reach every square foot, yet avoid making the space a solar oven.
How to Calculate the Right Skylight Size
After you describe your roof shape and room size, the calculator on this page do the rest. It converts bare square footage into helpful percentages of daylight. Homeowners typically worry about how big a skylight unit they get. They don’t realize that unseen losses occurs from the moment the sun’s rays enter house until light reaches the floor.
Shaft depth matter. When a skylight runs down through an attic plenum or any finished ceiling, the tunnel walls will steal some of the light. An overly long, dimly lit shaft could reduce that by more than one-third. In a long, dark tunnel, light levels could drop to as low as sixty-five percent, and it might still look good from above. The calculator adjusts for that loss so that you’re not shocked when new window impresses from the rooftop yet fails to lighten the space beneath it.
There is also the hidden variable of reflectance, which screws things up. The light coming off your ceiling bounce around the space because your skylight is shining on it. But if your floor is thick carpeting and your wall color is dark wood, that bounced light will die fast. To counteract this, you must have more total glass area. Light colored walls and white ceilings functions as secondary sources of light. In other words, they enhance the impact of every unit.
To account for reflection, we ask the calculator user to estimate what percent their surfaces are reflecting. The system adjusts target area accordingly so that you don’t underestimate in dim rooms, and overbuild in bright ones. It is a small thing, but it is very important to the overall appearance.
Glare is probably the least considered element in home design. Sure, your big honkin’ solitary skylight may cover all square feet needed. But does it result in a glaring hot spot right under the dome? The test factors include both the amount of glazing relative to area of the room, and the slope of the roof.
In general, steeper roofs tend to shoot light down with greater force. That makes contrasts worse. Softer diffusion comes from shallower slopes. Higher scores for glare usually don’t signal need for a smaller unit. You’ll be better off making many smaller units instead, scattering the total glazing over several opening. Spread the light around; soften its punch. Maintain the level of illumination overall while lowering the intensity at any specific point.
It is a trade-off between comfort and convenience that no one seems to talk about before plans are drawn up. The amount of daylight needed varies from room to room. Hallways and bathrooms simply requires enough light to be safe and move around easily. Usually this is between three and five percent of the floor area. Studios and kitchens need far more, up to six to ten percent depending on whether you’re sketching out a design, or slicing a vegetable.
To help you understand what those numbers are by room type, the reference tables that come with the calculator detail those target levels. Use them as a starting point when adjusting for your unique circumstances. If you have a large space with high ceilings in your studio loft, a generous amount of naturaly light will be necessary to avoid feeling cavernous. Even a moderate opening might make your tiny powder room uncomfortably bright.
It’s all about context. It’s all about physics, the physics of delivering light. It is as much about planning how to deliver light as it is about the hardware itself. This isn’t just window shopping; this is a lighting system design based off solar power. Understanding spacing dynamics, wall color and other factors (like shaft losses) help to eliminate blind spots or over-bright areas.
A calculator above does the math for you. It turns abstract percentages into concrete numbers, in counts and in placement strategy. From there, when you begin to grasp how these inputs tip the scales, you cease guessing and begin designing. And the key is understanding exactly what’s being measured… And not just what’s visible from the roof.