Shower Niche Size Calculator
Size a recessed shower niche around real bottles, tile module, grout joint, stud bay, waterproofing reveal, shelf thickness, and placement height before framing or ordering a prefabricated insert.
Start with a common shampoo niche, tub-shower layout, double shelf, kids bath, or compact razor ledge, then adjust the exact bottles and tile stack.
Calculation breakdown
Small shampoo niche
Best fit: 2 to 3 bottles in a single row.
Works well in a standard 14.5 inch stud bay when trim and waterproofing are kept modest.
Double shelf niche
Best fit: family showers with taller bottles.
The shelf thickness matters because it subtracts from clear bottle height between rows.
Tile-aligned niche
Best fit: visible feature walls.
Round the opening up to full tile modules to reduce tiny sliver cuts at the niche edge.
Wide framed niche
Best fit: custom framing or non-load-bearing partition walls.
If the opening exceeds the stud bay, plan blocking or header framing before waterproofing.
| Niche type | Typical interior | Bottle plan | Tile note |
|---|---|---|---|
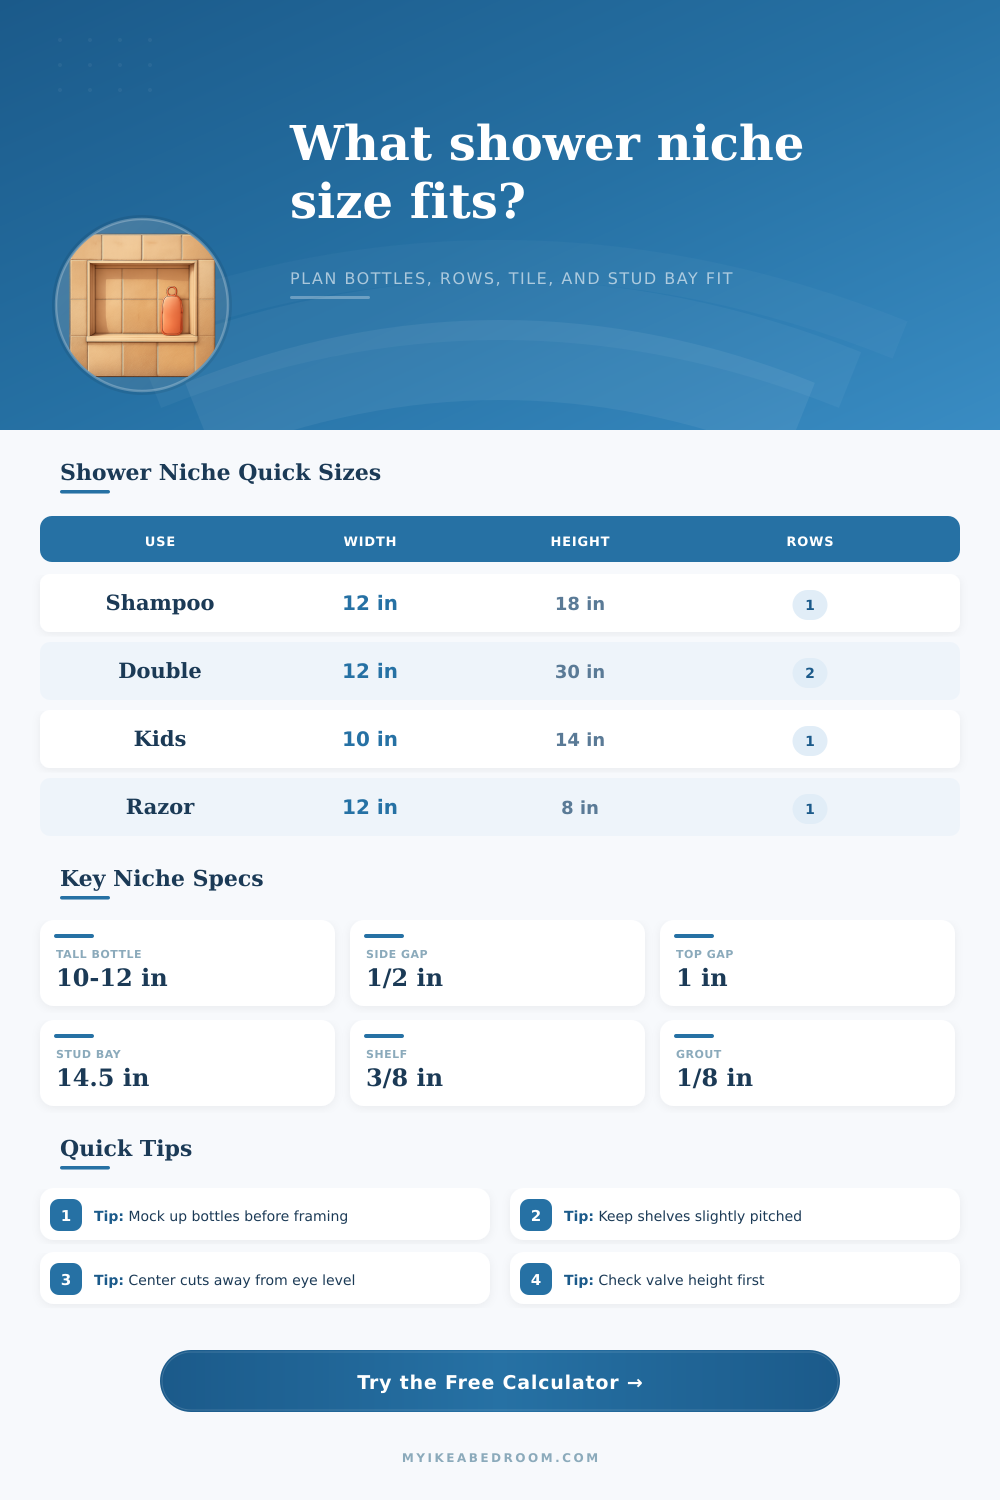
| Shampoo niche | 12 in wide by 18 in high | 2 to 3 tall bottles | Often aligns with three 6 inch rows plus grout. |
| Double niche | 12 in wide by 28 to 32 in high | Two storage rows | Count shelf thickness before choosing row height. |
| Kids bath niche | 10 in wide by 14 in high | Short bottles and toys | Lower placement improves reach but check splash zone. |
| Razor ledge | 12 in wide by 6 to 8 in high | Razors, soap, small tubes | Works with one tile course on many subway layouts. |
| Tub-shower niche | 12 in wide by 16 to 22 in high | Shared sitting and standing use | Measure from tub deck when setting placement height. |
| Tile size | Grout joint | 2 modules | 3 modules |
|---|---|---|---|
| 3 in by 6 in subway | 1/8 in | 6.125 in or 12.125 in | 9.25 in or 18.25 in |
| 4 in by 4 in square | 1/8 in | 8.125 in | 12.25 in |
| 6 in by 12 in large subway | 1/8 in | 12.125 in or 24.125 in | 18.25 in or 36.25 in |
| 100 mm by 300 mm metric | 3 mm | 203 mm or 603 mm | 306 mm or 906 mm |
| Stored item | Typical height | Recommended top clearance | Row planning note |
|---|---|---|---|
| Standard shampoo bottle | 8 to 10 in | 1 in | Single row niches usually feel roomy. |
| Pump bottle | 10 to 12 in | 1.5 to 2 in | Measure with the pump unlocked and raised. |
| Kids bath bottle | 6 to 8 in | 0.75 in | Lower row height can preserve a clean tile layout. |
| Razor and soap ledge | 3 to 5 in | 0.5 in | Width matters more than vertical clearance. |
| Framing condition | Clear width | Practical niche width | Check before cutting |
|---|---|---|---|
| 2x4 studs, 16 in on center | About 14.5 in | 10 to 12.5 in interior | Verify plumbing and vent stacks first. |
| 2x6 studs, 16 in on center | About 14.5 in | 10 to 12.5 in interior | Depth improves, but width is similar. |
| Custom framed bay | Project-specific | Opening minus reveals | Use blocking, slope, and waterproofing details. |
| Prefab niche insert | Manufacturer listed | Use listed interior size | Confirm flange and membrane overlap allowance. |
Mock the storage first. Place the actual bottles in a row on a counter and measure the space your hand needs to lift them out without scraping tile edges.
Confirm framing before tile layout. A perfect tile module still needs room for studs, plumbing, blocking, membrane overlap, shelf pitch, and trim thickness.
First, get out biggest bottle you really own. Most folks choose a typical size shampoo bottle. However, a wide-based ergonomic conditioner or a big-pump lotion for someone in household will change your needs. Next, factor in the real-world width of that object, and how much space your hand require to grip it without banging knuckles against walls. A half inch each way may sound like plenty, until you’re trying to yank a wet bottle free, skin slicked by water. That tiny margin makes difference between usable storage and a daily obstacle course.
Shelves also consume vertical space, so it’s extra important to watch your vertical spacing. When planning for two rows, remember that you need to deduct the thickness of each shelf material from total interior height. That means if you’re using the standard ceramic tile for shelves, they’ll each be only about three eighths of an inch thick, but those inches stack up quickly when you’re trying to squeeze a dozen-inch pump bottle beneath a dividing shelf. Once you plug in your actual tile dimensions (and grout width) into the calculator above, it do the math for you; no more guesswork on whether or not your planned layout matches the module. It counts, because cutting little slivers of tile around each gap looks messy and weaken the waterproofing seal at the corners.
How to Measure for Your Shower Niche
Another issue with niche design is framing. Standard residential construction involve 16-inch-on-center stud spacing, meaning about fourteen and a half inches of clear space between studs. Sounds like plenty! However, you must subtract thickness of all the stuff you put behind it (waterproofing membrane, cement board, maybe some trim added down the road). And if you want an opening bigger than that clear bay, you’re either going to have to custom frame or provide some additional blocking, adding complexity and cost. Far better to know that ahead of time so you would of not end up ordering a prefabricated insert only to discover that it’s too wide for your walls.
Until you picture it in 3-D, it sound like placing the niche at a logical height. Too high and you have a display shelf instead of a storage place. People won’t be able to see or reach the items without standing on a chair. Too low and you create a splash-zone target. On average, the mid-shoulder line is typical the sweet spot for an adult user, though depending on who use the space (kids?), you may want to drop it down just enough so they can access it independently.
Note: If you lower the niche, you also bring the bottom portion closer to the shower floor or tub deck. This is where the waterproofing detail matter and where water may pool.
While we are focused on exact bottle sizes, it’s also important to note that aligning tiles will play into finished appearance. You don’t want an odd cut through the middle of a row of tiles. This can leave you with uneven grout lines, and you wouldn’t want that drawing attention away from other details in your bathroom. You get a clean finish that minimizes wasted materials during installation and a slightly nicer looking bathroom because you aligned the opening to fit full tile modules.
It’s got to be a good fit, the niche should solve one problem and not create another. It needs to be wide enough not to be crowded but deep enough to accommodate everything. Ideally it’ll be somewhere that feels naturaly for your arm to fall into. If you can bring actual bottles to the space (either by laying them out on the floor the way they will go, or even better, bringing them in the shower stall area before framing) then do so. This is where seeing the scale in person often reveals problems that is hidden by numbers on a page.
When you get those measurements down, the rest flows much more smoothly. A well thought-out niche blends into the background; it simply works. And you’re left free to use the shower to wash up instead of wrangling with packaging.