Shower Door Size Calculator
Size sliding, pivot, hinged, frameless, tub, and neo-angle shower doors from finished opening measurements, plumb error, curb width, overlap, hardware allowance, and handle clearance.
Start with a common opening, then adjust the top, middle, bottom, height, curb, hardware, and clearance values from the finished tile or wall panels.
Calculation breakdown
Framed sliding door
Best fit: alcove openings with modest wall variation.
Tracks usually tolerate more adjustment, but overlap and bottom guide placement still depend on curb width.
Frameless pivot door
Best fit: plumb walls, wider curb, and clear swing space.
Small deductions matter because seals and hinges have less forgiveness than framed kits.
Fixed glass panel
Best fit: walk-in showers with a planned open entry.
Order width is panel width, not full opening width, so the desired entry controls the glass size.
Tub bypass door
Best fit: bathtub ledges with a long, flat mounting surface.
Panel overlap helps water control, but ledge width and wall plumb decide how cleanly the track sits.
Neo-angle side panel
Best fit: angled curbs measured along each straight segment.
Side panel width should be checked independently because angle kits stack tolerances at each corner.
Inline hinged door
Best fit: a door plus fixed panel in one straight opening.
The fixed panel absorbs width while the entry door still needs swing radius and handle clearance.
Wide bypass door
Best fit: wider alcoves needing a larger entry without swing space.
More overlap reduces splash gaps, but too much overlap narrows usable entry and cleaning access.
Steam-style door
Best fit: taller doors with tighter seals and a transom or sweep.
Height, plumb, and curb flatness become more sensitive as the door grows taller and heavier.
| Door type | Typical finished opening | Common deduction or overlap | Adjustment note |
|---|---|---|---|
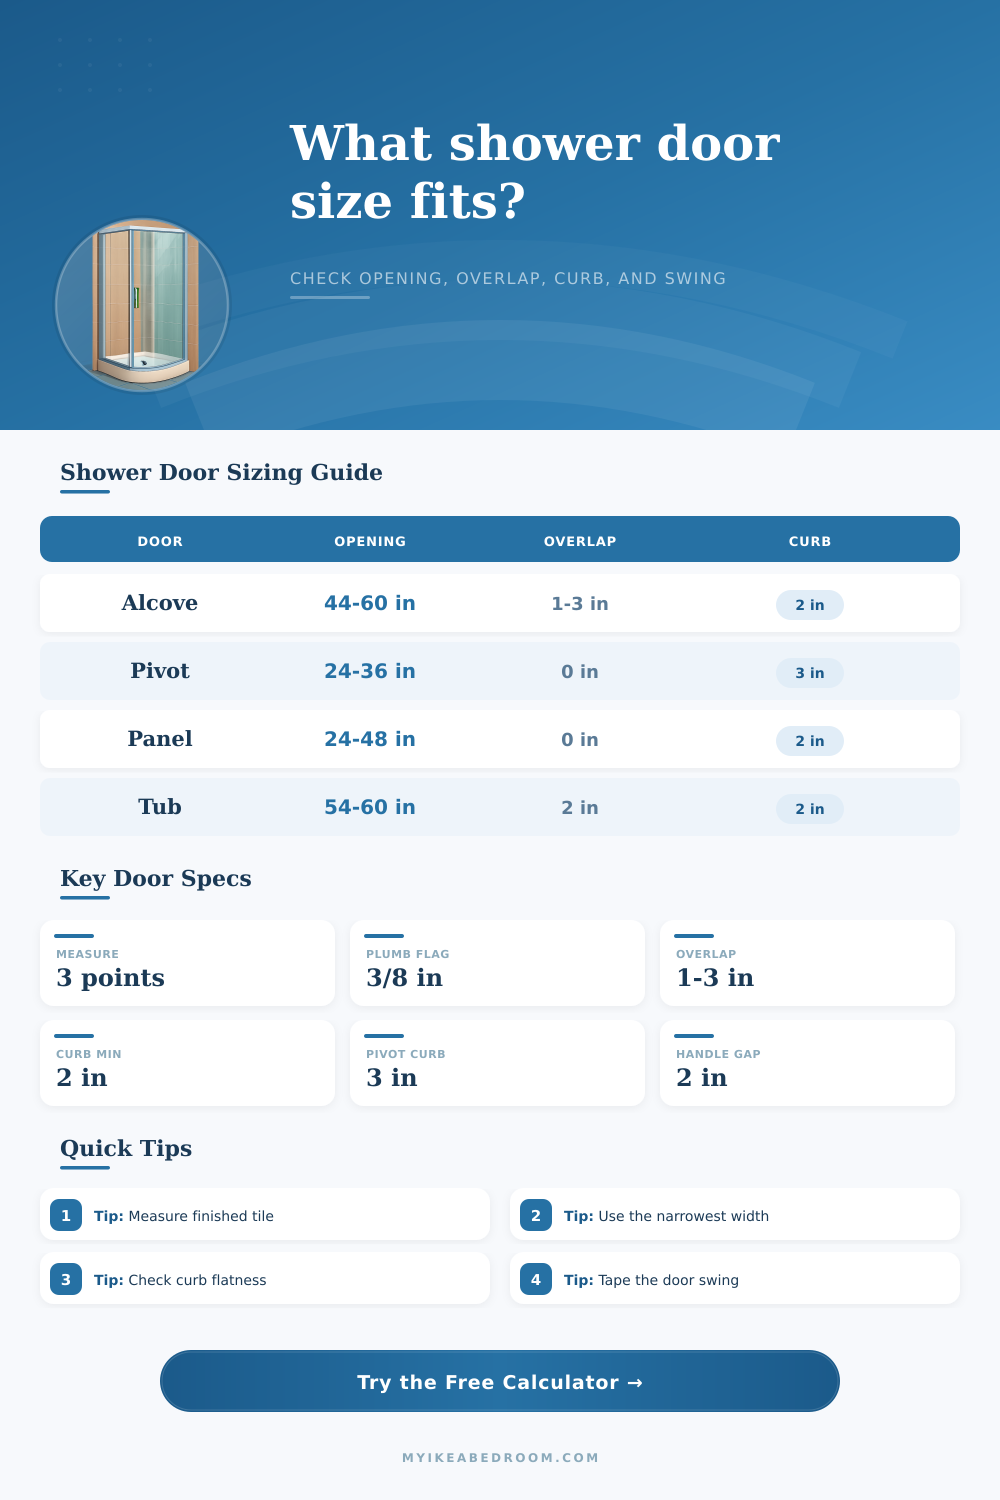
| Alcove sliding door | 44 to 60 in wide, 70 to 76 in high | 1 to 3 in panel overlap plus track take-up | Use the narrowest width and verify the bottom guide lands on flat curb. |
| Pivot door | 24 to 36 in wide, 70 to 80 in high | 1/4 to 1/2 in hinge and strike allowance | Plumb walls are more important because side seals have limited reach. |
| Frameless fixed panel | Panel often 24 to 48 in wide | Deduct desired entry from total opening | Clamp width, wall channel depth, and return splash distance set the final panel. |
| Tub bypass door | 54 to 60 in wide, 56 to 60 in high | 2 in overlap is common for two panels | Measure the tub ledge, not the outside apron or rounded lip. |
| Neo-angle side panel | Side panels often 17 to 36 in | Corner posts and channels take up 1/2 in or more | Each side segment should be measured along the curb centerline. |
| Measured variation | Fit meaning | Likely correction | Action before ordering |
|---|---|---|---|
| 0 to 1/8 in | Very straight opening | Standard deduction only | Order from the narrowest width and confirm height. |
| 1/8 to 3/8 in | Normal tiled opening variation | Use jamb or channel adjustment | Reserve plumb correction in the allowance field. |
| 3/8 to 5/8 in | Noticeable taper or lean | Framed or adjustable kit may fit better | Confirm the product adjustment range in writing. |
| Over 5/8 in | High-risk custom fit | Templating or wall correction may be needed | Do not rely on average width alone. |
| Mounting surface | Useful flat width | Best door types | Fit check |
|---|---|---|---|
| Narrow curb | 1.5 to 2 in | Light fixed panel or slim framed track | Check clamp footprint and water sweep path carefully. |
| Standard shower curb | 2 to 3 in | Sliding, fixed panel, many framed systems | Bottom track or guide should sit fully on the flat surface. |
| Wide curb or pony wall cap | 3 in or more | Pivot, hinged, steam-style doors | Allows stronger hinge/strike support and a cleaner sweep line. |
| Tub ledge | 2 to 4 in if flat | Tub bypass and tub pivot doors | A rounded or sloped ledge reduces usable mounting width. |
| Door style | Entry target | Swing radius | Clearance note |
|---|---|---|---|
| Pivot or hinged door | 22 to 30 in clear entry | About the door slab width | Keep the handle away from vanities, toilets, and towel bars. |
| Inline hinged door | 24 to 28 in clear door with fixed panel | Door width plus handle projection | Fixed panel absorbs the remaining opening width. |
| Bypass sliding door | Roughly half the opening minus overlap | No outward swing | Entry is limited by overlapping moving panels. |
| Walk-in fixed panel | 22 to 30 in open entry | No door swing | Panel width should leave enough splash protection and access. |
Measure after finish surfaces are complete. Tile, wall panels, waterproofing build-up, curb caps, and tub ledge curves can change the actual door opening enough to affect the order width.
Mark the swing before choosing hardware. Tape the hinge side, door edge, handle projection, and nearest obstruction on the floor so the calculated swing clearance matches the real room.
Okay, so you think you’ve got this whole puzzle figured out. There’s new tile work and you’re standing there with your measuring tape. Your opening is fifty-nine inches across and you order a sixty-inch door. Three days later it comes and doesn’t fit. Why? Because most folks measure the amount that they see rather then how much space hardware require.
What are you measuring? How often will that be equal to the distance from one wall to another? So how does it work? After you enter in your final dimensions (no guessing on secret deductions) (the math is handled by calculator).
How to Measure Your Shower Door Opening Correctly
But here’s where all the heavy lifting occurs: you’ll need to measure at 3 different heights. Tile adds layers and walls aren’t straight lines. The width might be bigger at top compared to the bottom, the bottom or vice versa. If you only take a single measurement, you run risk of purchasing glass that’s too wide for tightest spot. That’s why tool needs widths for the top, middle, and bottom to determine controlling dimension. Most folks skips over this step.
Because a sliding door require a flat surface to slide on, I’d think about the tub ledge (or curb) next. If your tub has rounded corners and an edge, don’t assume that the rounded part counts towards width of usable mounting space. For example, maybe you thought there was a three inch ledge but only two inches is flat enough for track. That’s what the calculator is asking for, the flat width, which helps determine if bottom guide will stay in place or slide into the drain. A narrow curb restricts options to lightweight systems; wide curbs can accommodate heavier pivot doors that feel more substantial. Although a small detail it matters with daily use.
Another unseen variable is plumb correction because new construction settles and old houses lean. If a wall leans in a quarter of an inch, you’re not going to get your rectangular door into a trapezoidal opening unless you do something about it. To make room for this mistake, the calculator subtracts the mistake from your ordered width, allowing for enough seal on all four sides to reach glass. Without this allowance, you’ll have gaps where water escapes, running down onto floor. If you ignore imperfection, you will have leaks; you shouldn’t let math overlook these flaws.
If you’re opting for a hinged door, swing clearance is just as important (because you can’t just measure the door opening and assume it’ll work). Imagine what the door’s arc will be once open. If there’s a vanity corner or towel bar in its way then the door becomes a daily annoyance. With this handy-dandy thingie, you check to see how much space you have between other obstructions and your handle so you don’t run into anything while pulling the door open. Why? Because it’s harder to judge how much space you have on paper than it is in real life. You should of checked this earlier.
Frameless doors are slick, but unforgiving, needing a wall that’s both plumb and fitted precisely. With framed systems you have more wiggle room (literally) due to metal channels that move slightly to compensate for small errors. Here’s how various door styles deal with variation (see table below).
Bypass doors need lots of panel overlap to prevent water leaking in, a good thing if you want to maintain privacy yet not swing the door out into the room. Too little overlap lets steam escape in all directions. Actualy, it can be a problem.
Ordering: Be sure to make some marks on the wall or floor where you measured. Mark the hinge side, the door edge, and the handle projection. Stand in the room as if the door is installed. If you can walk around easily without banging your shins on fixtures, you’re probably good to go. Your eyes and body confirms what the calculator spits out. Now it’s no longer a risky guess but a confident decision.
Accounting for finished tile and hardware take-up converts the risk of guessing into a confident decision because you now know how much more to add when measuring furnitures. Fit it once, don’t just make it look right on paper. You can recieve the door any day now.