Shed Base Gravel Calculator
Estimate the gravel pad size, loose and compacted volume, material weight, bag count, bulk quantity, geotextile fabric, and excavation volume for a shed base.
Clean crushed stone
Best fit: shed pads needing drainage and stable point support.
Planning note: use the compacted depth field for the finished layer.
Density: about 2,600 to 2,800 lb per yd³.
Dense grade gravel
Best fit: bases that need a tighter, flatter surface.
Planning note: compaction allowance matters because fines settle.
Density: about 2,800 to 3,000 lb per yd³.
Pea gravel
Best fit: small, light storage sheds where drainage is the priority.
Planning note: round stones can shift under narrow skids.
Density: about 2,350 to 2,500 lb per yd³.
Road base
Best fit: heavy-duty pads with firm compaction and edge restraint.
Planning note: check drainage because fines reduce void space.
Density: about 2,900 to 3,100 lb per yd³.
| Finished depth | Coverage per yd³ | Coverage per m³ | Typical use |
|---|---|---|---|
| 3 in | 108 sq ft | 13.1 m² at 75 mm | Small light-duty storage shed |
| 4 in | 81 sq ft | 10.0 m² at 100 mm | Common garden shed gravel pad |
| 5 in | 64.8 sq ft | 8.0 m² at 125 mm | Larger shed or soft subgrade |
| 6 in | 54 sq ft | 6.7 m² at 150 mm | Workshop, mower, or heavier loads |
| Unit | Volume | Units per yd³ | 4 in coverage |
|---|---|---|---|
| 0.5 ft³ bag | 0.0185 yd³ | 54 bags | 1.5 sq ft per bag |
| 1 ft³ bag | 0.0370 yd³ | 27 bags | 3.0 sq ft per bag |
| 2 ft³ bag | 0.0741 yd³ | 14 bags | 6.0 sq ft per bag |
| Bulk yd³ | 27 ft³ | 1 delivery unit | 81 sq ft per yd³ |
| Shed footprint | Pad with 12 in overhang | Base area | 4 in gravel with 15% compaction |
|---|---|---|---|
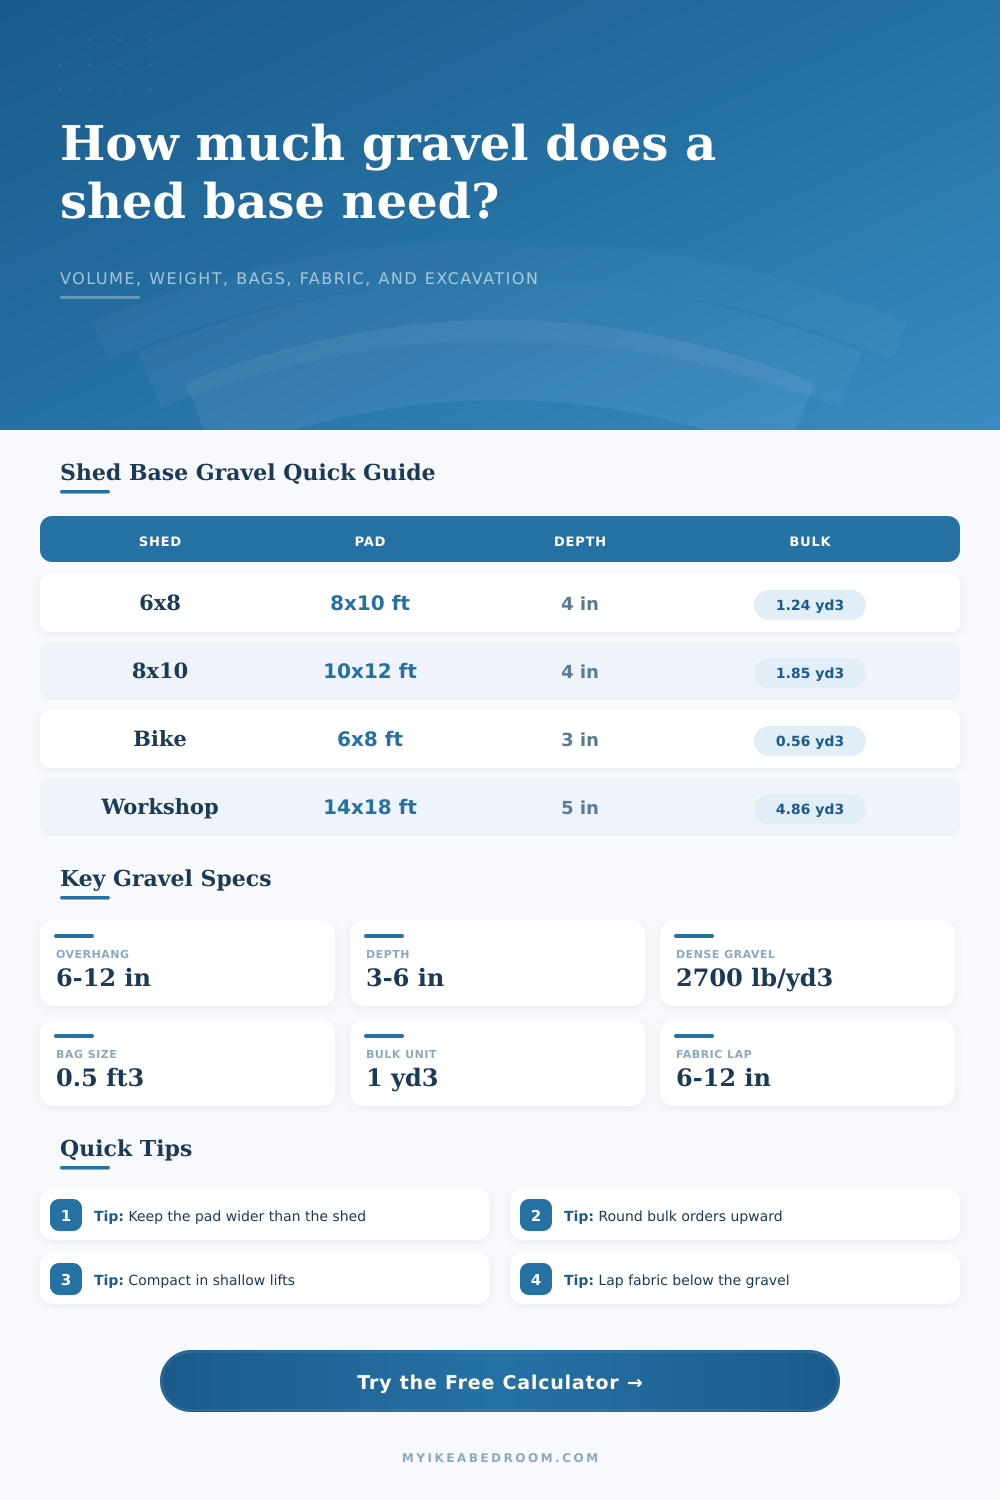
| 6x8 ft | 8x10 ft | 80 sq ft | 1.14 yd³ loose, round to 1.25 yd³ |
| 8x10 ft | 10x12 ft | 120 sq ft | 1.70 yd³ loose, round to 1.75 yd³ |
| 10x12 ft | 12x14 ft | 168 sq ft | 2.39 yd³ loose, round to 2.5 yd³ |
| 12x16 ft | 14x18 ft | 252 sq ft | 3.58 yd³ loose, round to 3.75 yd³ |
| Planning item | Formula | Example | What it checks |
|---|---|---|---|
| Base area | (shed length + 2 overhang) x (shed width + 2 overhang) | 8x10 shed becomes 10x12 pad | Footprint for gravel and digging |
| Fabric area | (pad length + 2 overlap) x (pad width + 2 overlap) | 10x12 pad with 12 in lap needs 12x14 fabric | Geotextile roll coverage |
| Excavation volume | base area x excavation depth | 120 sq ft x 5 in = 50 ft³ | Soil to remove before gravel |
| Loose gravel | compacted volume x (1 + compaction %) | 1.48 yd³ x 1.15 = 1.70 yd³ | Extra material before tamping |
To ensure your shed is level and remains that way for years, you’ve got to start with a strong foundation. That’s where gravel comes into play. But using gravel need careful measurements. It expands if left uncontained, and compacts down once stepped on. If you get those measurements correct, you’ll avoid crooked doors by the onset of winter.
Simply input your custom dimensions, and the calculator will calculate how much material are needed, eliminating guesswork from prep stages. Most people start with the shed size and stop there, but ignoring the overhang is usually where problems begin. The “pad” is that part of gravel outside your building walls, called the overhang. This is typically a foot out on both sides, since it allow room to work and keeps you from walking off pad into softer ground. It also redirects water from the roof to run onto the stone instead of the soil. Mud then won’t creep underneath the skids. If you don’t have any room for an overhang, erosion will eat away at foundation. The tool will adjust footprint for you as soon as you update these values. This way, you’ll know exactly what you’re buying before shopping.
How to Build a Strong Shed Foundation with Gravel
Another parameter worth considering isn’t so obvious, depth. Four inches of finished compacted gravel is the sweet spot for most residential storage buildings, providing enough mass to resist minor settling while remaining drainable. You can skimp by using three inches (it’ll save a few bucks), but soil will pack down excessively under weight of your equipment, creating a wavy surface that adds stress to the structure. For larger pieces of equipment or if the ground is softer, you might go with six inches (no problem as long as budget allows it). By setting those depths in the calculator, you’re able to vary the thickness and see what effect it has on volume needs. Is the increased security worth the extra expense?
Note: To ensure your base remains stable and drainable, aim for about four inches of finished compacted gravel to provide enough mass to resist settling while still allowing water to drain. Also keep in mind that gravel doesn’t maintain its loose volume once installed. By settling into each other and being tamped down with a roller or driven over with a vehicle, it’ll sink about fifteen to twenty percent lower then you anticipated, which means your total thickness will shrink by that amount. When you place an order for a bed based off the depth of material post-compaction alone (without any padding), you’ll end up with a shoddy base (skinny in spots), thick in others. To prevent this, the calculator includes this percentage so you buy enough loose material to get finished dense layer you want. It’s not much when viewed numerically, but it makes all the difference to how strong the surface is.
One key support element is the geotextile fabric that the gravel sits on to separate it from the mud or clay below. If no fabric were used, over time the gravel would settle in the muck and you’d have slurry where once was hard surface, hence the need to prevent it from sinking into the mud. To estimate fabric quantity, simply add a margin for overlap to allow for tear-resistant seams, as those seams are always more likely to rip. Let the fabric stick out beyond the stone, so that it can be fastened down securely. Geotextile fabric costs very little relative to the cost of rebuilding a sunken floor. It is not much work to install.
Finally, because we used bulk delivery rather than buying bags, I’ve included that option in the calculator. If you have a larger workshop (or even a smaller one where a truck can’t pull up), using bags instead of bulk delivery might be easier. However, you’ll need an area to pile gravel before spreading it. For tighter spaces with no room for a parked truck near work area, buying individual bags will be more expensive on a per-cubic-yard basis, but easier to spread and control. The calculator will show the breakdown of bags vs. Truckloads, as well as estimate weight for each so you know whether your driveway can handle the load or if you need to spread deliveries out over a week. Truckloads, as well as estimate weight for each so you know whether you’re able to carry it all up your driveway at once, or need to stagger deliveries.
Although this is typically the most undesirable step in any project, excavating is a must! Don’t think you can just dump some stone over your grass and hope for the best. You have to dig down a bit to create an edge. This keeps the gravel from spreading out when stepped on and messing up the level. Enter your pad dimensions and set depth to see exactly how much dirt you’ll need to remove before you start digging.
Good math with stone and soil is essential to a good shed base. Know your space, make allowances for settlement and factor in weight of everything you plan to put there. The calculator spits out those figures, but it’s the thoughtful installation that keeps you sane over time. Turns out, that’s really what holds up the shed.