Seat Cushion Tie Length Calculator
Estimate fabric ties, cord ties, or ribbon ties for chair pads, bench cushions, round stool cushions, and outdoor seat cushions with real allowances for knots, bows, rail wrap, cushion thickness, seam turnback, and cutting buffer.
Load a common cushion situation, then adjust the rail size, tie count, knot style, fabric strip, and number of cushions to match your chair or bench.
| Closure style | Knot or bow allowance | Tail target | Best use |
|---|---|---|---|
| Plain knot | 4 to 5 in per tie | 2 to 3 in | Kids pads, utility cushions, hidden chair backs |
| Double knot | 6 to 7 in per tie | 3 to 4 in | Dining chair pads and cushions that are removed often |
| Small bow | 8 to 10 in per tie | 3 to 5 in | Decorative kitchen chairs and bedroom vanity seats |
| Full bow | 11 to 14 in per tie | 4 to 6 in | Visible bow loops on rocking chairs or accent seating |
| Wrap once plus bow | 14 to 17 in per tie | 4 to 6 in | Outdoor seats, smooth metal frames, and thick rails |
| Anchor type | Typical wrap | Add for reach | Notes |
|---|---|---|---|
| Thin spindle or slat | 2 to 3 in | 1 to 2 in | Measure around the narrowest useful tie point. |
| Flat ladder-back rail | 3 to 5 in | 2 to 3 in | Flat rails often need more length than round spindles. |
| Round chair back post | 4 to 6 in | 2 to 4 in | Use longer tails if the tie may slide downward. |
| Bench back cleat | 5 to 8 in | 3 to 5 in | Long bench cushions usually need several tie pairs. |
| Outdoor metal tube | 5 to 9 in | 3 to 6 in | Slick frames benefit from a wrap plus knot or bow. |
| Tie material | Suggested buffer | Finished feel | Cutting note |
|---|---|---|---|
| Cotton fabric strip | 8 to 10% | Soft, easy bow | Press folds evenly before sewing long strips. |
| Canvas or outdoor fabric | 12 to 18% | Bulkier knot | Allow more for thickness at knots and seams. |
| Linen blend strip | 10 to 15% | Decorative drape | Frays easily, so test the finished end treatment. |
| Grosgrain ribbon | 5 to 8% | Flat bow | Seal or fold the ends before frequent washing. |
| Cotton cord | 5 to 10% | Compact knot | Use cord stops or larger knots when needed. |
| Elastic tie | 0 to 5% | Stretch hold | Do not over-tighten against delicate chair finishes. |
| Cushion project | Common tie layout | Starting cut length | Why it changes |
|---|---|---|---|
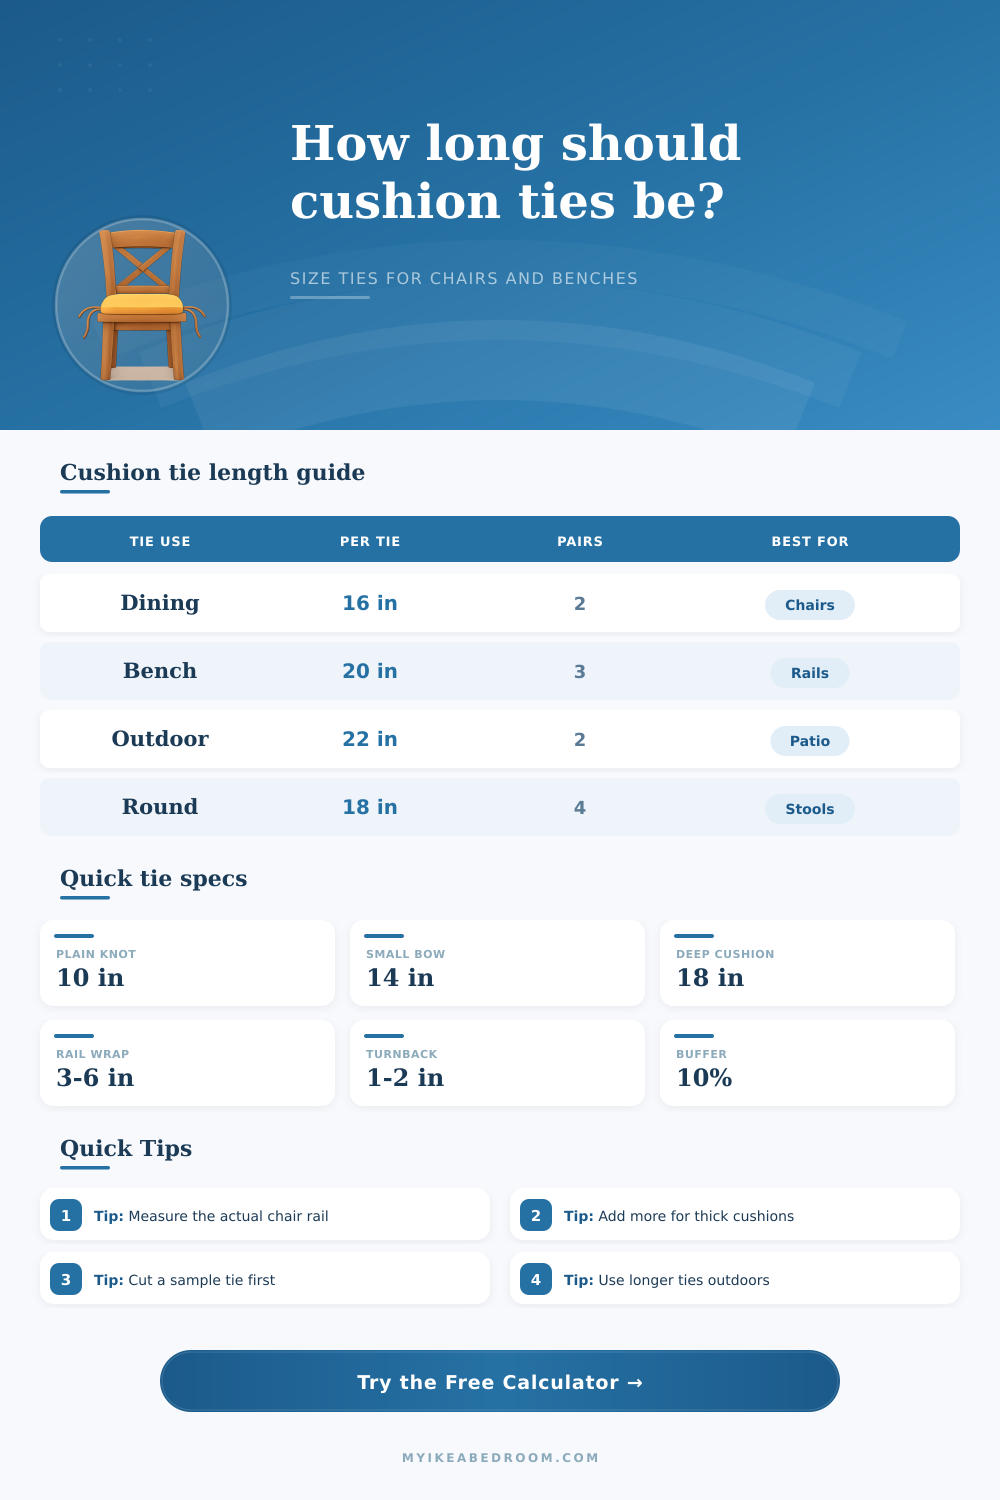
| Dining chair pad | 2 pairs at back corners | 15 to 18 in each | Rail thickness and bow size drive most variation. |
| Bench cushion | 3 to 4 pairs along back | 18 to 22 in each | Longer cushions need more tie points, not just longer ties. |
| Round stool cushion | 4 pairs around seat | 16 to 20 in each | Anchors may wrap under a lip instead of around a back rail. |
| Patio chair cushion | 2 pairs with double knot | 20 to 26 in each | Wind, slick frames, and thick foam need extra wrap. |
| Rocking chair cushion | 2 to 3 ribbon pairs | 18 to 24 in each | Visible bows usually need longer tails and loops. |
How the calculator sizes one tie
Each tie strip starts with the sewn-in turnback, travels from the cushion edge to the chair rail, wraps partway around the rail or spindle, uses length inside the knot or bow, then leaves a visible tail.
Single tie cut length = turnback + reach + half wrap + knot or bow allowance + visible tail, then adjusted by fabric behavior and cutting buffer.
Total length multiplies the single strip by two ties per pair, the tie pairs on each cushion, and the number of cushions in the set.
Make one test tie first. Tie it around the actual chair rail with the cushion in place, then shorten or lengthen the calculated result before cutting the full batch.
Keep pairs consistent. Cut all strips for one cushion from the same measured length, and mark the attachment points before sewing so the cushion sits square on the chair.
But the ties themselves were more than just decorative ribbon tied onto something after-the-fact. They’re a structural element of the cushion that has certain specific geometric needs. Too-short ties will slip out from under the rail before they form a good knot; too-long ones forms messy bulked-up loops that snag clothes or simply don’t look finished. The right length requires knowing precisely what part goes up into the seam, how far it’s pulled down to meet the anchor point, then how far down you’ve got left for the final visible closure.
Once you have established the geometry of your chair, the calculator up top will do the math. But it all begins with the rail itself, which is where most estimates go awry. While many spindles is wood and quite thin, they require much less wrap than a wide bench cleat or the thick metal of a patio frame. Keep this in mind: it isn’t enough to just measure the width across the face of whatever you’re tying. Instead, you must measure the entire distance around the anchor point. That is how far the tie has to travel to fasten on itself.
How to Measure Cushion Ties
For outdoor furnitures, slick surfaces requires longer lengths for a solid double knot, or even for a wrap-around approach that keeps the piece from slipping while the furniture is being used. Think leverage and think friction and how those two forces interact with movement and gravity. How much of your material will be consumed by the knot? More than you’d think. A plain slip knot requires minimal fabric, great if it’s just going to stay in place on an occasional-use pad, while a pretty bow eats up inches of fabric that vanish into the loops. This is spelled out nicely in reference table on the page, showing how much fabric each type of tie-up eats (plain vs. Full bow tied with tails showing). And there’s no getting around it: Form or function? Decide now, since one can eat up a lot less material then the other.
The looped end will use up a couple of inches of fabric that could of gone toward a nice-looking loop, like those on the back of a dining chair. Factor that in when planning your total fabric usage. If you don’t account for that, you will end up with a knot and no fabric left to hide or tie it off with. Also don’t neglect the extra length hidden permanently inside the cushion casing, which is the seam turnback. You cannot get away from this for durability. Sewing your ties into the wrong amount of fabric anchored inside the hem turn them into rips when you sit down hard on them the first time.
And thicker foams bring another vertical challenge as the tie has to travel down through the depth of the cushion before it can start its trip to the back rail. This creates a linear variable that many DIYers fail to consider until their tie is hanging uselessly below the seat level. The tool automatically adjusts for such thicknesses so your strip should be just the right length to clear the foam and then have enough slack to form a secure closure at the top.
How you cut your ends is also important (but subtly so), depending on the type of fabric used. If it’s a natural fiber such as cotton canvas or linen, then leaving them raw will cause those fibers to fray, so you will need some sort of fold or hem to add a bit of buffer. With synthetics, however, which tend not to fray (ribbons specifically) a clean cut may be more appropriate than a long hem.
Multiply all of these factors by the amount of cushions you’re doing, and the waste adds up fast. An extra inch or two on one chair may not seem like much when cutting, but across a set of eight dining chairs, that makes a big difference in sewing time and material costs. You want something cushy but not strained-looking. Something that fits the seat, but doesn’t look sloppy. If you balance the extra length for the knot with how much you wrap and reach, the hold will look like it was meant to be part of the chair. It should not look like an afterthought.
Try tying one in your real-life chair, before committing to the whole set. Theory and practice don’t always match up when it comes to the friction of reality. If you nail the ratios, though, those ties just dissapears. And all that’s left is comfort. The initial forward movement is quickly forgotten. All you need is a firm seat, which stays steady until you are ready to move it yourself.