Scarf Valance Length Calculator
Calculate the fabric length for a scarf valance from rod span, swag count, droop depth, side tails, rod wraps, hem allowance, seams, pattern repeat, and rounding yardage.
Start with a common window treatment, then adjust the exact rod span, drop, tails, and fabric allowances.
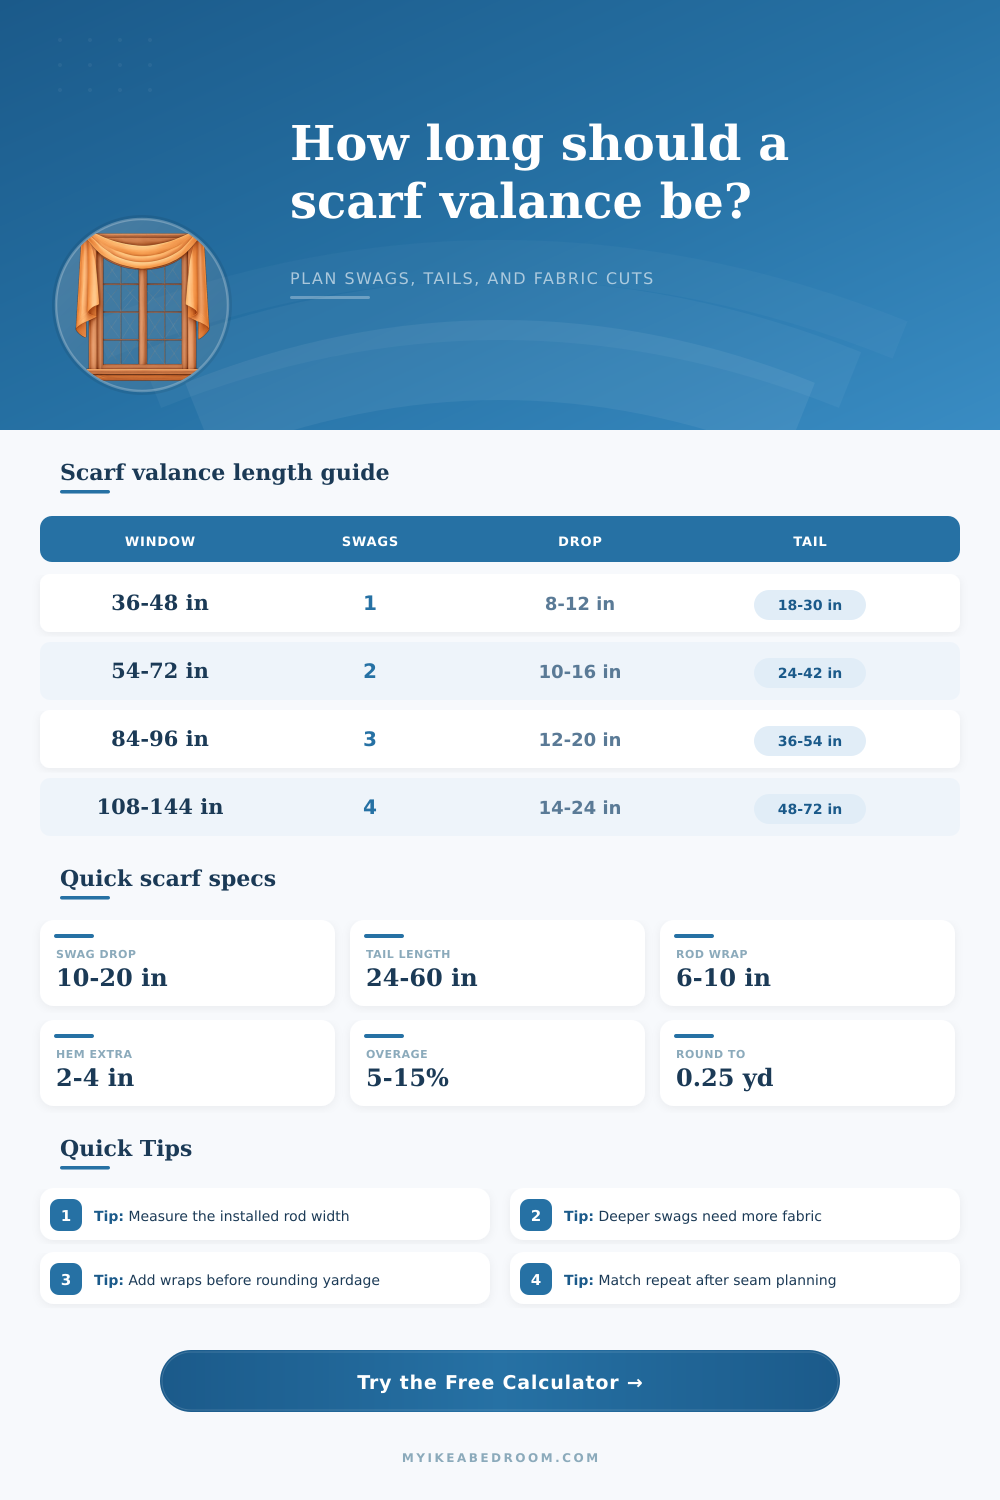
| Treatment width | Common swags | Center droop | Tail drop |
|---|---|---|---|
| 30 to 48 in | 1 swag | 8 to 12 in | 18 to 30 in |
| 54 to 72 in | 2 swags | 10 to 16 in | 24 to 42 in |
| 84 to 96 in | 3 swags | 12 to 20 in | 36 to 54 in |
| 108 to 144 in | 4 or 5 swags | 14 to 24 in | 48 to 72 in |
| Allowance | Typical amount | Where it applies | Calculator use |
|---|---|---|---|
| Rod wrap | 6 to 10 in each | Medallions, knobs, or pole turns | Multiplied by the number of turns. |
| Hem finish | 2 to 4 in each end | Tail ends and cleanup trimming | Added twice for both scarf ends. |
| Seam overlap | 0.5 to 2 in each | Joined scarf sections | Added for every fabric join. |
| Pattern repeat | One repeat or more | Centered prints and mirrored tails | Added before buffer and rounding. |
| Cutting buffer | 5 to 15 percent | Slippery or shaped fabric | Applied to the total cut length. |
| Fabric type | Drape character | Suggested drop | Planning note |
|---|---|---|---|
| Sheer voile or organza | Airy and light | Shallow to medium | Can look generous without much added weight. |
| Cotton or linen | Crisp soft folds | Medium | Works well with balanced tails and clear swags. |
| Poly decorator fabric | Stable folds | Medium | Predictable for repeat prints and joined sections. |
| Velvet or heavy drapery | Full and weighty | Medium to deep | Needs stronger supports and extra curve ease. |
| Lined scarf valance | Structured | Shallow to medium | Use less droop if the rod support is light. |
| Scenario | Rod span | Swag setup | Finished path before allowances |
|---|---|---|---|
| Small bedroom window | 42 in | 1 swag, 10 in drop | About 90 to 105 in with tails. |
| Dining room window | 66 in | 2 swags, 14 in drop | About 145 to 165 in with tails. |
| Wide living room | 96 in | 3 swags, 16 in drop | About 215 to 250 in with tails. |
| Patio door scarf | 84 in | 2 swags, uneven tails | About 210 to 260 in depending on tails. |
| Bay window scarf | 120 in | 3 swags, medium drop | About 275 to 330 in before extra wraps. |
Measure support point to support point. A scarf follows the rod, knob, or medallion path, not just the glass width.
Keep swag drops realistic. A deeper center droop needs more curve length and can pull tails shorter after styling.
Plan wraps as real length. Each turn around a pole, hook, or medallion uses fabric before the tail begins.
Round only at the end. Add hems, joins, repeat allowance, and buffer first, then round the purchase length upward.
If there’s one lesson I learned fast about making a scarf valance, it’s that taking the width of your window doesn’t tell the whole story. There are the whims of gravity and fabric to reckon with, plus what will happen when it meets the floor (or the sill). It wants to hang; it wants to drape; it wants to cascade; it wants to fold over the curtain rod and then dangle in tails… before it touches the ground. You want to know these things before you buy extra yardage, a sure sign you’ve miscalculated length. That’s where this comes in. Math becomes geometry, and the math of fashion becomes less important then the fashion itself.
Most people start by measuring the width of glass, which is where the trouble begins. A valance does not live on the window pane; it lives on rod. You must measure from support point to support point (with any added overhang you desire beyond the brackets). Do you want to frame out the window in a generous way? Then add those inches before proceeding to anything else. The reason I ask for the span of the installed rod first is that all other numbers follows from it. Everything builds based off that.
How to Measure Your Window and Buy Fabric
Now that you have your width, next decide how many swags you want to make. A single swag will be simple and soft looking, whereas 3 or 4 makes a more formal look. And each extra swag adds a curve to the math, and curves takes up more fabric than straight lines. Droop depth is the most misunderstood variable in window treatments. An eight-inch drop requires much less fabric then a twenty-inch deep plunge. Why? The greater the distance between the rod and where the fabric swoops off, the longer the fabric has to be to make this arc without being pulled tight. It seems backward because we usually think about vertical height, but that height determines how many yards of fabric you need to go across.
Then there are the tails. Usually they’re balanced but now uneven designs is popular. For example, if you want one side to hit the sill and the other to pool on the floor, the math change completely. It’s all math, which changes entirely. The tool covers these various droops. This prevents you from ending up with two short tail when you wanted one long statement piece.
Finally, don’t ignore hems and wrapping the rods. These things can realy throw off your project, since every single one takes up a few inches of fabric as it loops around knobs and medallions. A few inches doesn’t seem like much (six to ten inches per wrap seems pretty small!), but when you do 3 or 4 of them….yeah. Round out your total cost estimate with a bit for hidden expenses like this!
Hems also contribute to “hidden” fabric cost. How many inches will you need for a narrow hand-sewn hem? Or how about finishing with a zig zag? Add that in at both ends of the scarf. What about seam allowances? Did you piece smaller fabric panels together in order to get finished dimensions? Those will take up inches as well.
And then there’s pattern repeats: Will you have something really big printed onto your fabric that needs to be centered exactly from swag to swag? Matching those edges adds a lot of waste, enter that into the equation, as well! The calculator lets you plug in an allowance for repeat patterns to cover the extra fabric needed to match the edges.
The other thing that affects fabric is its behavior. Heavy velvet will behave different than sheer voile, which will flow in different ways than lightweight fabric. Soft, light fabrics requires less ease to drape, but if your fabric is heavy, you’ll need more length to create full folds without looking stretched out. That’s where the fabric behavior settings comes into play on the tool. Depending on the physical movement of the material, it’ll adjust for the right amount of fullness.
Lastly, don’t forget to account for a cutting buffer! An overage of ten percent is standard for settling, trimming errors, and mistakes. When ordering, round up to next 1/4 yard. You would of rather have a bit too much at the end than too little just before the hem. Measure the rod. Not the glass. Trust the math.