Sanding Grit Progression Calculator
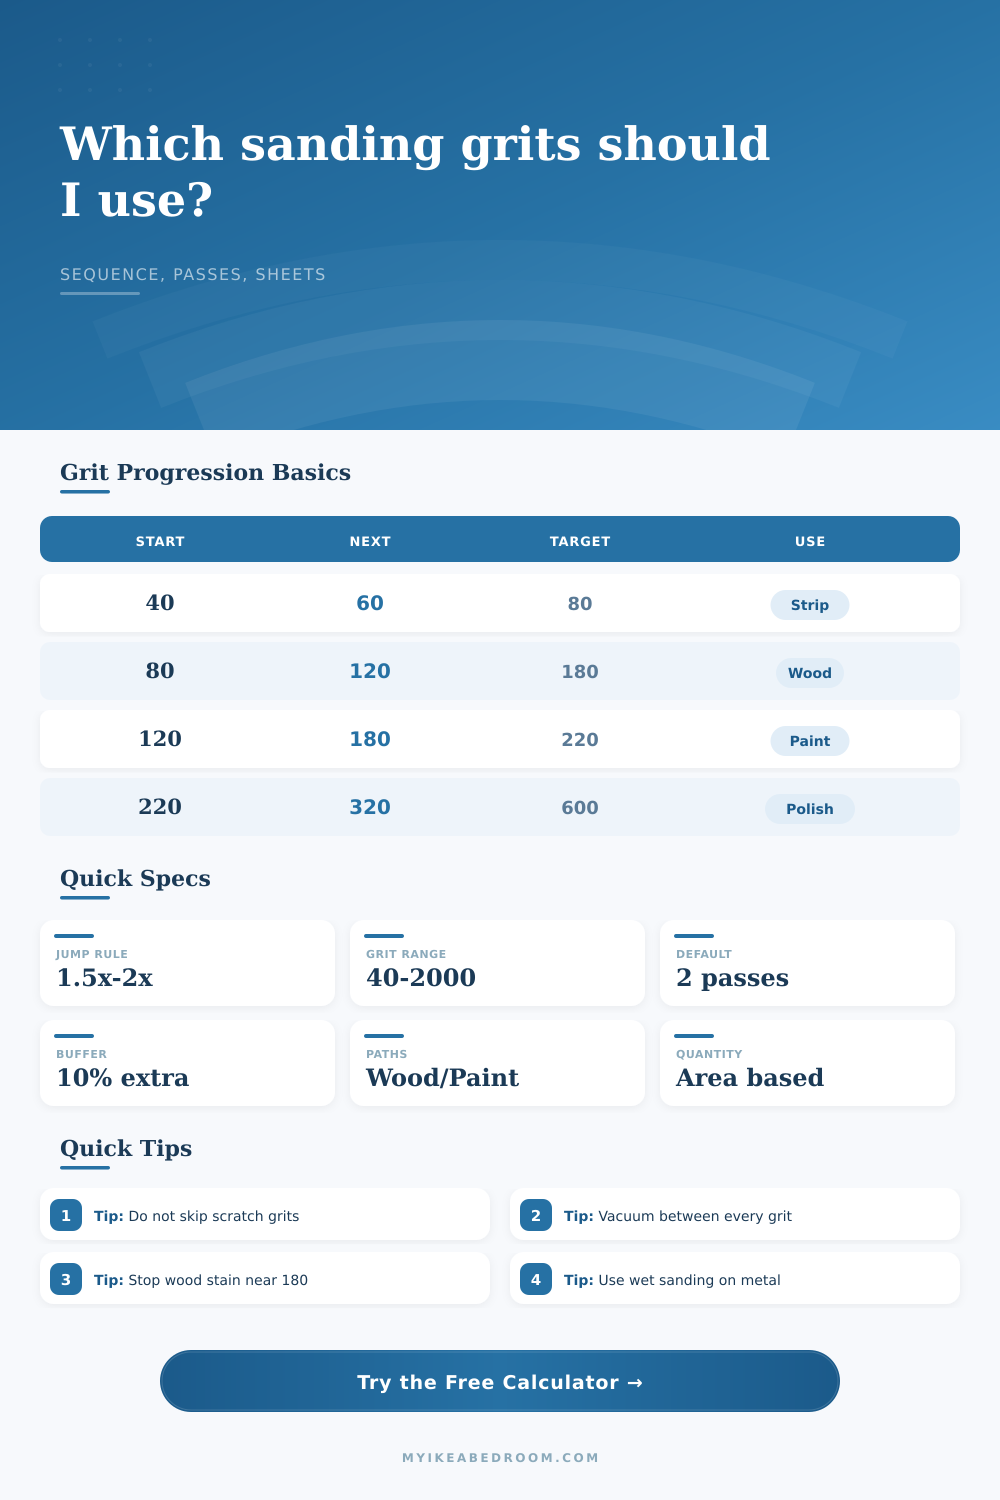
Plan a sensible grit sequence from starting grit to target grit, check the maximum grit jump rule, estimate passes, and calculate sheets or discs from the surface area.
📌Material and finish presets
⚙Sanding inputs
Your sanding grit progression result
| Step | Grit | Role | Pass area | Abrasives |
|---|---|---|---|---|
| 1 | 80 | Start | 0 sq ft | 0 discs |
🧱Finish path quick grid
📐Progression formulas
next grit <= current grit x max jump
abrasives per grit = ceiling(workload area x passes x buffer / coverage)
📊Finish path target table
| Material or finish path | Common start | Common target | Planning note |
|---|---|---|---|
| Raw softwood for stain or oil | 80 or 100 | 150 to 180 | Stopping too fine can reduce stain pickup on softwood. |
| Raw hardwood under clear coat | 80 or 120 | 180 to 220 | Clear film finishes usually benefit from a finer last scratch pattern. |
| Thin veneer furniture panel | 120 or 150 | 180 to 220 | Use light passes because veneer thickness is limited. |
| MDF, primer, or painted furniture | 120 or 150 | 180 to 240 | Primer needs enough scratch for mechanical grip without fuzzing edges. |
| Existing paint for repaint | 180 or 220 | 220 to 320 | The goal is dulling gloss and feathering edges, not full removal. |
| Old paint or clear finish removal | 40 to 80 | 150 to 180 | Rebuild the scratch pattern before primer, stain, or clear coat. |
| Bare metal before primer | 80 or 120 | 180 to 220 | Use the coating system guidance if it specifies a surface profile. |
| Metal polishing or gloss leveling | 220 to 400 | 600 to 2000 | Wet sanding often extends abrasive life and controls fine dust. |
🔢Maximum grit jump examples
| Current grit | 1.5x next limit | 2x next limit | Common next grit choice |
|---|---|---|---|
| 40 | 60 | 80 | 60 for safer scratch removal, 80 for fast stripping. |
| 60 | 90 | 120 | 80 or 100 for wood, 120 only for rough work. |
| 80 | 120 | 160 | 120 under a strict path, 150 under a wider path. |
| 120 | 180 | 240 | 180 for wood, 220 or 240 for finish prep. |
| 180 | 270 | 360 | 220, 240, or 320 depending on finish path. |
| 320 | 480 | 640 | 400 or 600 for wet sanding and coating leveling. |
📏Abrasive coverage reference
| Abrasive format | Typical coverage | Best use | Quantity note |
|---|---|---|---|
| Quarter-sheet pieces | 10 to 14 sq ft | Hand blocks, furniture rails, flat drawer fronts. | Folded paper loses efficiency on edges and profiles. |
| Third-sheet strips | 12 to 16 sq ft | Sheet sanders and long flat panels. | Good for shelves, doors, desks, and cabinet sides. |
| 5 in hook-and-loop discs | 16 to 22 sq ft | Random orbit sanding on furniture and doors. | Paint and resin can reduce coverage sharply. |
| 6 in hook-and-loop discs | 22 to 30 sq ft | Larger tops, doors, and metal panels. | More area per disc but still change when cutting slows. |
| Hand sanding pads | 8 to 12 sq ft | Edges, corners, shaped parts, and between coats. | Use extra allowance when sanding profiles by hand. |
| Wet sanding sheets | 6 to 10 sq ft | Metal, epoxy, gloss clear coat, or polish steps. | Rinse slurry often and replace sheets when scratches dull. |
🔧Grit role reference
| Grit range | Wood path role | Paint path role | Metal path role |
|---|---|---|---|
| 40 to 60 | Heavy flattening only when necessary. | Old coating removal and edge knockdown. | Rust or heavy scratch removal. |
| 80 to 100 | First regular cut for rough boards. | Feather damaged paint after stripping. | Shape rough metal before primer prep. |
| 120 to 150 | Remove coarse scratches before finish prep. | Primer prep and filler leveling. | Refine scratches before coating. |
| 180 to 240 | Final wood prep for stain, oil, or clear coat. | Painted surface scuff and primer sanding. | Primer-ready or brushed metal preparation. |
| 320 to 600 | Between coats, not usually raw wood prep. | Between paint or clear coats. | Wet sanding before polish. |
| 800 to 2000 | Special polish, not normal furniture stain prep. | Gloss leveling and defect removal. | Polishing path before compound. |
💡Sanding calculation tips
A paint job or piece of woodwork may look good in the shop by artificial light, but then you go to look at it closely and it’s awful. That’s typically about the time you realize that you sanded with no plan, just an act of faith. How do you know if it will come out looking like polished stone or scratched plastic?
Sanding sequence. When you know where you’re starting from and what you want for a finish, the grit progression calculator figure out the rest. It eliminates the guessing game around how many steps there really are between final polish and rough removal.
How to Sand Wood Correctly
Sandpaper leaves micro scratches and these is called scratch geometries. So most folks think that sanding is only smoothing out the surface, but it’s actualy all about control over the scratch geometry. Each grit will leave a patterned set of very fine valleys. And if your jumps are too large from one step to another, then those valleys aren’t erased by finer paper, they’re still there. But that’s not what happens when we choose our ratio, the tool computes how big a jump is safe. It keeps you in the zone where following steps will reliably erase the preceding steps marks. That’s why the jump rule is so important.
The biggest challenge in most cases is choosing which grit to start with, no one wants to use sandpaper that isn’t “the good stuff” so it’s tempting to start out at four hundred grit if your board still sports some mill marks. That’s not going to work; you’re just polishing dirt into the fibers.
Surface area and number of panels is there to protect you from purchasing three hundred discs when you really only need thirty. A normal random orbit sander disc will cover a small area and wear through finish or load up with dust pretty quickly. How much finish you have to take off also makes a difference: do you have a veneered tabletop or an oak table? These measurements change how much of an abrasive the calculator suggests.
It includes the “oops factor”… Those times a sheet rips or clogs up and has to be replaced. In the formula that’s little, but it makes an enormous difference in the shop. It saves you from running out to buy more while your finish is tacky.
The second place you can’t trust your gut is the difference between wood preparation and paint preparation. When staining raw wood, you want just enough tooth so the dye will bite into grain. Typically this means stopping at about one hundred eighty grit sandpaper. For example, going any finer on a softwood will blotch and actualy seal the wood grain.
On the other hand, if you want a wood surface prepared for paint or clear coat then it require far finer a start so as to be mechanically adherent. So the tool’s presets mirror those various paths. It separates the needs of a surface being prepared for staining from one being prepared for a high gloss polish.
Wet sanding epoxy or metal changes the cutting speed and the friction. In those cases, the rule change again. In those cases, water drops the coverage estimate considerably. That is reflected by tool if you change the coverage input. Wet sanding eats abrasives; the slurry washes off the sharp corners of your grit, so going to coarse next is like trying to shave with scissors on your first pass.
Each step has its place. Knowing those steps will help you avoid skipping ahead to save time. Skipping ahead can cost you an hour later when you try to hide the scratches from the level you skipped. Going straight from 1500 to 3000 might save you five minutes but it’ll probably cost you an hour later when you see all the scratches in your final coat and have to go back.
The breakdown of how many passes per step to get the job done correctly means you know exactly how many times you should be going over each area until you’ve taken out any sign of last grit’s scratches. It is a linear process. You need patience.
Should it be fine or coarse? Choose fine or coarse. This was the choice. You can’t mix these two. To mix them would of cost you in the end. And the tool spells that out so nicely. It shows which comes first and what material to use side by side. It transforms your hazy thought of “oh, just keep sanding till it’s smooth” into an actionable step-by-step plan.
At the heart of a nice finish are those scratches you don’t see. The calculator helps you see all that invisible architecture before you lift up sander. You gain the confidence to quit at the right moment based off the math, rather than after you have sanded your forearms raw and worn into underlying wood.
Because you honor the jump limits, each layer of grit performs perfectly. The final finish reflects light equally without you having to polish it to oblivion. No, the reflective surface comes from setting things up right at the start with that rough layer and allowing the later layers to build on what came before. And there lies the lesson: Good finishes aren’t about polishing the finish to death so much as managing the transition from one degree of roughness to another.