On Point Quilt Block Calculator
Plan a rotated block layout with full blocks, side setting triangles, corner triangles, borders, backing, binding, and fabric estimates from real on-point cutting formulas.
Start from a familiar quilt size, then tune block size, borders, triangle cuts, and fabric roles for your layout.
| Finished block | Block diagonal | Side setting square | Corner square |
|---|---|---|---|
| 6 in block | 8 1/2 in | 9 3/4 in, cut twice diagonally | 5 1/8 in, cut once diagonally |
| 8 in block | 11 3/8 in | 12 5/8 in, cut twice diagonally | 6 5/8 in, cut once diagonally |
| 9 in block | 12 3/4 in | 14 in, cut twice diagonally | 7 1/4 in, cut once diagonally |
| 10 in block | 14 1/8 in | 15 3/8 in, cut twice diagonally | 8 in, cut once diagonally |
| 12 in block | 17 in | 18 1/4 in, cut twice diagonally | 9 3/8 in, cut once diagonally |
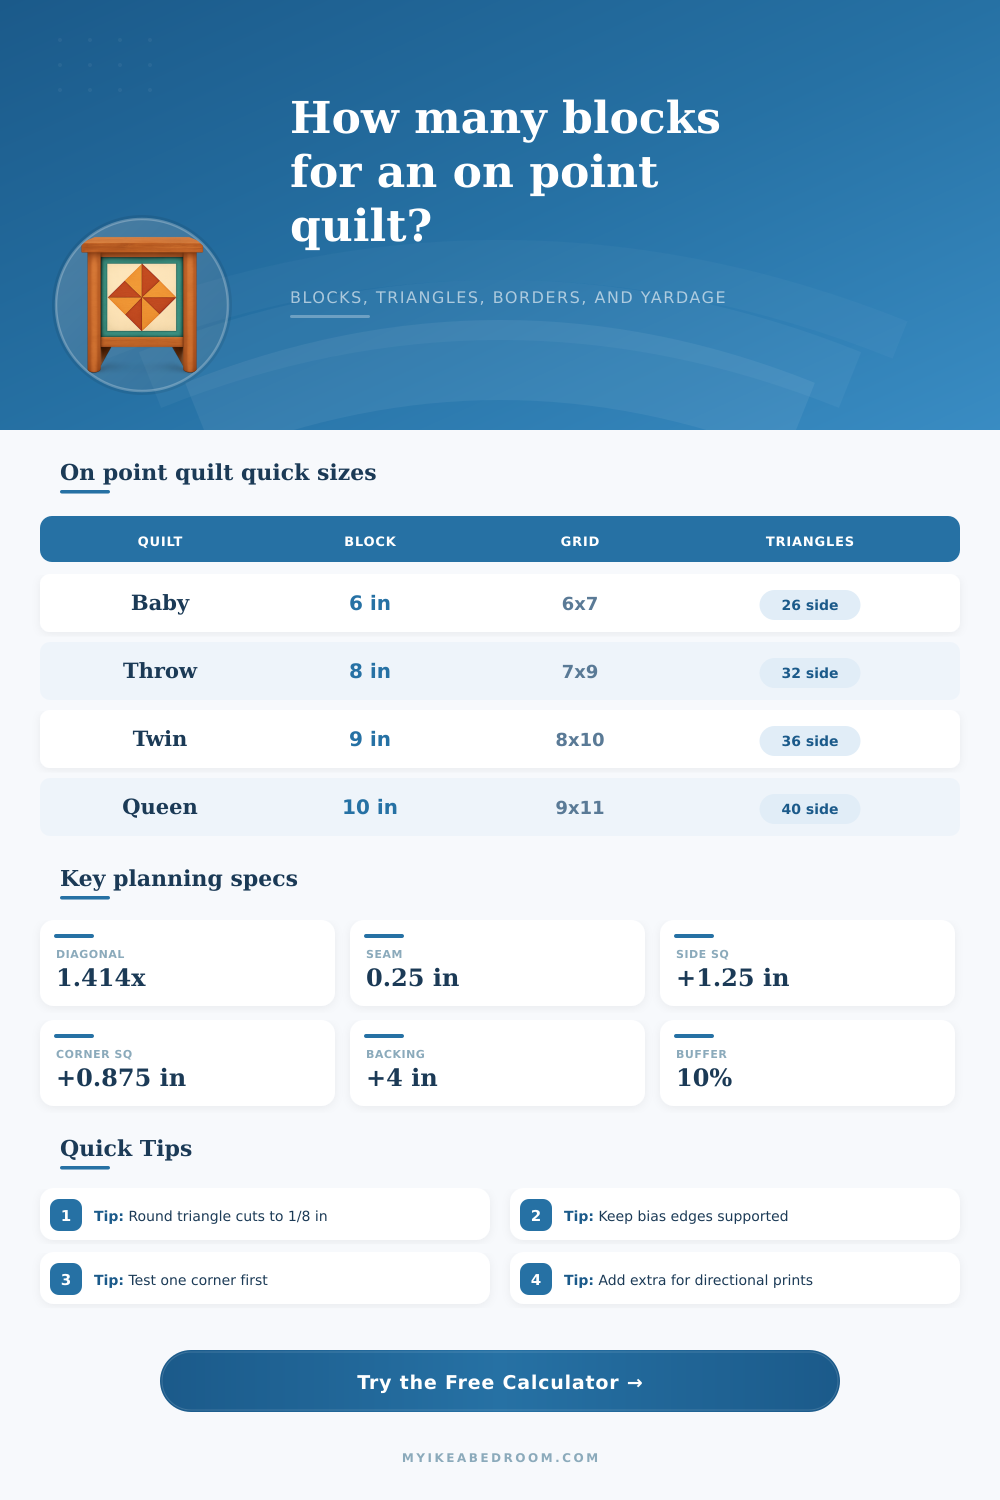
| Quilt type | Finished size | Typical block | Planning note |
|---|---|---|---|
| Baby | 36 by 45 in | 6 in finished blocks | Small blocks keep diagonal rows flexible. |
| Throw | 60 by 72 in | 8 in finished blocks | A 3 to 4 inch border helps tune the final size. |
| Twin | 70 by 90 in | 9 in finished blocks | Use sashing when sampler blocks vary slightly. |
| Queen | 90 by 108 in | 10 in finished blocks | Directional prints often need a higher cutting buffer. |
| King | 108 by 108 in | 12 in finished blocks | Large blocks reduce seam count and triangle handling. |
| Piece type | Calculator formula | Cutting method | Planning caution |
|---|---|---|---|
| Full blocks | Grid columns times grid rows | Cut as normal square blocks with seam allowance | Square up blocks before arranging diagonal rows. |
| Side setting triangles | Two per outside row and column | Cut large squares twice diagonally for four triangles | Outer long edge is straight grain when cut correctly. |
| Corner triangles | Four total corners | Cut smaller squares once diagonally for two triangles | Corner pieces are easy to rotate accidentally. |
| Sashing strips | Between full block modules | Cut finished width plus two seam allowances | Long diagonal rows can stretch while sewing. |
| Borders | Finished perimeter strips plus piecing buffer | Cut measured border lengths, not raw edge estimates | Measure through the quilt center before attaching. |
| Binding | Quilt perimeter plus join allowance | Round strip count up by usable fabric width | Bias binding suits curved edges, not required here. |
Even block mix across the center.
Best for repeating bedroom quilts and simple diamond flow.
Half feature and half plain blocks.
Best for star blocks, applique blocks, or busy prints.
Center focus with calmer outer rows.
Best when one block or fabric should anchor the design.
Extra buffer protects print orientation.
Best for stripes, motifs, text prints, and one-way fabric.
Triangle tip: Side setting triangles are usually cut from squares sliced twice diagonally, which keeps the straight grain on the quilt edge. Label stacks before sewing.
Layout tip: Arrange diagonal rows on a design wall or floor before joining rows. On-point layouts change quickly when alternating blocks are rotated.
An on-point quilt layout are used when the blocks is rotated so that they are on a diagonal instead of sitting in the straight-rows of the quilt. Instead of the quilt blocks lining up with the edges of the quilt, an on-point layout create a grid of diamonds across the quilt top. The diamonds creates long lines across the quilt top, changing the way that the quilt appear.
Additionally, an on-point layout can change the way in which the quilt is cut; the number of blocks that are to be cut; and the way in which the quilt will behave when the rows are sewn together. The rotation of the blocks will change the measurements of those blocks. For instance, a quilt block that is cut into a square that measure eight inches from one side to the next will measure approximately eleven and three-eighths inches from corner to corner when that square block is rotated to lay on a diagonal.
How to Plan and Cut an On-Point Quilt
Because each of these blocks will be longer from corner to corner, setting triangles will need to be added to the sides of each block, as will corner triangles be added to each point of the quilt. Without these additional triangles, the quilt will have jagged edges. Additionally, the bias grain of these triangles will help to ensure that the edges of the quilt are more stretchier than a quilt made up of straight-set blocks.
Therefore, care will need to be taken when sewing the outer rows of the quilt. The number of blocks that will be used in an on-point quilt is different than the number of blocks that may be used in a quilt with a straight-set layout. Additionally, a calculator can be used to determine the number of blocks that will be needed.
The dimensions of the quilt that will be made can be entered into the calculator, as well as the size of the blocks, and the width of any sashing that will surround the blocks within the quilt. Based off these entries into the calculator, the number of full blocks can be determined, as well as the number of side-setting triangles that will be needed, and the number of corner triangles that will be needed to complete the quilt. Knowing each of these numbers will allow the quilter to begin cutting the fabric needed to create the quilt.
If any of the dimensions of the quilt are changed, the number of quilt blocks will change. For instance, if the size of the blocks in the quilt is to be increased, the diagonal measurement of each block will increase. An increase in the diagonal measurements of the blocks will usually lead to a decrease in the total number of blocks needed for the quilt.
Additionally, if sashing is to be added to the quilt, the size of the module of the quilt will increase. An increase in the size of that module will change the total number of blocks that are counted for the total grid of the quilt. Additionally, changing the width of the borders will change the amount of space that will be made available for the center of the quilt.
A change in the width of the border will change the number of rows of blocks in the quilt from six rows to five rows, for instance. A change in the number of rows will change the number of triangles that are needed to sew the rows together. The fabric pieces will need to be cut according to the number of blocks, sashings, and triangles that are to be made.
Triangles will be cut by slicing squares in half, twice for side-setting triangles, once for corner triangles. Each cutting formula will include the seam allowance and extra inches for the bias grain of the triangles. Additionally, some quilters will round the measurements to the nearest eighth of an inch to make it easier to measure the fabric pieces with the ruler.
Other quilters will choose to cut the pieces larger to allow room for squaring up the fabric pieces prior to sewing. Whatever choice is made, all of the fabric pieces that are to be sewn together will need to be the same size. Fabric planning will be necessary to determine how much fabric will be purchased for the quilt.
Knowing the number of full blocks and the number of triangles will allow an estimation of the yardage that will be needed. The total area of the cut pieces can be divided by the width of the fabric to determine the total yardage. Additionally, extra fabric can be purchased to account for errors when cutting the fabric.
Quilts made up of many different fabrics will require less fabric to be purchased than a quilt that uses a large print fabric throughout the quilt. Similarly, the yardage for the backing of the quilt will need to be calculated. The backing will need to be several inches larger than the finished quilt.
Finally, the binding for the quilt will also need to be calculated. The binding will need to be the same perimeter as the quilt top being sewn together, with additional fabric to account for the joining of the strips of fabric and to allow for turning the corners of the binding. Each of these calculations will help determine the amount of fabric that will have to be purchased during the shopping trip for the quilting project.
Many different types of blocks can be used within an on-point quilt layout. For instance, blocks can be squares, nine-patch blocks, star blocks, and appliqués can be used. Each of these blocks will be arranged on a diagonal, which will cause them to touch at the corners of the blocks.
Some blocks will gain movement within the on-point quilt layout, while others will appear as if they are flattening out within that layout. Quilters may choose to make a single row of blocks that are to be laid on a diagonal in order to view how the different types of blocks may appear within an on-point quilt layout prior to sewing the quilt together. The preparation of an on-point quilt must occur prior to beginning to cut the fabric for the quilt.
The quilt top can be pre-determined to be of a certain size, the blocks can be of a certain size, sashing can be chosen, and the width of the borders can be determined. These decisions will allow for the creation of the grid for the quilt, the number of triangles that will be needed for the quilt, and will allow for the estimation of the total yardage that will be needed. Once these decisions have been made, the sewing of the quilt will begin.