PSU Wattage Calculator
Estimate PC power supply size from CPU and GPU TDP, platform load, memory, storage, fans, USB peripherals, overclocking, GPU transients, PSU efficiency, and headroom.
Start from a common build type, then tune each component load to match your parts list and upgrade plan.
Power breakdown
CPU-heavy build
Watch: sustained CPU package power and motherboard VRM load.
Best for compiling, simulation, and CPU rendering rigs.
GPU-heavy build
Watch: GPU board power plus transient spike allowance.
Best for gaming, GPU rendering, AI workloads, and high refresh displays.
Drive-heavy NAS
Watch: hard drive count and simultaneous spin-up current.
Use extra headroom when many mechanical drives start together.
Mini ITX PC
Watch: SFX capacity, cable clearance, and heat density.
A smaller PSU still needs enough 12V capacity for short GPU spikes.
RGB showcase
Watch: fans, pumps, controllers, strips, and USB headers.
Small items add up when the build has many lighting devices.
Upgrade path
Watch: the next GPU class, not only the current card.
Choosing the next PSU tier can prevent a second rebuild later.
| Build type | Typical peak DC load | Transient concern | Common PSU range |
|---|---|---|---|
| Home office PC | 80 to 180 W | Low, unless adding a GPU | 300 to 450 W |
| Budget GPU build | 250 to 420 W | Moderate on midrange GPUs | 500 to 650 W |
| Mainstream gaming PC | 420 to 620 W | Often GPU driven | 650 to 850 W |
| Creator workstation | 650 to 900 W | High CPU and GPU load together | 850 to 1200 W |
| Storage server or NAS | 180 to 500 W | Hard drive spin-up | 450 to 750 W |
| Component | Typical range | Calculator default | Notes |
|---|---|---|---|
| CPU package power | 35 to 250 W | User entered | Use actual boost power when known. |
| GPU board power | 75 to 600 W | User entered | Use total board power, not slot power only. |
| Motherboard/platform | 25 to 90 W | User entered | Chipset, VRM, WiFi, controllers, and onboard devices. |
| RAM stick | 3 to 8 W | 5 W each | High-speed RGB memory may sit near the upper end. |
| NVMe drive | 4 to 9 W | 6 W each | Peak transfers draw more than idle. |
| Hard drive | 6 to 12 W | 9 W each | Spin-up can briefly exceed running load. |
| Fan or pump item | 1 to 8 W | User entered | RGB fans and AIO pumps can be higher than plain fans. |
| PSU load after sizing | Band | What it means | Typical action |
|---|---|---|---|
| Under 35% | Light | Quiet, but capacity may be more than needed. | Fine when silence or upgrades matter. |
| 35% to 70% | Sweet spot | Comfortable load range for efficiency and fan noise. | Ideal target for most builds. |
| 70% to 85% | Warm | Still usable, but less upgrade room remains. | Consider one PSU tier higher. |
| Over 85% | Tight | Transient spikes and aging can become concerns. | Choose a larger PSU. |
| Preset | CPU/GPU | Other load focus | Why it matters |
|---|---|---|---|
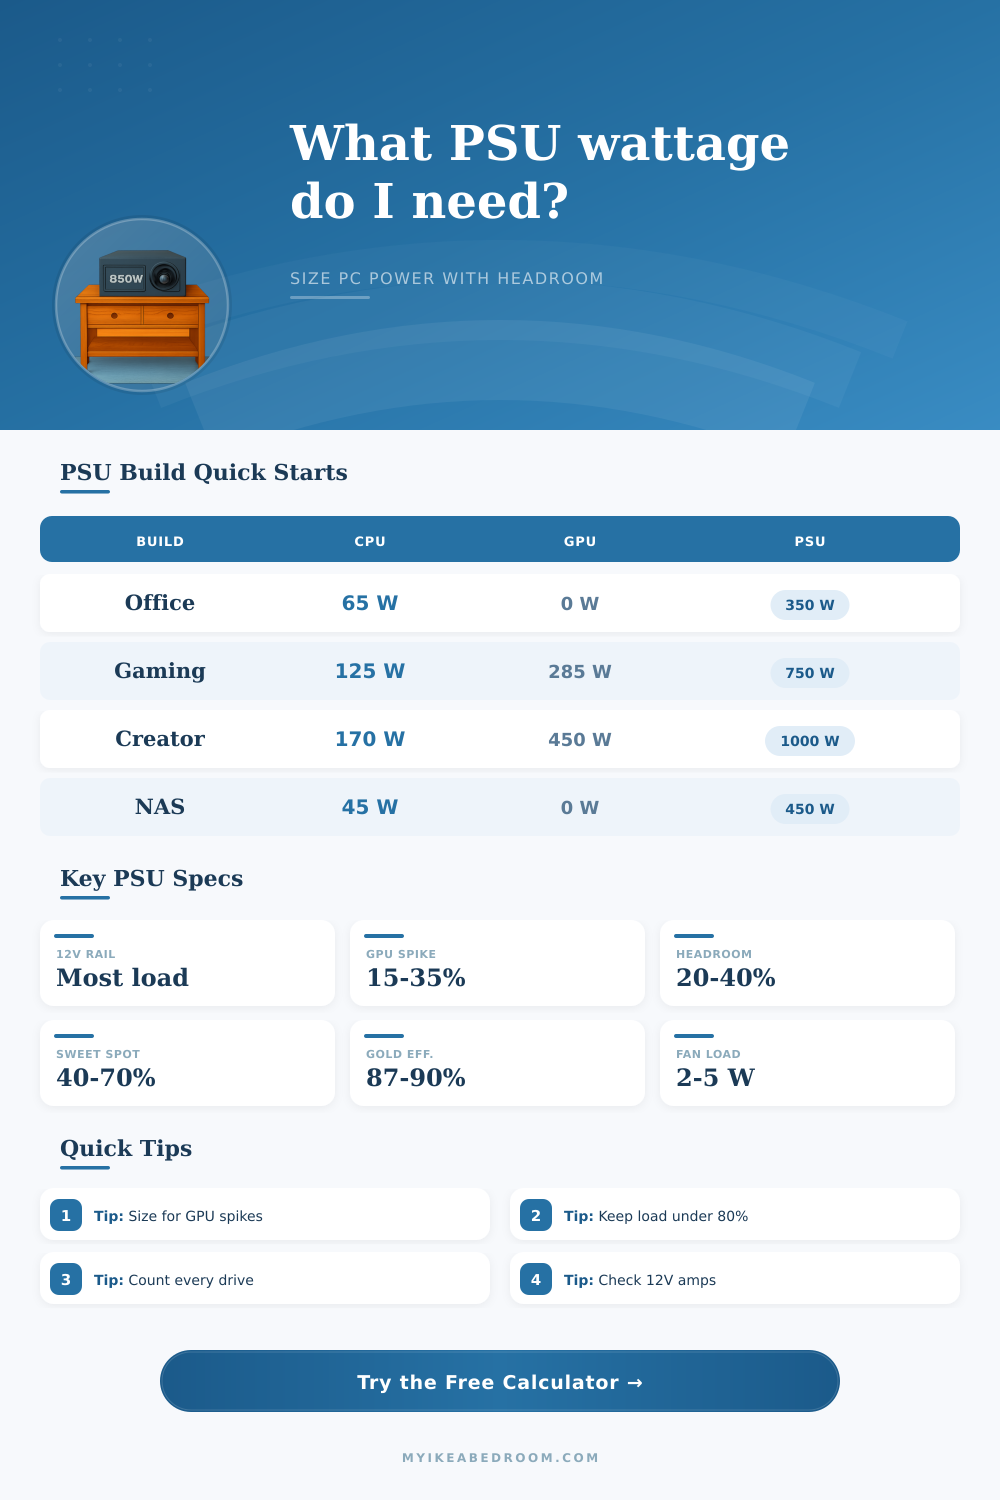
| Home office PC | 65 W / 0 W | Low USB load | Usually CPU and platform limited. |
| 1440p gaming PC | 125 W / 285 W | GPU transient spikes | The graphics card usually sets the PSU tier. |
| Creator workstation | 170 W / 450 W | Many drives and fans | CPU and GPU can load together for long sessions. |
| Drive-heavy NAS | 45 W / 0 W | Eight hard drives | Spin-up and 12V drive load need margin. |
| High-end overclocked | 250 W / 600 W | Heavy cooling | Overclocking and transients push the top end quickly. |
Check the 12V label. PSU wattage is not the whole story. The CPU, GPU, drives, fans, and pumps mainly depend on available 12V current.
Do not size from average gaming draw only. A PSU should handle short GPU spikes, sustained boost behavior, and a little aging without running near its limit.
The power supply is treated as a black box in the corner of the case by most people building PCs. As long as it has enough watts on the sticker, it’s all good. If your system fan are screaming at light loads or crashing under heavy ones, that’s probably why.
It’s not because components have set power requirements. Moddern silicon is less about steady flow and more about pulses. A CPU or GPU will draw huge instantaneous spikes well above its rated TDP, then relax almost instantly. That’s where average sizing comes into play, it masks those peaks. Peak sizing without context can lead you to buy big, expensive power supplies when you really don’t need them.
Why Your Power Supply Needs Headroom for Power Spikes
The calculator above breaks out the headroom requirement vs. It looks at the transient behavior and sustained draw, then runs the math for you. First it wants your GPU board power and CPU package power. Those are the heavy lifters.
Most folks get TDP confused with actual wattage. TDP is a cooling metric. It’s not an electrical metric. Often, a processor with a 125-watt TDP will pull far more power then that when its boost feature kicks in during gaming or rendering loads. If you know what your max sustained package power is, enter that value. Otherwise, just go with the stock number (as a baseline) and allow the overclock allowance field to account for the variance.
Why does this matter? Because the power supply must be capable of delivering peak current immediately, not gradually ramping up over a period of ten seconds. Then there’s another wrinkle in graphics cards. They spike. For a millisecond, modern designs will draw twice their rated capacity when rendering a frame and then drop back down again as voltage regulation takes hold.
This is accounted for in the tool: You add a percentage of your GPU workload to account for these transient draws. Otherwise you may choose a supply sufficient for your average workloads but one which trips out when a demanding scene pops on-screen. A little thing, but that makes a difference in how stable your system stays.
And the tool makes you consider some of the lower bits and pieces that all add up silently. There are a few watts pulled from RAM sticks; a couple more from NVMe drives; a sata ssd here, a mechanical hard disk there. None of them is significant individually. But in a build targeted at NAS or a workstation, all those parts may add up into a meaningful portion of the required 12V rail demand.
The last variable is headroom. Running power supplies at either super-low or super-high percentages of total capacity isn’t great for them (they don’t operate at maximum efficiency). Typically it’s somewhere around 40-70% where things are humming along nicely. Adding some headroom, say, thirty percent. Means you’re operating near the sweet spot and leave some breathing room for both upgrades and component aging.
The chart below shows this clearly; depending on your usage, each type of build has its own wattage range. That high end creator workstation with beefy cooling requirements will be pushing a thousand-ish watts, whereas a home office PC require just over three hundred.
It’s not so much about the number of Watts with a power supply as it is about how the power is distributed. Most of the weight in a PC are going to be carried by 12V rail; fans, drives, graphics cards, and processors all get their juice there. So check out the Amperage rating of that rail, not necessarily the total wattage of the system. You could have a supply rated at high total watts, but split across several rails, choking your GPU.
And don’t forget efficiency ratings (Gold, Platinum, etc.). Those will let you know what percentage of the energy that is converted is wasted as heat. The less wasteful your supply, the quieter the system and the cheaper it will be to run over time.
What is the main point? A power supply is really just an insurance policy for all your pricey gear. Slightly oversize it to prevent temporary failure and voltage sag. Don’t undersize it and risk losing power when things get hairy, that could destroy data and equipment. You should of oversized it to be safe. You want something with enough cushion to absorb those spikes while not buying more than you need. Plug in the real-world part list, factor in all the mayhem of today’s power delivery, and select a unit that will stabilize your rig. Quiet fans and bright lights mean you dialed in the numbers properly.