📺 Throw Distance Calculator
Match projector throw ratio, screen size, and lens offset before you mount the unit or lock in the seating plan.
📋Preset setups
🔧Calculator inputs
📷Projector spec grid
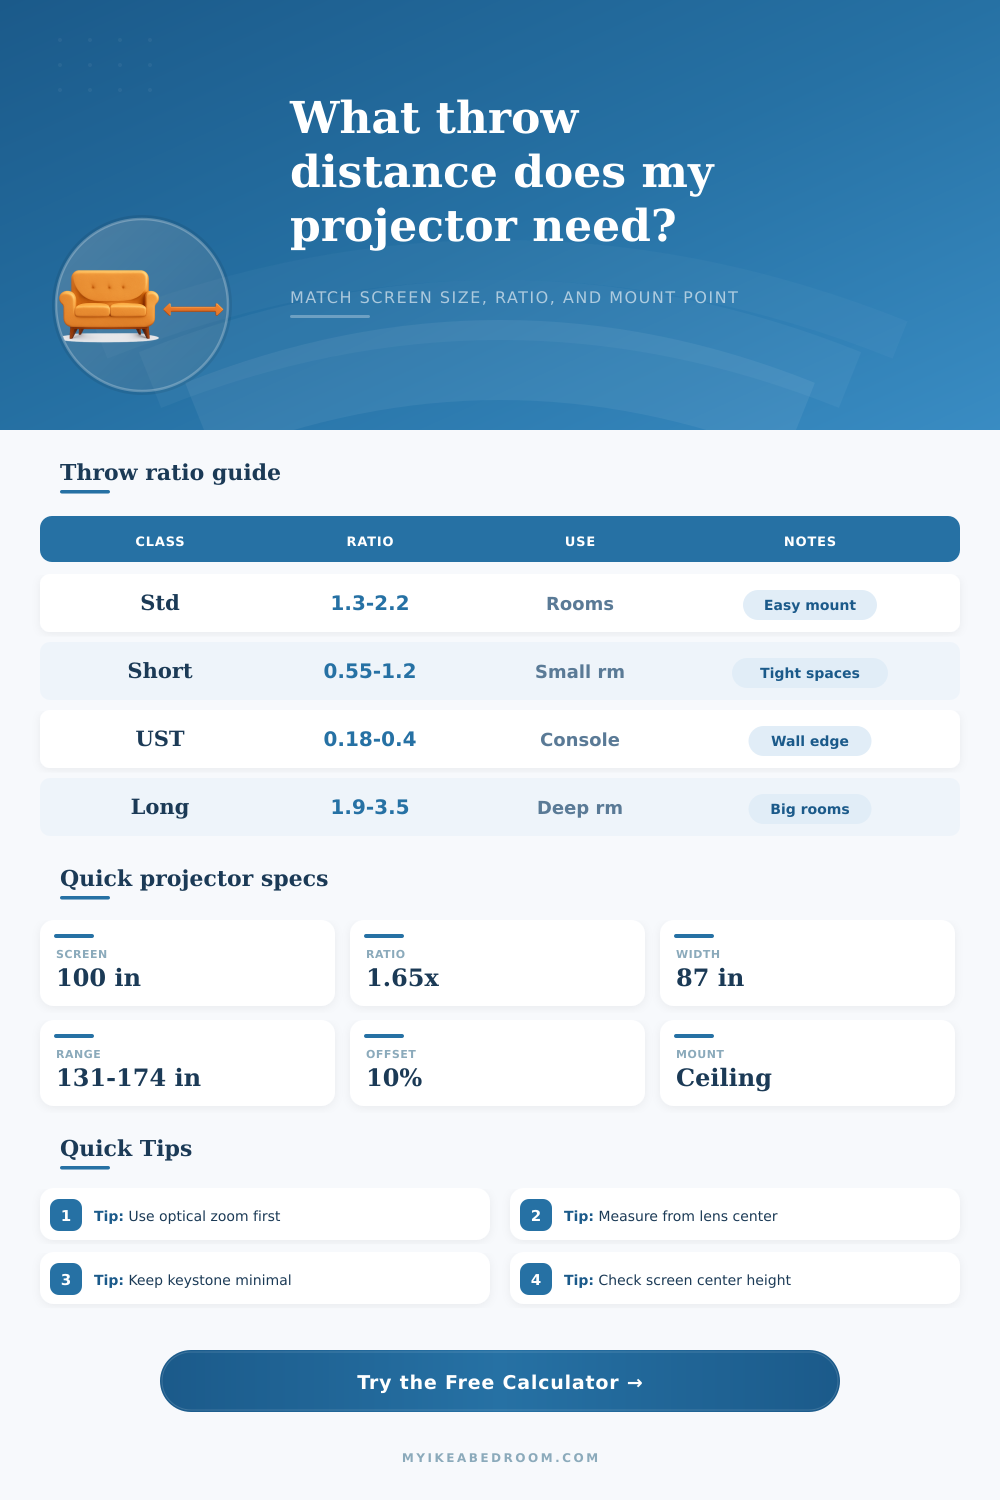
📊Reference tables
💡Practical tips
📈Calculation results
Projector throw distance is a measurement of the distance between the projector lens and the screen. Knowing the throw distance for a projector is essential to ensure that the projector’s image will evenly cover the screen from edge to edge. If the projector throw distance arent calculated correctly, then the projector image may either be too small to fill the screen or may be cropped on the edges of the screen.
Projectors has different ratios of the distance that the projector needs to be from the screen in order to properly display the image. Standard throw projectors need to be placed between 1.5 and 2 times the width of the screen. Short throw projectors are made for small space and can display the screen from a distance that is less than the width of the screen.
How to Measure and Place a Projector
Ultra short throw projectors are made to be placed very closely to the screen, often only inches away from the screen. Long throw projectors require alot of space to display the screen properly because they must be placed a significant distance from the screen. The projector must match the throw ratio to the space in the room where the projector will be placed otherwise there will be distortions in the proyected image.
Lens offset is the measurement of where the projector lens is in comparison to where the image is projected. Most projectors dont project an image from the center of the lens. Many projectors has an offset that places the image slightly above the projector lens.
A ceiling mount use the lens offset to even out the image so it does not hit the ceiling. A table mount uses the lens offset to even out the image so that it rests properly on the wall when the projector is resting on a shelf. If you dont account for the lens offset when positioning the projector, digital image corrections will have to be made.
Digital corrections may result in a less sharp projector image than if you had taken the lens offset into consideration when positioning the projector. Aspect ratio is the relationship between the width and the height of the proyected image. A projector with a 16:9 aspect ratio will display a widescreen image and is often used for movies.
A 4:3 aspect ratio will produce a taller image and is often used for older presentations. A 21:9 aspect ratio produces an ultra wide screen and is often used for cinematic images. A 100-inch diagonal screen with a 16:9 aspect ratio will be 87 inches in width.
However, the same size screen with a 4:3 aspect ratio will be less in width. In order to ensure that the projected image properly fits on the wall, the width of the screen should be used when measuring the projector distance from the screen. Zoom range allow a projector to be positioned closer or farther from the screen after the projector has been mounted to the screen.
The projector zoom range can be used to find the sweet spot in the projector where the image will be the brightest and the clearest. In calculating the projector distance from the screen, you should use the width of the screen rather than the diagonal measurements of the screen size. Projectors are affected by multiple environmental factors.
One of the factor is ambient light. If the room in which the projector will be placed has alot of ambient light, then the projector may have to be brighter than one that is placed in a darker area in the room. Another environmental factor is how much light reflects off the walls in the projector area.
Using darker paint on the walls will help the projector to maintain the brightness of its image. The viewing angle of the projector can also have an impact on the image as it will impact the way in which the audience views the colors. Finally, the distance from which the image should be measured will impact the projector image.
The distance must be measured from the center of the projector lens, not the front of the projector. Otherwise, the measurements will be inaccurate. Projectors also come with a variety of presets.
Presets are settings that can be used to set the projector to settings for common room types. For example, one preset can be set for living rooms and the other for bedrooms. Living rooms may use the standard throw projector and the 16:9 aspect ratio.
Bedrooms may use the short throw projector and the table mount preset. Another essential function for those purchasing projector mounts is the use of output data to determine whether the projector will work in the designated space. Output data will display the area of the screen in square feet, the zoom span of the projector, and the height of the top edge of the screen.
If the output data for a projector displays positive clearance, the projector will fit in the area. However, if the output data displays negative clearance, it means that the projector is too low for the available space. Digital keystone correction is one of the features that should of been avoided with a projector.
This feature can even out a projector whose lens is not even with the screen. However, digital keystone can also make the projector image less bright and less sharp than it would otherwise appear. To avoid this issue, it is best to use optical zoom or to physically position the projector to even out the lens to the screen.
The surface on which the projector will be displayed should also be flat and matte. A flat and matte surface will even out the projector image because the light will not scatter off the screen. If these steps are followed in positioning a projector, the projector image will even out and be sharp on the screen.