Pipe Insulation Length Calculator
Estimate insulation sleeve length for exposed home pipe runs, including parallel hot and cold lines, fittings, stock piece count, leftover length, outer wrap area, and seam tape for closets, basements, bathrooms, garages, and utility rooms.
Imperial mode uses feet for measured pipe length and stock pieces. Pipe diameter and insulation wall thickness stay in inches because sleeve sizes are usually sold that way.
Choose a realistic home pipe-insulation run, then adjust length, diameter, sleeve material, fitting count, and waste allowance for your measured project.
Pipe insulation estimate
Typical pipe insulation materials vary by thermal conductivity, flexibility, moisture tolerance, and stock form. Lower k-value means stronger resistance for the same thickness.
Polyethylene foam
Best fit: short hot or cold domestic supply lines.
Form: flexible pre-slit sleeve, commonly 3 ft or 6 ft long.
Calculator effect: easy cuts, typical 10 percent waste unless the run is very straight.
Elastomeric rubber
Best fit: condensation-prone cold water, AC, and refrigeration-style runs.
Form: closed-cell tube or sheet wrap with sealed seams.
Calculator effect: tape length matters because vapor-tight seams depend on continuous closure.
Fiberglass section
Best fit: long hot-water and hydronic runs in basements or utility rooms.
Form: rigid hinged section with jacket lap and butt strips.
Calculator effect: jacket area and butt-joint rings are useful takeoff checks.
High-performance wrap
Best fit: tight clearances, valves, bends, crowded manifolds, and small cabinets.
Form: thin wrap strip or rigid low-k section.
Calculator effect: fitting count can dominate because wrap overlaps at irregular shapes.
| Pipe description | Typical outside diameter | Closest sleeve ID | Common home location |
|---|---|---|---|
| 3/8 in fixture supply tube | 0.375 in / 9.5 mm | 3/8 in | Under sinks and toilet supplies |
| 1/2 in nominal copper, PEX, or CPVC | About 0.625 in / 15.9 mm | 5/8 in or 1/2 in labeled CTS sleeve | Bathroom, kitchen, and laundry branches |
| 3/4 in nominal copper, PEX, or CPVC | About 0.875 in / 22.2 mm | 7/8 in or 3/4 in labeled CTS sleeve | Water heater, basement, and trunk branches |
| 1 in nominal copper, PEX, or CPVC | About 1.125 in / 28.6 mm | 1-1/8 in or 1 in labeled CTS sleeve | Main hot-water and larger cold-water lines |
| 1-1/4 in nominal pipe | About 1.375 in / 34.9 mm | 1-3/8 in section | Hydronic and mechanical-room piping |
| 2 in nominal drain or condensate line | About 2.125 in / 54.0 mm | 2-1/8 in section or wrap | Condensate, drain, and larger utility runs |
| Stock format | Length per piece | Calculator conversion | Best planning use |
|---|---|---|---|
| Short pre-slit sleeve | 3 ft | 0.914 m | Cabinets, vanity tails, and small repairs |
| Long pre-slit sleeve | 6 ft | 1.829 m | Garages, basements, and water-heater lines |
| Metric pipe section | 1 m | 3.281 ft | Precise metric takeoffs and short appliance runs |
| Long metric section | 2 m | 6.562 ft | Continuous joist-bay and mechanical-room runs |
| Flexible roll or wrap | Custom cut | Use roll length as piece length | Irregular fittings, coils, bends, and tight clearances |
| Use case | Typical wall thickness | Primary purpose | Planning note |
|---|---|---|---|
| Interior hot-water branch | 3/8 in to 1/2 in | Reduce standby heat loss | Use measured pipe length times each hot run. |
| Cold pipe in humid cabinet | 1/2 in to 3/4 in | Limit condensation | Seal seams and fittings continuously. |
| Garage or crawlspace line | 3/4 in to 1 in | Improve freeze resistance | Add more waste for cramped cuts and supports. |
| Hydronic or high-temperature run | 1 in to 1-1/2 in | Hold supply temperature | Rigid sections often need jacket and butt strips. |
| AC condensate or drain | 3/8 in to 1/2 in | Control sweating and drips | Elastomeric seams should be vapor-tight. |
| Insulated outside diameter | Allowance per fitting | Why it is added | Example fitting |
|---|---|---|---|
| Under 1-1/2 in | About 0.45 ft | Small miter cuts plus collar trimming | Under-sink elbow or stop valve |
| 1-1/2 in to 2-1/4 in | About 0.55 ft | Extra wrap at bends and pipe clips | Water heater elbow or tee |
| 2-1/4 in to 3 in | About 0.70 ft | Wider insulation produces larger miter offcuts | Garage branch tee or hydronic bend |
| Over 3 in | About 0.90 ft | Large collars, jacket laps, and irregular cuts | Large hydronic or condensate section |
| Project | Measured pipe | Typical fittings | Planning result |
|---|---|---|---|
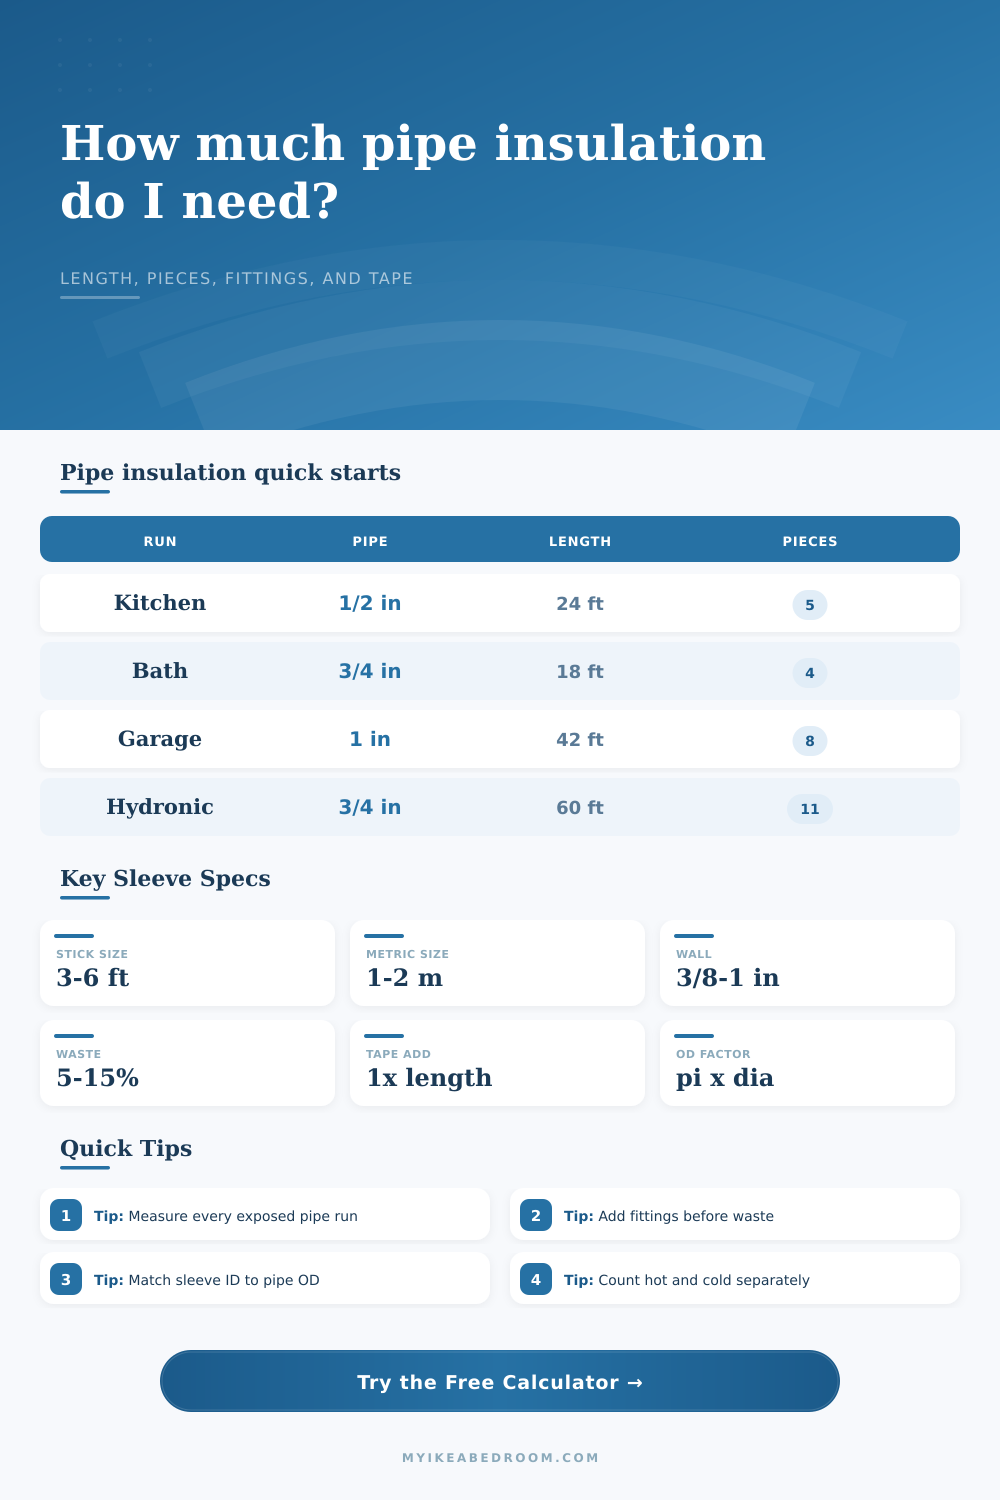
| Kitchen sink hot and cold | 12 ft x 2 runs | 4 stops and elbows | About 5 pieces at 6 ft |
| Water heater hot takeoff | 18 ft x 1 run | 5 bends and valves | About 4 pieces at 6 ft |
| Garage cold-water wall | 42 ft x 1 run | 8 clips, tees, valves | About 8 pieces at 6 ft |
| Hydronic radiator loop | 30 ft x 2 runs | 10 bends and valves | About 11 pieces at 6 ft |
Separate straight length from fittings. Measure each exposed pipe centerline first, multiply by matching parallel runs, then allow the fitting count to add miter and collar allowance before the waste buffer is applied.
Use outside diameter for wrap checks. The sleeve inside diameter fits the pipe, but tape rings and jacket area follow the finished outside diameter: pipe OD plus twice the insulation wall thickness.
Pipe insulation is to most people what roll of tape is to most homeowners: Measure once, cut one strip, and pray it’s long enough. More often than not, it isn’t. In truth, insulating plumbing are less about length than it is about dealing with interruptions. Each time there’s a support bracket or an elbow or a valve or anything else interrupting a straight shot, you have to contend with a messy cut that yields scraps.
You’ll never know how much wastage will be involved until you allow for a bit of extra room, which means there’s a place for a specialized tool here. It is not because you get perfect accuracy, but so you don’t find yourself purchasing three feet worth of material when you actualy need six.
How to Measure Pipe Insulation Correctly
Always measure the actual exposed run on centerline as your starting point. Meaning, don’t measure the cabinet space or the wall. Measure the actual pipe. Since most plumbing has parallel hot and cold lines (under most vanities/sinks), you’ll need to multiply that by two before any additional steps.
This is where a dedicated tool becomes useful. You just plug in how far it is and choose the number of runs. The calculator do the rest for you. Seems like common sense, right? Yet so many folks forget to factor in the second line or the return trip at all, leading to middle-of-job shortages.
Next, there’s material selection, and this has far greater significance than most people know. Flexible polyethylene is inexpensive and can fits around objects like valves without being removed from the cabinet. That is good if that is what you have. Closed cell elastomeric rubbers do better in high humidity, as their nature is to resist moisture intrusion. That means they don’t get saturated and lose their thermal value.
Rigid fiberglass pieces must be jacketed, which changes how you calculate the surface area for applying tape or vapor barriers. All of this is why the tool accounts for such decisions: a rigid piece next to a flexible sleeve will act different at the joint. One slides right on; one needs to be taped and spliced.
That’s because fittings are where the majority of estimates goes wrong. An elbow isn’t as simple as a straight pipe; you can’t just wrap a straight tube around a bend. You might need miter cuts or special collar-like pieces that use more material. Either way, both eat up additional material. And the calculator has a built-in allowance for each fitting you input. It knows that waste increases with any type of interruption.
So if you’re navigating a crowded crawl space with lots of clamps, elbows and tees, increasing your wastage by ten to twenty percent makes sense. This is especially true when you factor in trying to cut precisely while you lie there in the dark.
It gets trickier when considering thickness. Although many people obsess about this part of the equation, it’s really not a big deal. If you’re insulating an unconditioned space (e.g., crawlspace, garage) you want more mass because you don’t want it to freeze. Usually that pushes you into the three-quarter- or full-inch range.
The tool accounts for how increased wall thickness expands the outer diameter. That makes surface area larger, which requires more tape to seal it up. So while your bigger-wall insulation seems super-impressive on paper, it also require more tape. And those bigger walls create larger joints that require extra care to get sealed effectively.
The other variable that catches people off guard is the length of the stock. Pre-slitted sleeves are available in lengths of either 3-feet or 6-feet. Metric sections might arrive in one- or two-meter cuts. Depending on what the store has stocked, this informs your cutting strategy.
The more long pieces you purchase the fewer joints you need to seal. Not only is it quicker but also better thermaly. Based off the stock size you choose, the calculator rounds up to complete stock pieces. This way when you leave, you’ll have sufficient material to get the job done without needing to return because you’re short by a foot.
In the end, then, insulating your pipes isn’t difficult. It takes patience. Measure well; plan for each turn and kink; select based off climate conditions; cut accordingly. Let the tool do its part: take away the math. Instead let yourself concentrate on the actual labor: measuring and cutting. If done correctly, the pipe will remain warm through the winter and cool during the summer. That’s about as much as anybody can ask of it.
Remember, though: don’t measure the surrounding wall (measure the pipe).