Picture Molding Calculator
Plan a bedroom accent wall or full-room wall panel layout from wall size, panel grid, margins, spacing, molding face width, stock length, waste, adhesive coverage, and nail spacing.
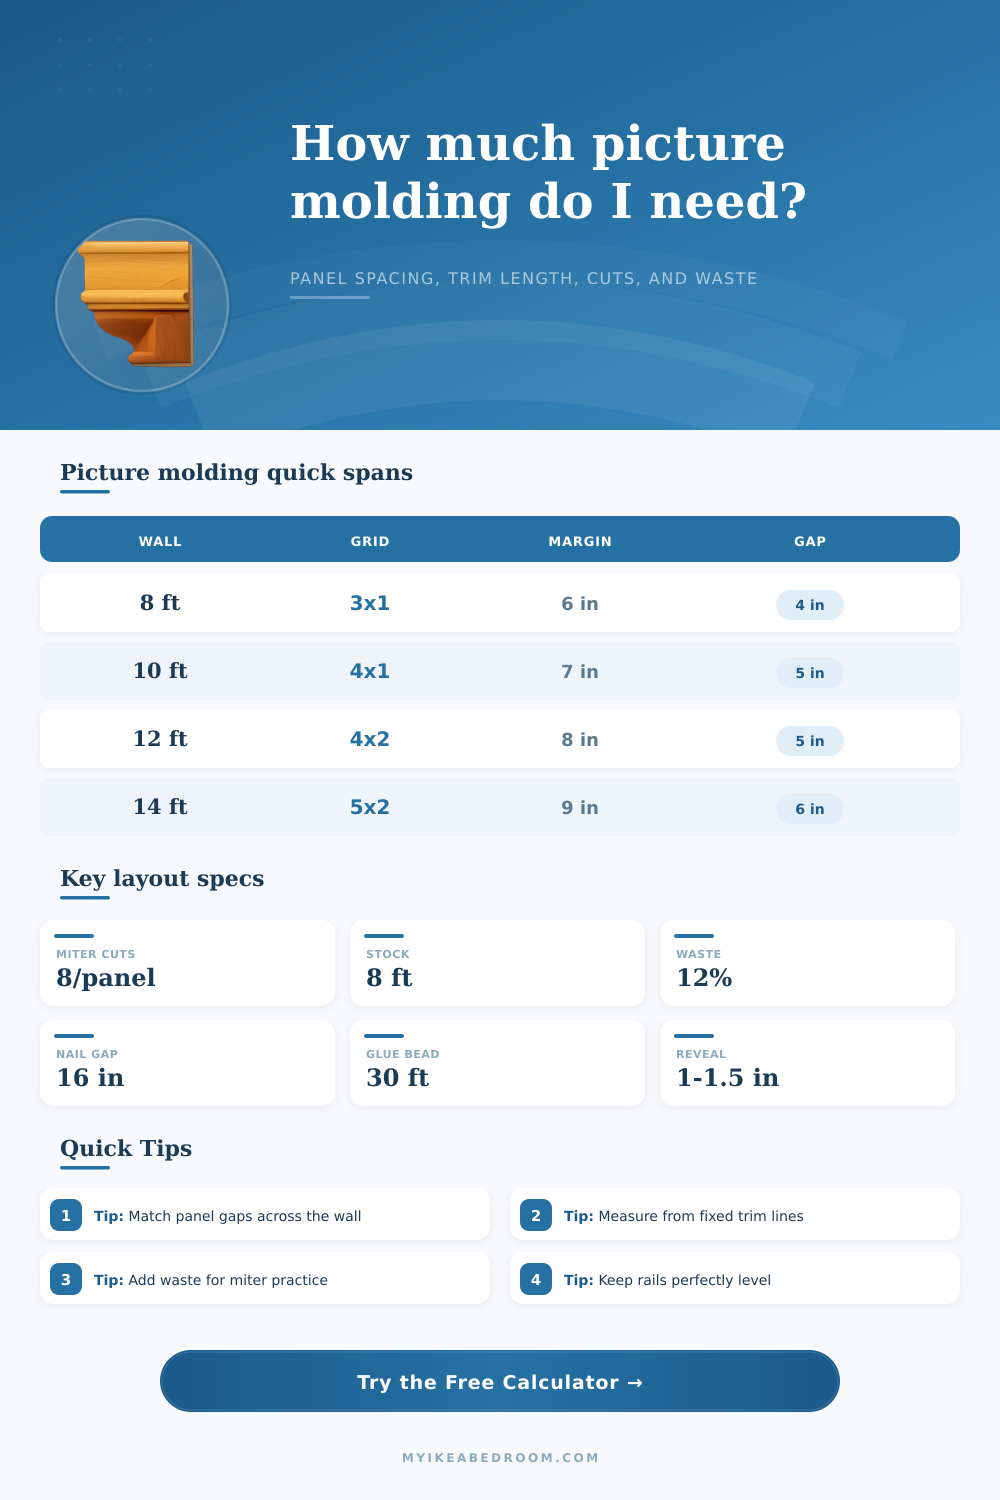
Choose a common wall panel layout, then fine tune the margin, gap, trim width, and stock length for your room.
| Wall span | Common grid | Side margin range | Gap range |
|---|---|---|---|
| 72 to 96 in wall | 2 or 3 columns by 1 row | 5 to 7 in from side trim | 3 to 5 in between frames |
| 97 to 120 in wall | 3 columns by 1 row | 6 to 8 in from side trim | 4 to 6 in between frames |
| 121 to 156 in wall | 3 or 4 columns by 1 row | 7 to 10 in from side trim | 5 to 7 in between frames |
| 157 to 192 in wall | 4 or 5 columns by 1 row | 8 to 12 in from side trim | 5 to 8 in between frames |
| Tall accent wall | 3 to 5 columns by 2 rows | 7 to 10 in at both sides | 5 to 7 in vertical and horizontal |
| Stock length | Best use | Practical limit | Planning note |
|---|---|---|---|
| 8 ft stick | Small bedrooms, apartments, short rails | 96 in before saw kerf | Easy to transport and commonly stocked. |
| 10 ft stick | Wide frames with fewer rail joints | 120 in before saw kerf | Good middle choice for queen or king bed walls. |
| 12 ft stick | Long horizontal rails and full walls | 144 in before saw kerf | Reduces offcuts when panel widths are large. |
| 16 ft stick | Long runs and full-room paneling | 192 in before saw kerf | Needs careful transport and storage support. |
| Molding face | Best room scale | Inner opening change | Design note |
|---|---|---|---|
| 3/4 in to 1 in | Small rooms, narrow panels, rental-friendly walls | Subtract 1 1/2 to 2 in | Reads light and quiet around furniture. |
| 1 1/8 in to 1 3/8 in | Most bedroom accent walls | Subtract 2 1/4 to 2 3/4 in | Balanced for bedside tables, dressers, and headboards. |
| 1 1/2 in to 1 3/4 in | Tall walls and larger rooms | Subtract 3 to 3 1/2 in | Creates a more architectural frame line. |
| 2 in and wider | Formal rooms or oversized panels | Subtract 4 in or more | Check that the clear opening still feels generous. |
| Project | Sample wall | Layout | Likely trim length before waste |
|---|---|---|---|
| Small bedroom headboard wall | 96 in by 84 in | 2 columns by 1 row | About 42 to 48 linear ft |
| Queen bed accent wall | 120 in by 96 in | 3 columns by 1 row | About 58 to 66 linear ft |
| King bed accent wall | 144 in by 96 in | 4 columns by 1 row | About 78 to 88 linear ft |
| Bedroom office backdrop | 132 in by 96 in | 3 columns by 2 rows | About 110 to 125 linear ft |
| Long hallway wall | 180 in by 84 in | 5 columns by 1 row | About 95 to 110 linear ft |
Best for: headboard walls and dresser walls.
Produces tall rectangles with fewer miters and a calm bedroom rhythm.
Best for: tall walls and office backdrops.
Uses more trim but fills height without making panels too stretched.
Best for: hallways and closet returns.
Repeating slim frames can keep long walls from feeling empty.
Best for: beds, benches, and large art.
Fewer large rectangles reduce visual noise behind furniture.
Layout tip: Keep the same visible gap around every frame whenever possible. If outlets or switches interrupt a panel, adjust the entire grid instead of trimming only one rectangle.
Cutting tip: Label rails and stiles by panel before cutting. A stop block on the miter saw keeps repeated pieces consistent across the full wall.
Picture moldings is used to make a bedroom wall appear finished. Picture molding works by add trim to a flat surface. Before you can begin to cut picture molding pieces, you must first determine how the pieces will fit together to the wall.
If you cut the molding incorrect, the pieces wont fit the wall. A person may have many question regarding the measurements of the wall prior to purchasing the molding. For instance, questions may include the width of each panel and the space between each panel.
How to Use a Picture Molding Calculator
Additionally, another question that a person may have is how many piece of molding will be needed after making forty-five degree cuts to each piece. A molding calculator is a helpful tool in determine these measurements. To use a molding calculator, you will enter the dimensions of the room into the calculator.
The width and height of the wall will determine the boundary of the molding. You will choose the number of rectangle that you want to divide your wall into with the number of columns and rows of rectangles that you want in your completed picture molding installation. Additionally, the amount of space that you want between the rectangles and the edges of the room will be chosen.
The width of the molding panels will be entered into the calculator as well. You will enter the length of the molding panels that are available in stores into the calculator, as many molding panels comes in eight, ten, or twelve foot sticks. Finally, you will enter a percentage for waste into the calculator; this accounts for molding that may be cut while testing the molding or the wall, or molding that may get damaged in any way while performing the installation.
This waste will be used to determine how many tubes of adhesive will be needed to complete the installation. The calculator will output various measurements that will have an impact upon your budget and your schedule for completing the project. The total length of the molding including waste will tell you how much molding you will have to carry home; the number of sticks will determine how many trip you will have to make to the lumberyard to purchase the molding.
The fastener count and the adhesive estimate will allow you to ensure that you do not run out of supply while installing the molding. The inner opening size will allow you to ensure that the space in the bedroom will appear generous and comfortable with the molding installed. The rail and stile counts will allow you to determine how many horizontal and vertical piece of molding will need to be cut with your saw prior to installation.
Each panel portion will impact the appearance of the molding once installed. For instance, using a single row of tall rectangle may be used for placing behind a bed; however, two rows of rectangles may be used in areas where there is a dresser because using two rows will prevent the panels from looking stretched. Additionally, narrow bays can be used in areas like hallways that are of a long distance; however, wide bays may be better suited for areas behind a dresser because fewer, larger panels will be used to cover that area.
These type of layouts can be tested in the calculator prior to cutting any molding. The width of the molding will change the visual appearance of the molding. For instance, narrow molding can be one inch or less in width, while wide molding will be one and a half inch or more in width.
Narrow molding may dissapear on a large wall, but may be useful in a small bedroom. Wide molding is useful for making an architectural line in the bedroom, but takes away from the amount of clear space within each panel. Tables of different face widths and the types of rooms that are suitable for each face width can help you to determine what type of molding will be best for the bedroom.
Waste is an element of the installation that will occur; however, it is accounted for in the molding calculator. For instance, you may use a higher percentage for waste if you are cutting molding to match a pattern in the room, or if you are cutting molding to use in an existing structure. In these cases, it is likely that some of the molding will be damaged.
In a simple room where you are installing molding to look nicely and even, the waste percentage can be lower. Using a percentage for waste will ensure that you do not run out of molding during installation. Your fastening strategy will impact the way in which the molding is installed in the room.
For instance, the closer together the nails are spaced, the more likely the molding will remain flat against a wall with drywall that isnt smooth. Additionally, the calculator can determine the number of tubes of adhesive that will be used; this will help with the number of tubes you purchase. Additionally, another decision that can be made is whether you will use both adhesive and nails for the installation, or if you will only use adhesive.
Another decision is if you will only use nails; this will impact the time necessary for installation. Running the number for the molding prior to cutting it will allow you to make adjustments to the molding based off the calculations that were made with the molding calculator. For instance, if the calculations indicate that each panel of molding is too tall for the wall, you can adjust the number of rows of panels or the gap between each row prior to cutting the molding.
Additionally, if the calculations indicate that the length of molding that you purchase will result in many offcuts of molding, you can adjust the length of molding sticks that you purchase. These types of adjustments will result in a cleaner installation of the molding, as well as result in less wasted molding on the floor of the bedroom. Picture molding will be successful in the bedroom if the calculations are correct and the mathematical figure match the dimensions of the room.
The molding calculator accounts for the mathematics for you, so that you can focus upon the appearance of each panel. The appearance of each panel will be the determining factor in whether or not you’ll like the chosen picture molding installation for your bedroom in the future.