Pantry Shelf Space Calculator
Estimate pantry shelf area, usable front-access space, container capacity, vertical clearance, reserved zones, and distributed storage load for cabinet, reach-in, walk-in, galley, L-shape, and U-shape pantry layouts.
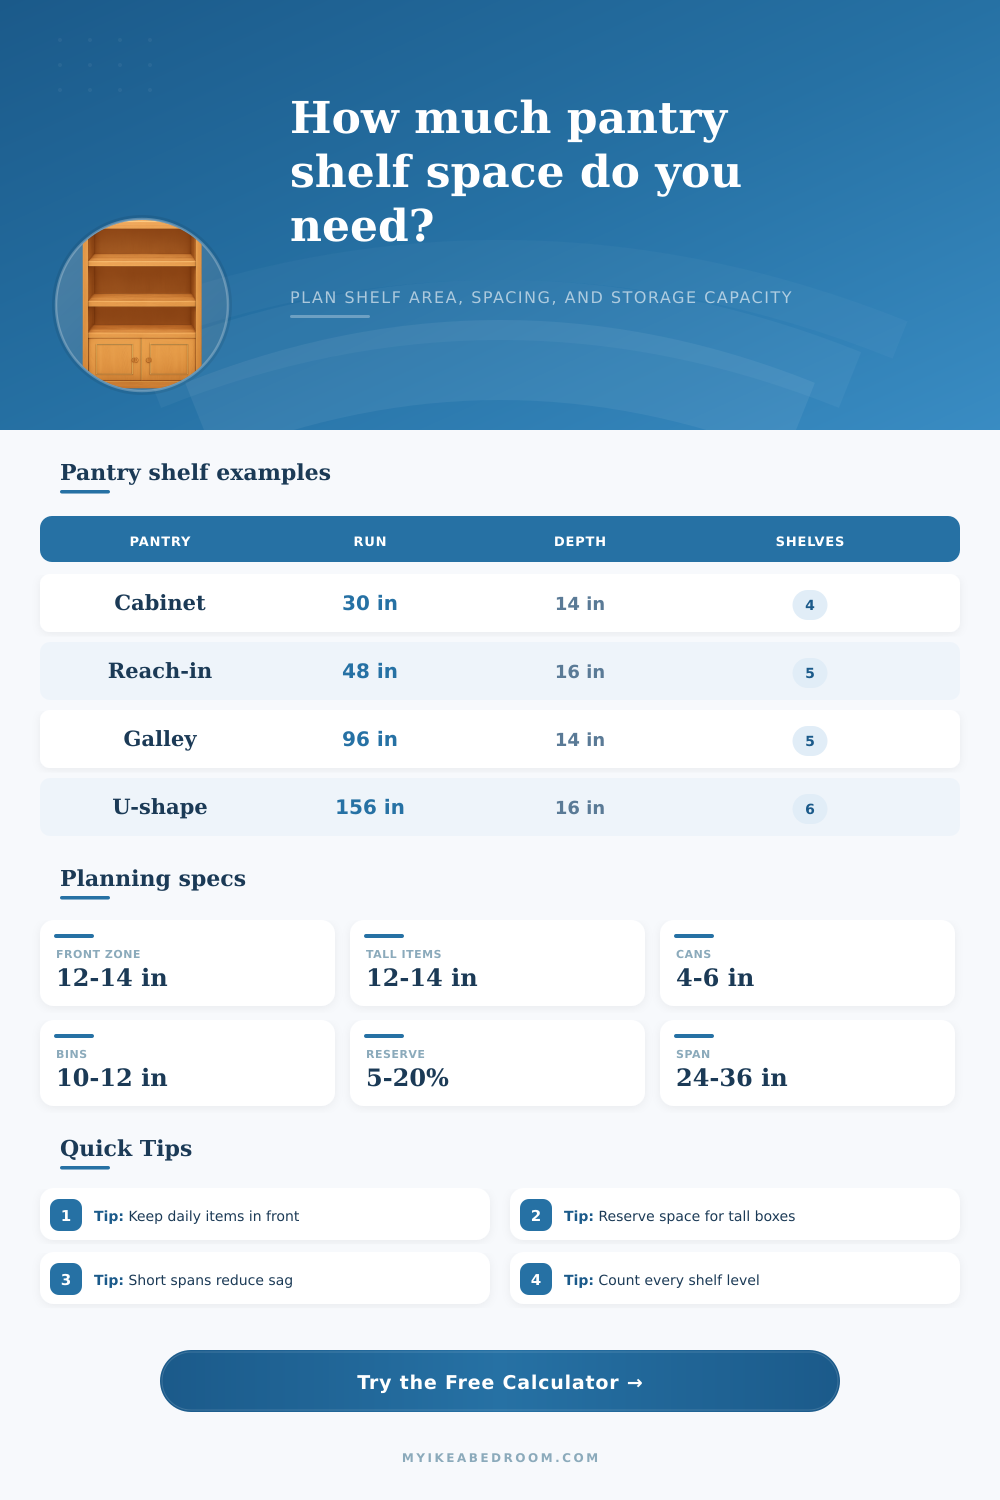
Choose a realistic pantry setup, then fine tune the shelf run, depth, shelf count, spacing, container profile, and support span.
| Pantry setup | Typical shelf run | Depth range | Useful shelf levels |
|---|---|---|---|
| Narrow cabinet pantry | 18 to 30 in per level | 12 to 15 in | 4 to 5 levels for jars, cans, and small boxes |
| Reach-in closet pantry | 36 to 60 in per level | 14 to 18 in | 5 to 6 levels with one taller zone |
| Walk-in single wall | 60 to 96 in per level | 12 to 16 in | 5 to 7 levels depending on ceiling and bins |
| Galley or U-shape pantry | 96 to 180 in per level | 10 to 16 in | 5 to 6 levels so aisles stay usable |
| Shelf depth | Best pantry use | Front access area per 48 in shelf | Planning note |
|---|---|---|---|
| 10 to 12 in | Cans, spices, narrow jars, packets | 3.3 to 4.0 sq ft | Very easy to scan; less room for bins. |
| 14 in | General pantry shelves and baskets | 4.7 sq ft | Strong everyday depth for labels and containers. |
| 16 to 18 in | Bulk goods, cereal boxes, small appliances | 5.3 sq ft front zone; rear becomes overflow | Use bins so items do not disappear at the back. |
| 20 to 24 in | Deep cabinet or appliance storage | 5.3 sq ft front zone; rear is secondary | Plan pull-outs or large bins for the rear half. |
| Storage profile | Average footprint | Target clearance | Typical load behavior |
|---|---|---|---|
| Stacked cans and jars | 16 sq in per item | 5 to 6 in | Dense load; shorten bracket spans. |
| Mixed pantry goods | 24 sq in per item | 8 to 10 in | Balanced capacity for cans, jars, and boxes. |
| Tall cereal and oils | 32 sq in per item | 12 to 14 in | Needs at least one taller shelf zone. |
| Baskets and bulk bins | 60 to 96 sq in per bin | 10 to 14 in | Lower item count but better grouping. |
| Support style | Reference span | Planning strength | Best pantry match |
|---|---|---|---|
| Melamine board on pins | 24 in or less | Medium | Daily dry goods, cereal, snacks, light jars |
| Plywood on wall cleats | 24 to 32 in | Medium high | Mixed pantry shelves with cans and bins |
| Wire shelving with clips | 24 to 36 in | Light medium | Light baskets, packets, paper goods, overflow |
| Heavy brackets or rail standards | 16 to 32 in | High | Bulk containers, flour, water, and dense jars |
Front-zone tip: Treat the first 12 to 14 in of shelf depth as everyday pantry space. Anything behind it should be grouped in bins or kept as overflow so labels remain visible.
Spacing tip: Do not make every shelf the same height. Reserve one taller zone for cereal, oils, paper towels, or appliances, then use tighter shelves for cans and jars.
Pantry organization are the process of managing the usable space in each shelf in the pantry. Pantry organization isnt just about the total amount of food that a person purchases. A person may own many differents types of food.
However, the size of the food containers and the way that the person can reach for those food containers limit the amount of usable space on each shelf in the pantry. A person must account for the size of the food containers and the way that they can reach for those containers in order to create a function pantry. One of the tasks that a person must accomplish when organizing the pantry is matching each grocery item to each board in the pantry, making sure that each of the boards can hold the weight of the food in the pantry without sag.
How to Organize Your Pantry Shelves
The person created the calculator that calculates the mathematical equations for a person after they enter there specific data into the calculator. The person must enter data regarding the total shelf run, the depth of each shelf, the number of shelf levels that they will have in their pantry, and the type of items that they will be storing in their pantry. Each of these data elements are necessary to compute the number of items that a person can actualy store in their pantry.
For instance, the total shelf run and the depth of the shelves will determine how many items can be stored on each shelf. However, the person will have to subtract the depth of each shelf that will be needed to access the items to account for the items that will be stored on that shelf. One of the factors that a person must consider when organizing a pantry is the depth of the shelves.
For instance, 14-inch deep shelves are useful for those who would like to be able to keep the label of their stored food products visible while they are standing in their pantry, and because it is within the depth that an individual can easily reach for the items on the shelf. However, the 14-inch depth limit the number of shallow bins that can be placed on the shelf. Going deeper than 14 inches, such as to 18 or 20 inches will allow for deeper bins to be create for the stored items.
However, the back half of the shelf will likely be difficult for an individual to easy reach for their stored items. Thus, solutions to this problem may be to place the items into baskets or bins that can be placed into the shelf. The vertical spacing of the shelves also need to be considered.
Vertical spacing also follows some of the same logic as shelf depth. For instance, if all shelves are of equal heights, items such as tall bottle of oil or tall boxes of cereal will not be able to be fully stored on the shelf. However, short cans of stored items will take up all of the space above the other stored items of that same product.
The setting for the clearance of each shelf allows a person to decide how many shelf will be created to hold the tallest types of items that will be stored in the pantry. Each shelf can be measured for its average clearance for the items to determine if additional shelf will be created for items of certain heights. Another important element of organizing a pantry is the material that will be used to create the shelves in the pantry.
Different materials allow the shelves to hold different amount of weight. For instance, melamine boards can hold the weights of the cans that may be stored on the shelves. However, the melamine boards will begin to sag if the shelves are more of 36 inches or longer in length.
This calculation accounts for the amount of weight that can be placed on the shelves, given the type of material to be use for the shelves. Additionally, shorter spans to the shelves will reduce the amount of sagging of those shelves. There are other hidden factors of a pantry that the mathematical calculations cannot account for.
For instance, the location of the pipes behind the wall, doors that may open into the pantry, or the ceiling height will all potentially reduce the length of the pantry. Thus, the access buffer setting will allow a person to calculate the impact of these hidden feature on their pantry. However, the last test that a person performs with their pantry organization plan is to actually place a bin into the space to ensure that no handle will hit the trim of the shelves.
Another rule that a person can follow when organizing the pantry is to consider the front 12 to 14 inches of each shelf as prime real estate. Thus, the items that are placed into the pantry behind this 12 to 14 inch line should be placed into bins, or the items behind this line can be the overflow items for that shelf. By following this rule for each shelf, the individual who utilize the pantry will easily find the items that are used the most.
Additionally, the deeper portions of the shelves will be of more utility if they are used as overflow for the items in that pantry. By considering all of the factors mentioned, and by planning the shelves according to these suggestion, a person will have a pantry that matches the way in which they cook in the kitchen.