Miter Angle Calculator
Set a clean joinery angle for trim, picture frames, polygon shelves, mirror frames, baseboards, and return pieces with saw mode, kerf, reveal, stock width, and tolerance checks.
Choose a common cut, then fine-tune the corner angle, measurement side, kerf, stock width, and saw mode for your exact setup.
Cut list breakdown
| Regular shape | Number of sides | Included corner | Miter cut angle |
|---|---|---|---|
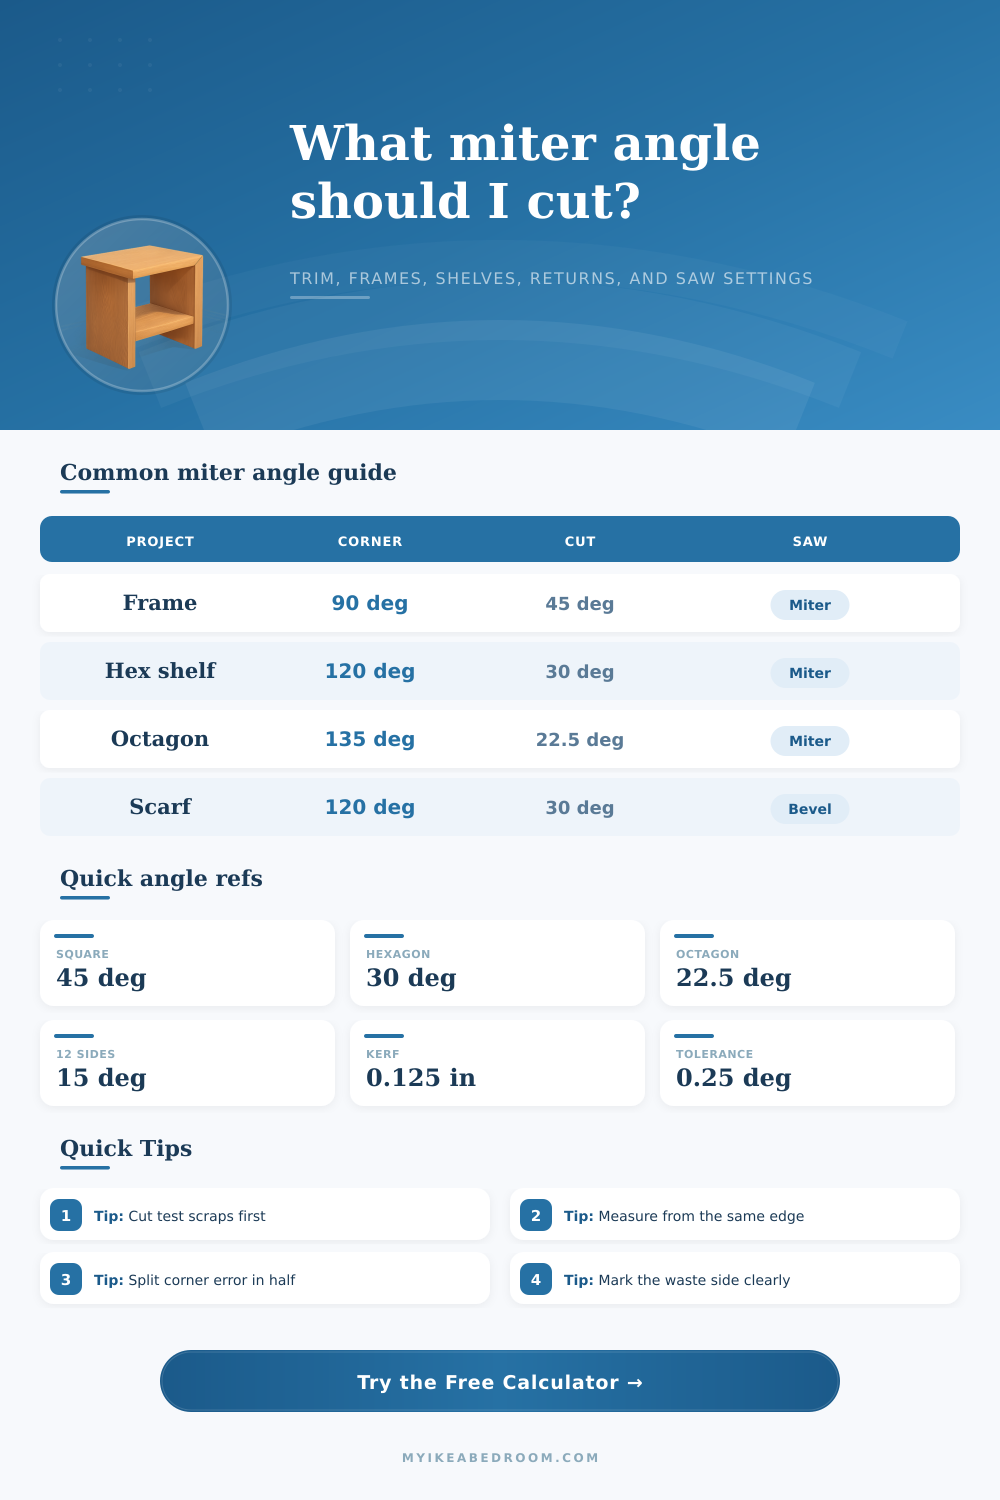
| Triangle tray or panel | 3 | 60° | 60° |
| Square picture frame | 4 | 90° | 45° |
| Pentagon tray | 5 | 108° | 36° |
| Hexagon shelf | 6 | 120° | 30° |
| Octagon mirror frame | 8 | 135° | 22.5° |
| 12-sided ring or medallion | 12 | 150° | 15° |
| Trim situation | Corner angle to enter | Common cut | Measurement side |
|---|---|---|---|
| Picture frame or cabinet face frame | 90° | 45° | Short point or inside opening |
| Baseboard outside corner | 90° nominal, measure actual wall | 45° adjusted | Long point often controls |
| Baseboard inside corner miter | 90° nominal, split the wall error | 45° adjusted | Short point often controls |
| Bay window return | Use the measured bay angle | Half the corner supplement | Centerline for repeatability |
| Long scarf joint | Use 120° for a 30° scarf | 30° to 45° | Mark the visible face |
| Saw mode | What the result means | Best use | Setup check |
|---|---|---|---|
| Miter saw table angle | Rotate the table from 0° | Frames, casing, baseboard flat | Fence face stays square to stock |
| Blade bevel / table saw tilt | Tilt blade from vertical | Wide panels, flat bevel cuts | Keep good face oriented consistently |
| Table saw miter gauge | Gauge angle from the slot direction | Small frame parts and sleds | Use a backer to reduce tearout |
| Crown flat, 38° spring | Compound miter and bevel pair | Most 52/38 crown returns | Confirm spring angle on scrap |
| Crown flat, 45° spring | Compound miter and bevel pair | Equal spring crown profiles | Mark ceiling and wall edges first |
| Allowance | Typical input | Effect on cut list | When to use |
|---|---|---|---|
| Thin-kerf blade | 0.094 in | Add about half per saved end | Finish saws and small trim |
| Standard kerf blade | 0.125 in | Add about half per saved end | Most shop cut lists |
| Small reveal | 0.063 to 0.125 in | Adds or subtracts from finished edge | Door casing and returns |
| Wide stock runout | Width x tan(cut) | Can exceed the board width at steep angles | Picture rails and shelf frames |
Equal miter
Best for: picture frames, shelf boxes, mirror frames, and square trim layouts.
Both workpieces get the same cut angle, so the finished corner is easy to check with a square or bevel gauge.
Scarf joint
Best for: extending trim when one board is not long enough.
A shallow angle increases glue area and hides the joint better along the sight line.
Inside trim
Best for: baseboard, casing, and wall trim where walls are rarely perfect.
Measure the real corner, split the error, and keep the short point reference consistent.
Compound crown
Best for: crown returns cut flat on the saw table.
The calculator converts the corner into a miter and bevel pair for common 38° and 45° spring profiles.
A miter cut is a cut made at an angle so that two piece of material can join together to form a corner. Miter cuts is often difficult to make because there is a chance that a gap will form between the two pieces of material that is to be joined together. This gap often forms due to the cut angle of the material not matching the actual angle of the corner that is to be formed.
In order to prevent this from happening, you must account for the width of the material, the side of the material that is being measured, and the amount of material that the saw blade will remove when cutting the miter cut. The angle of a miter cut is determined by the angle of the corner that is to be formed. You divide the angle of the corner by two to form two angles for the two pieces of the material that is to be joined together at the corner.
How to Make Accurate Miter Cuts
For instance, if the corner is 90 degrees, each piece of material will be cut at a 45-degree angle. If the corner is 120 degrees, each piece will be cut at a 30 degree angle. The same mathematical equation is performed for each corner because the angle of the miter is always half the angle of the corner.
The width of the material impacts the length of the miter cut. A wide piece of material will have a longer runout than a narrow piece of material. Runout is the distance from the short point of the miter cut to the long point of the cut.
It is necessary to decide whether the measurement for the cut is to the short point of the cut, the long point of the cut, or the centerline of the material. If any of these measurement are changed at any point in the project, the two pieces will not be able to fit together. The saw blade will remove a certain amount of material from each piece of the material that is being cut.
The amount of material the saw blade removes is referred to as the kerf. The kerf of a standard saw blade is 1/8 inch of material. You must account for this amount of material in the project so that the pieces will not end up too short.
Another measure that can be used is known as a reveal offset. The reveal offset introduces the concept of one edge of the material being set back from the finished face of the sawed material. Both the kerf of the saw blade and the reveal offset are important measurements that can impact the project.
They each impact the dimensions of the sawn material. The different modes on the saw will change how the angles of the tools are set. For instance, a miter saw table angle changes the angle of the fence of the saw in relation to the saw blade.
A table saw tilt changes the angle of the saw blade. If the type of saw that is being used can perform compound cuts, such as a miter saw with a saw blade that tilts both horizontally and vertically relative to the saw table, then the saw blade can be used to cut crown molding while the molding is lying flat on the saw table. Compound saw cuts allow a saw blade to be set at both a miter angle and a bevel angle at the same time.
Each mode that is used will impact the settings of the saw, and it is important for the saw settings to match the saw mode in use in order to accurately form the miter cut. Many corners in buildings are not formed with perfect right angles. The leaning of the walls in some buildings, or the settling of the corners in time after the buildings are constructed, often results in corners that have angles that are other than 90 degrees.
To determine the angle for the corner, it is necessary to measure the actual angle of the corner instead of the assumed 90-degree angle of the corner. After measuring the angle of the corner, divide the error by two to determine how many degree to adjust each piece of wood. Cut test scraps of wood to test the joint before cutting the final pieces of wood.
The same mathematical equations can be used for projects with polygons like octagons or twelve-sided rings. An octagon has eight sides and requires eight 22.5-degree miter cuts. A twelve-sided ring requires 15-degree miter cuts on each side of the ring.
You can calculate the angle for the miter cuts for each polygon by dividing 360 by the number of sides in the polygon. For irregular polygons, you must measure each corner of the polygon individually to determine the angle for each corner of the polygon. For projects that use scarf joints and return pieces, the mathematics for determining the miter cuts for each piece of wood is different.
Scarf joints are used to join two pieces of wood by increasing the area of the joint that will be glued together. Returns are used to join two pieces of wood together by turning a corner of the return piece towards the corner that is being joined. For both these joints, a consistent measurement side and a mark on the waste side of the wood piece are required.
The saw will remove the required amount of wood when using a consistent measurement side and a marked waste side of the wood piece. One of the best habits for accurately cutting miters is to test the corner of each joint using scraps of wood. Cutting two pieces of scrap wood to the calculated angle will allow the craftsman to test if the joint will fully connect.
If the scrap wood joint does not connect, the saw angle must be adjusted. For example, if the scrap wood joint has a one-degree open corner, the saw angle must be adjusted by half a degree for each piece of wood to be joined. Adjusting the saw by half of the angle error will ensure that the joint will connect with the proper amount of wood.
The width of the wood impacts how significant the error in the angle of the miter cuts will be for each joint. The wider the piece of wood, the more significantly the error for any miscut angle of the miter saw. Thin pieces of wood will allow for more forgiveness in the angle of the saw.
Thin pieces of wood will show any gap between sawn pieces more easy. However, using the same measurement for each piece of wood and using the same saw mode for each piece will minimize the variables that may lead to errors in the saw. To complete a project with miter cuts successfully, the craftsman must follow the process described above.
Measure the corner of the project. Choose one measurement side for all pieces of wood. Cut test pieces of wood of the required dimensions to check that the angles will connect.
Finally, adjust the saw for half of the angle error to ensure that the pieces will connect properly when the project is complete.