LED Strip Lighting Layout Calculator
Plan strip routes for bedroom furniture, cabinets, bookcases, toe-kicks, headboards, shelves, and cove runs by length, cut spacing, corner slack, zones, voltage, power feeds, and diffuser waste.
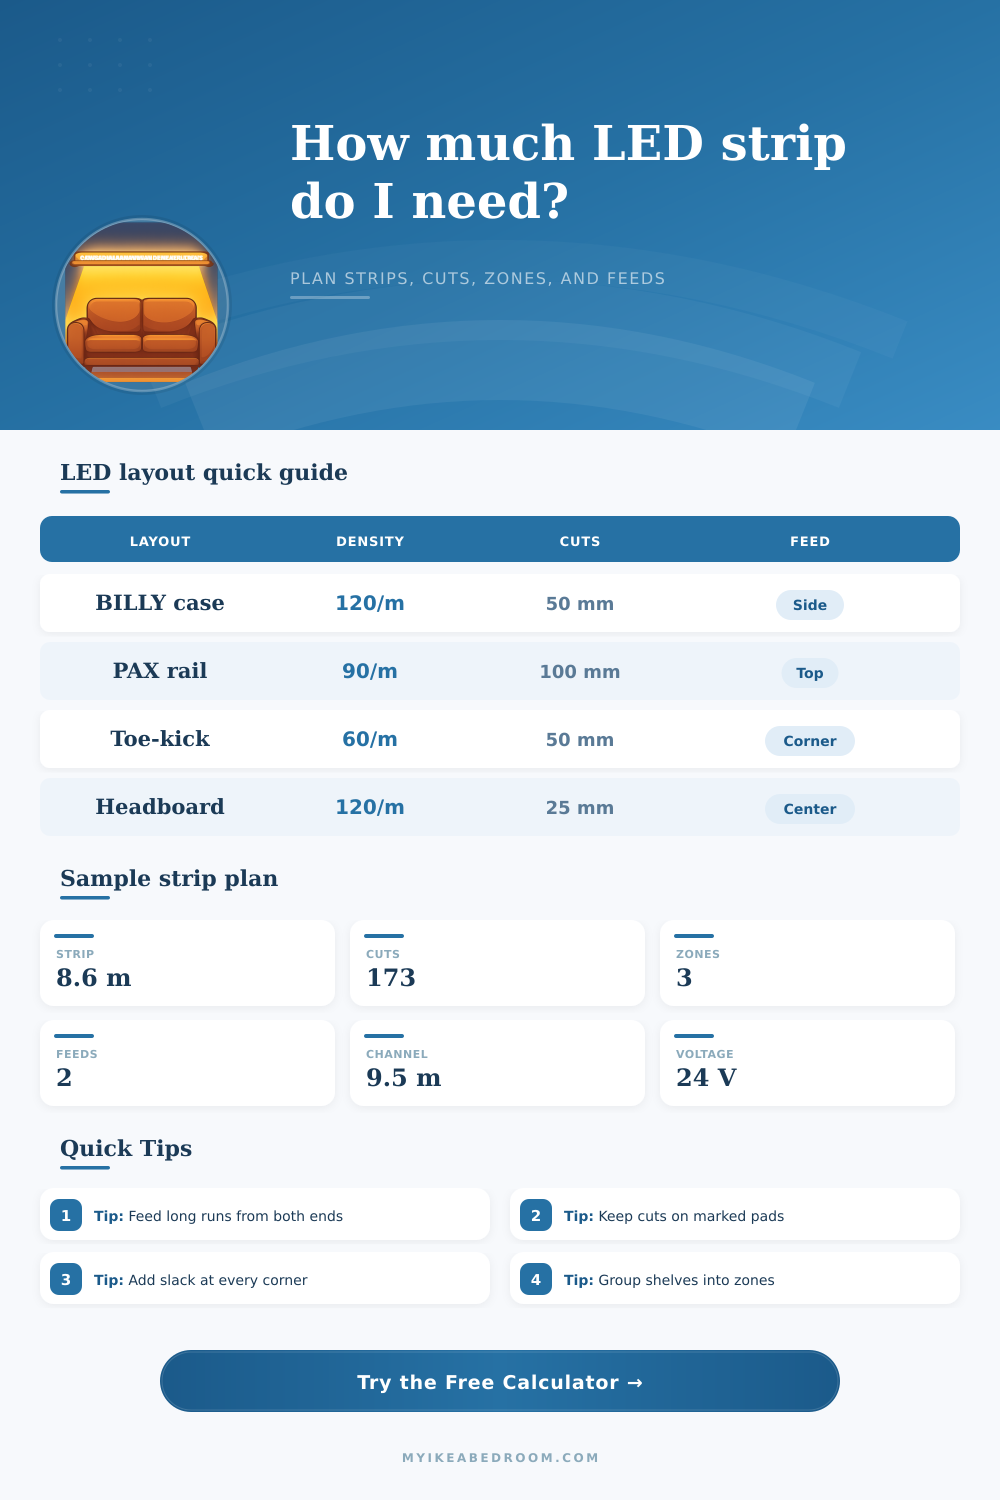
Load a common furniture or room lighting layout, then adjust dimensions, strip density, zones, and feed limits to match the exact route.
Detailed breakdown
LED strips contains electrical circuits that allow the strips to emit lights into the room. When installing LED strips, you must take note of the physics of an electrical circuit and the geometry of the furniture piece. Many people encounter voltage drop when they installs LED strips.
The reason for voltage drop is that every inch of the LED strip contain electricity resistance. To find the best way to manage the resistance of LED strips before cutting them, people can use an LED strip calculator. People must choose between using 12V LED strips or 24V LED strip.
How to Install LED Strips on Furniture
Using a 24V LED strip system is better for larger rooms since the 24V strip can go further down the room without dimming at the end of the strip. People must also understand the proper way to cut LED strips. LED strips have copper pads that allow people to cut the strip.
If people make a cut on an area other than these copper pad, that portion of the strip will be destroyed and will no longer emit light from that area. When cutting LED strips, people must ensure that the cut interval match the width of the furniture. Sometimes, the cut intervals for LED strips will not match the measurements of the furniture.
In such a scenario, people can use an LED strip calculator to round the number of LED strips needed to the nearest cut segment. Rounding people needs for LED strips to the nearest cut segment will ensure that there are no dark spot along the furniture. Another challenge for installing LED strips on furniture is installing them around corner.
People should not fold an LED strip at a right or ninety-degree angle since this will crease the internal circuitry of the strip. Snapping the internal circuit of an LED strip will destroy the strip. People can round the corner by create a soft loop with the strip or by soldering a jumper wire at the corner.
People should also add a few extra inch of LED strip for every corner that the LED strip must make turns around the furniture. By adding extra inches to LED strips for corners, the strip will remain flat on the furniture. If the strip is too tight around the corner, it will peel away from the adhesive on the strip.
If the strip peels from the furniture, the strip may sag in the middle of the furniture. For LED strips longer than a few meter, power injection is necessary to ensure that the strip maintains the same brightness from end to end. Many people will fail when they perform power injection.
People should not just plug the LED strip into one end of the strip. For long LED strips, people will need to perform power injection at multiple location. People can feed the power into both ends of the long strip or into the center of the strip.
Feeding power into multiple point of the LED strip will allow the strip to maintain even brightness along the strip. Power injection will require more wiring for the LED strip as well as a more complex power supply for the strip. However, power injection is the only proper way to avoid the dimming effect of the LED strips that are longer than a few meter.
Another factor that people must consider when installing LED strips on furniture is the density of the LEDs on the strip. The density of the LEDs impacts how the strip will look on the furniture. For furniture with lips or channels to contain the LED strips, the density of the LEDs can be lower.
For glass cabinets or clear diffusers for the LED strips, individual dots of light will be visible and may look cheaply. In this scenario, people will need to use LED strips with a higher density of LEDs per meter. The higher density of LEDs will increase the total wattage and amperage of the strip.
Thus, people must ensure their power supply can handle the higher wattage and amperage from the LED strips with a higher density of LEDs per meter. People can group their LED strips into zones when installing them on their furniture. The zones will allow people to have better control over their lighting designs.
People can split the lighting design into separate channel. Each separate channel can control the LED strips in a given zone. By grouping the LED strips into separate zones, people will have better control over the mood of the room.
People can also control the electrical load on each channel of LED strips by grouping the strips into separate zones. When installing the LED strips on the furniture, people should leave extra room to hide the power adapter for the LED strips. People can calculate the lengths of the LED strips, where to make the cuts, and where to perform power injection for the strips.
By doing so, people will have an even lighting installation from the first inch to the last inch of the LED strips installed on their furniture.