Graduated Drawer Calculator
Plan a stepped bedroom drawer stack from opening size, drawer count, reveal gaps, front-height graduation, slide clearances, box material, and usable interior volume.
Choose the closest dresser or wardrobe insert, then adjust the reveals, front progression, and box clearances to match the actual opening.
| Profile | Best use | Top feel | Bottom feel | Planning note |
|---|---|---|---|---|
| Equal fronts | Minimal wardrobes | Uniform | Uniform | Cleanest lines, less visual cue for storage type. |
| Gentle graduation | Bedroom dressers | Light | Moderate | Balanced storage without a heavy bottom stack. |
| Linear step | Classic chests | Clear step | Clear step | Easy to mark because each drawer grows consistently. |
| Deep lower curve | Blankets and sweaters | Small | Roomy | Pushes useful depth to the lowest drawers. |
| Condition | Between fronts | Top and bottom | Side check | Use when |
|---|---|---|---|---|
| Precision face frame | 1/16 in | 1/8 in | Square frame | New build with careful installation. |
| Standard bedroom cabinet | 1/8 in | 1/8 in | Even gaps | Most fitted drawer stacks. |
| Older or flexible frame | 3/16 in | 3/16 in | Shim slides | Existing furniture that is not perfectly square. |
| Inset with painted fronts | 3/16 in | 1/4 in | Check rub | More breathing room for finish thickness. |
| Usable box height | Good contents | Typical front | Organizer fit | Graduated role |
|---|---|---|---|---|
| 2.5-3.5 in | Jewelry, belts, watches | 4-5 in | Low trays | Top accessory drawer. |
| 4-5.5 in | Socks, underwear, tees | 5.5-7 in | Small dividers | Upper everyday drawer. |
| 6-7.5 in | Folded shirts and jeans | 7.5-9 in | Medium bins | Middle storage drawer. |
| 8-11 in | Sweaters, linens, blankets | 9.5-13 in | Deep bins | Lower capacity drawer. |
| Bank type | Opening size | Drawer count | Front plan | Slide depth |
|---|---|---|---|---|
| Narrow tower | 18 x 42 in | 5 | Small to deep | 16-18 in |
| Wide dresser | 30 x 44 in | 5 or 6 | Gentle step | 18-20 in |
| Wardrobe insert | 28 x 30 in | 4 | Equal lower stack | 18-20 in |
| Bed platform | 24 x 18 in | 2 or 3 | Deep fronts | 20-24 in |
Best for: calm wardrobe interiors and modern bedroom banks.
Storage is visually quiet, but every drawer has similar capacity.
Best for: mixed clothing with a tidy graduated look.
Top drawers stay useful while lower drawers gain volume gradually.
Best for: classic dresser fronts and simple marking.
Each drawer grows by a similar amount from top to bottom.
Best for: sweaters, bedding, and shared storage.
More capacity lands near the floor, where heavy soft items belong.
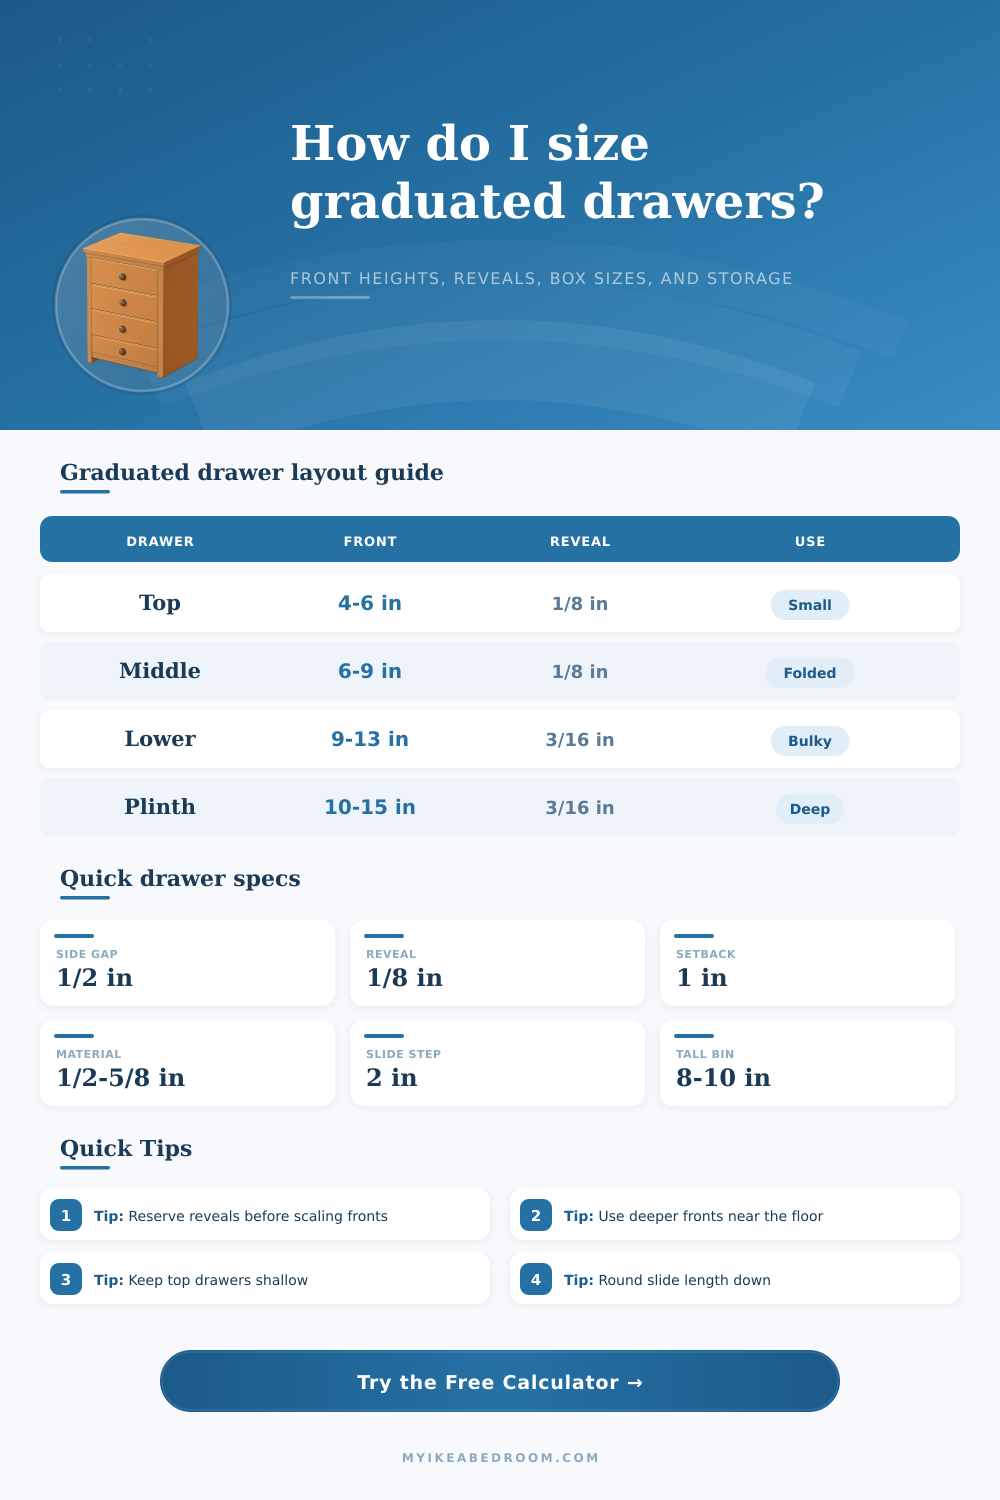
Reveal tip: Subtract top, bottom, and between-drawer reveals before deciding whether the top and bottom targets are realistic. Tiny reveals can look sharp, but they need square parts.
Box height tip: A drawer box usually sits shorter than its front. Keep enough finger and rail clearance above soft clothing so the drawer does not rub when loaded.
Slide tip: Round slide length down to a common size. A slightly shorter runner is usually easier to fit than one that collides with the back panel.
Graduation tip: Put the shallowest drawers where small accessories are easiest to see, and reserve the lowest deep fronts for sweaters, jeans, or spare bedding.
A dresser may appear finished on the outsides, but people may find the dresser to be disorganized on the inside due to the sizes of the drawers not matching the items to be store within the dresser. For instance, the top drawers may be too small for shirt, and the bottom drawers may be too large for sweaters. The problem with this is that the heights of the dresser drawer fronts is not graduated to allow for different sized items to be stored in the dresser.
By using graduated fronts for the dresser drawers, the designer avoids the problem as graduated fronts provide different heights to the dresser for the items to be store. The calculator included with the dresser can be used to determine the heights of each of the dresser’s drawer fronts. The calculator can make the calculations needed for each front once the drawer designer establishes the parameters for that dresser.
Make dresser drawers fit your things
The first step in entering the dimension into the calculator is providing the total opening of the dresser. The total opening of the dresser determine the available height for the front of the dresser. Many people will make the mistake of measuring the outside of the cabinet in which the dresser will go.
The inside measurement must be made to account for the space for the dresser drawers. Additionally, the designer must also subtract the height needed for side clearances and hardware for the slide mechanisms for the drawers from the total opening. The calculator will use this initial measurement to subtract the bottom reveal, top reveal, and gap between the dresser drawers.
These gaps between the dresser drawers must be made so that the drawers are not too close to each other that they may rub against the other drawers when the dresser is in use. These gaps will be subtracted in this initial step to ensure that the remaining measurement can be divided among the dresser’s drawer fronts. Once the opening of the dresser is established, the designer must choose the progression pattern of the front of the drawers.
A gentle curve would make the heights of the top of the dresser’s drawers small to allow for items that are small to be stored in those drawers, while the deeper depths of the lower drawers would allow for items that are deep to be stored within those depths. A linear step will make each drawer a slightly deeper size than the drawer ahead of it, and this is easier to mark on the plywood plan for the dresser. A deep lower option will make the depths of the lower drawers much more deeper than the remaining drawers to allow heavy items to rest in the lower portion of the dresser.
None of the patterns are the best for any specific situation, but each would match the storage habit of the dresser’s owner. The calculator will adjust the dimensions for the drawer fronts to ensure that the depth of the drawer fronts will add up to the total opening once the reveals are accounted for. The dimensions for the drawer box will be determined once the dimensions of the dresser drawer fronts are established.
The depth of the drawer box must be shorter than the depth of the drawer front to allow for the fingers of the drawer owner to access the items within the drawer. Additionally, the drawer box must be shorter than the drawer front so that the hardware for the drawers will not visible when the dresser is in its open state. The material thickness of the dresser, the slide setback, and the back clearance will be subtracted from the depth of the drawer front to determine the dimensions for the drawer box.
The calculator will report the outer width of the drawer box, the outer depth of the drawer box, the interior width of the drawer, and the interior depth of the drawer. The calculator will also provide a recommended length for the slide mechanism for the drawers. The calculator will round this length to the closest standard length for the slides.
Using the wrong length may result in the slide hitting the back panel of the dresser or wasting space behind the dresser’s drawer. The last parameter that will be entered into the dresser front calculator is the chosen storage of the dresser. For instance, if accessories are to be stored, the calculator will know to make the depth of the top drawers shallow.
If the dresser is to be used to store items of clothing, especially the bulky clothing, then the front height will be designed to make the depths of the lower drawers taller. Based off this information, the calculator will produce a list of the height of each drawer front of the dresser, the usable height of each drawer for the items to be stored, and a suggested use of each of the dresser’s drawers. This list will be a start for the dresser designer as it will show what items each drawer will store.
Real rooms and dressers have variables that a calculator will not be able to see. The walls upon which the dresser will stand may not be square, which could make a reveal that is thin for the dresser may be even more noticeable on one side of the dresser than the other. The paint that will cover the dresser could add some thickness to the drawers, changing the gap between the dresser’s drawer fronts.
If the dresser is to be placed on a carpet, the lower reveal of the dresser will have to be adjusted so that the bottom drawer does not constantly interact with the carpet. To account for these variables, it is important to know the ideal dimension that the calculator will produce for the dresser’s drawer fronts. Many drawer designer may not use the graduated planner based on the items that will be stored within the dresser to determine the dimensions of the dresser drawers.
For instance, a drawer designer may focus on the looks of the dresser when it is completed and ignore the items that need to be stored. In this case, it is possible that the designer will find that there is no space for items like socks within the dresser. If the designer makes each of the dresser’s drawers very deep and wide to allow for items like winter coats to fit in the dresser, then the upper drawers will appear empty and may be difficult for the owner to access the items.
By using the graduated planning method, each designer avoids these mistakes by designing the dresser to each owner’s items first. The calculator also includes reference table for the designer that list the dimensions for items like jewelry, shirts, and bedding. These tables can be used as suggestions.
The dresser opening is not likely to be square, so the designer can use the reveal dimension to allow for a gap in each drawer front. If the dresser is to be used by a child to store their clothing, then the kids clothing table can be used to determine the height of the upper drawers to the height that the child can reach to place their clothes within the drawers. Once the calculator has produced a plan for the dresser, the tallest usable height for the items to be stored will be tested against the items to be stored in the dresser.
A sweater can be folded and measured to determine whether the height of the sweater will fit within the usable height of the dresser drawer. Any dresser plan can be tested in this fashion before the dresser is completed. If the height is too tall for the item that will be stored, then the dimensions of the dresser can be changed to adjust the height of the drawers.
The changes can still be made to the dresser at this stage; once the dresser is assembled, the drawers cant be adjusted. This same test can be used for the shallowest drawer in the dresser. If the shallowest drawer is to be used for items like belts, then it is important to ensure that the interior height of that drawer will allow for the belt buckle to not hit the depth of the drawer.
Although the calculator may have subtracted for finger room and the thickness of the dresser materials, the depth must still be accounted for in the owner’s mind. If there is not enough space for the belt buckles, the progression of the drawers may be changed or the total number of dresser drawers can be reduced. The calculator may provide the drawer designer with the ideal dimensions for the dresser, but they may have to make the last adjustments to ensure the dresser meets the needs of the items that will live within the dresser in there room.