Grab Bar Height Calculator
Plan a bathroom grab bar by checking top-of-grip height, bar centerline, angle rise, possible stud hits, reach comfort, fixture clearance, and basic accessibility ranges.
Start with a common toilet, shower, tub, or transfer layout, then adjust the actual height, wall framing, bar length, and nearby fixture clearance.
| Installation zone | Reference height range | Measured to | Calculator use |
|---|---|---|---|
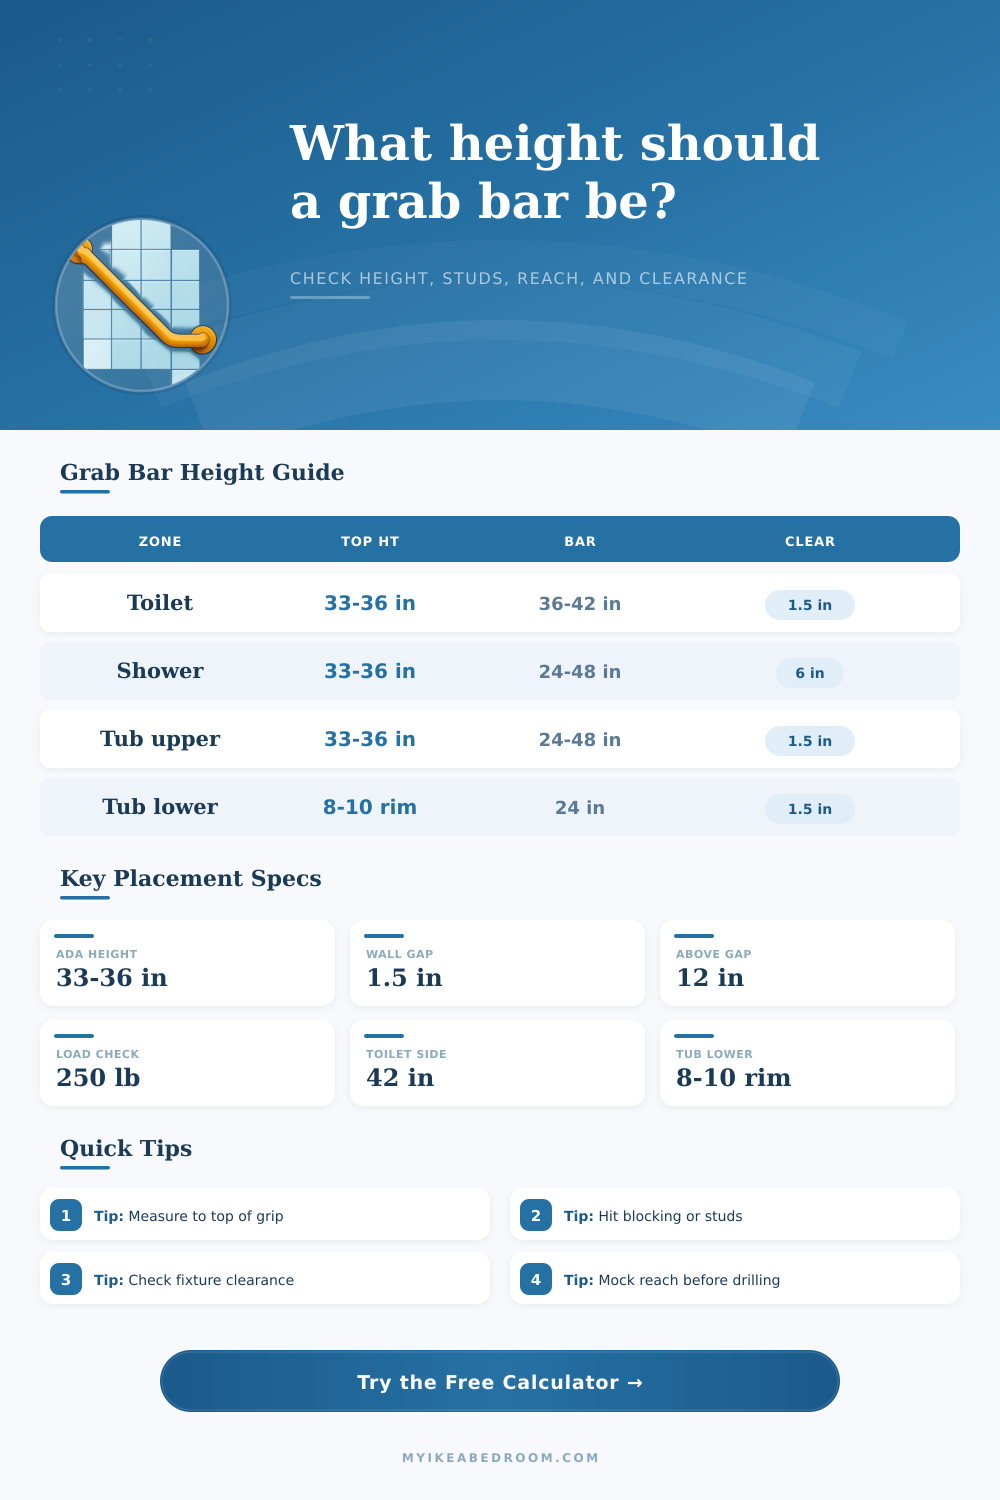
| Toilet side or rear wall | 33 to 36 in above finish floor | Top of gripping surface | Personalized top height is clamped inside this band. |
| Shower horizontal bar | 33 to 36 in above shower floor | Top of gripping surface | Angle warnings appear if the bar ends leave this band. |
| Bathtub upper back-wall bar | 33 to 36 in above finish floor | Top of gripping surface | Used for standing balance or tub entry support. |
| Bathtub lower back-wall bar | 8 to 10 in above tub rim | Top of gripping surface | Used when seated transfer is the reach priority. |
| Child-use water closet | 18 to 27 in above finish floor | Top of gripping surface | Not selected by default; verify the specific child-use rule before drilling. |
| Placement role | Common minimum | Typical location cue | Calculator warning |
|---|---|---|---|
| Toilet side wall | 42 in minimum | Begins near rear wall and extends forward | Flags side-wall bars shorter than 42 in. |
| Toilet rear wall | 36 in minimum | Extends both sides of toilet centerline | Flags rear-wall bars shorter than 36 in. |
| Shower transfer bar | Across control and back wall | Horizontal support near the seat path | Checks height, clearance, and stud span. |
| Tub control-end bar | 24 in minimum | At the front edge of the bathtub | Flags entry bars shorter than 24 in. |
| Angled assist bar | 24 to 36 in common | Often used outside required horizontal bar zones | Reports rise so both ends can be checked. |
| Clearance condition | Reference gap | What to measure | Result effect |
|---|---|---|---|
| Wall to gripping surface | 1.5 in | Back of grip to finished wall | Handled by hardware selection and field verification. |
| Objects below or at bar ends | 1.5 in minimum | Dispenser, trim, niche edge, valve escutcheon | Passes when fixture clearance is at least 1.5 in. |
| Objects above the bar | 12 in minimum | Shelf, towel bar, cabinet, soap niche | Can strongly reduce the clearance score. |
| Shower controls or another grab bar above | 1.5 in minimum | Valve trim, hand shower bar, second grab bar | Uses the smaller control exception allowance. |
| Adjacent shower walls | 6 in maximum end offset | Distance from bar end to nearby shower wall | Use the end-clearance option when checking a shower run. |
| Bar setup | Stud spacing | Projected mount span | Likely stud hit count |
|---|---|---|---|
| 24 in horizontal bar with 2.5 in flanges | 16 in | 19 in | 2 stud lines if shifted well |
| 36 in horizontal rear bar | 16 in | 31 in | 2 to 3 stud lines possible |
| 42 in toilet side bar | 16 in | 37 in | 3 stud lines possible |
| 36 in bar at 30° | 16 in | 26.8 in horizontal projection | 2 stud lines possible |
| 48 in shower bar on 24 in studs | 24 in | 43 in | 2 stud lines possible |
Straight round bar
Best for required toilet, shower, and tub horizontal placements. Simple geometry makes the top height and centerline easiest to verify.
Concealed flange bar
Clean finished look with a normal grip diameter, but the flange plate still needs blocking, studs, or a rated backing system.
Angled assist bar
Useful for sit-to-stand support when allowed by the project, but its rise must be checked at both bar ends.
Heavy-duty bar
Larger grip and stronger mounting hardware can help high-use spaces, provided the wall structure is designed for the load.
Folding wall bar
Can support transfer layouts where a fixed side bar blocks access, but it needs manufacturer-specific backing and swing clearance.
Removable suction assist
Helpful as a temporary balance cue on smooth surfaces, but it should not be treated as a structural grab bar.
Mock the grip before drilling. Tape the proposed top height and angled endpoints on the wall, then sit, stand, and step through the transfer path with the actual user.
Confirm wall structure first. A comfortable height still fails if the fasteners miss blocking, studs, or a rated backing plate for the grab bar system.
A good grab bar is not necessarily a matter of the metal. It is also a question of reach and shape. It is about how far you can bend without losing your safety or your comfort. Imagine a static image of that grab bar hanging on the wall. But think again: it’s actualy a dynamic tool, whose use lies wholly within the relationship between itself and the body reaching for it.
You could drop a hundred bucks on some heavy duty stuff but hang it an inch too low (or, heaven forbid, fail to back it with a stud) and what you have is useless clutter. The formula above do the math for you after you input user’s height and wall’s dimensions. That eliminates all the guessing and conversions. It keeps focus squarely on real-life usage patterns during install.
How to Place Your Grab Bar Safely
According to standard guidance, most bathroom fixtures should be installed at a top-of-grip height of anywhere from thirty-three to thirty-six inches. Why? Because that’s the sweet spot for reach for the average adult user, plus still leaves plenty of room to use to support their body weight when transferring. But averages are where things get dicey in the world of accessibility design. What’s ideal for the six-foot-tall person may be extremely painful for the five feet four-inch person. And what does it require? It force them to overextend their shoulders instead of using their stronger core muscles.
The magic happens when you plug your user’s exact height into the tool, which tightens its recommended range (within the allowable band) to favor comfortable reach. This is exactly why most folks miss this point. Instead of drilling for the person who needs it, they’re drilling for the code minimum.
Just as important as where it’s being installed is what it’s going to be installed on: Wall structure matter. Depending on what happens when someone slips or loses their footing, that grab bar needs to take a two-hundred-and-fifty-pound load, sometimes from a strange angle. You’ll never get adequate hold with drywall anchors alone. To check whether your planned mounting area crosses enough stud lines to provide proper support, the tool counts up the number of expected hits based off typical sixteen-inch spacing. If it predicts zero or just one stud will be reached by the proposed mount, consider attaching rated backing plates specifically made for heavy-duty use, or investigate installing blocking behind the wall surface. Unfortunately, people tend to realize this structural check is necessary after the fact, after they’ve mounted the bar, making changes difficult.
Another common pitfall in bath remodels is clearance. For safety, there must be a minimum of an inch and a half between the wall and the gripping surface (so that you have room to get a full grip on the diameter with a hand). You usually also desire 12 inches of clearance above the bar to shelves or cabinets, unless they’re other bars next to it, or shower controls. Confusing clutter around the grab bar can make it hard to know where to put your hands in a moment of need. When you enter your fixtures into the calculator, it will check their clearances and alert you if any could pose problems before you ever pull out the drill. It is a little thing, but it is a very big deal when you’re trying to hold yourself up in a place that might slip underfoot.
It’s also important to consider whether to go horizontal or angled. For most bathrooms, i.e. Showers and toilets, horizontal is typical, since it offers equal leverage at all times. In situations where someone may use a transfer bench or just needs help getting up from sitting (especially if that’s near a tub), then an angled bar might work well. But with an angled bar, the height change throughout its span, which means both sides must stay in reach of the person using it. This way you can see if the high or low side is out of reach. You can also see if the bottom part drops below a comfortable standing height. The app will adjust the rise to match whatever angle you select.
Ultimately, designing a plan for a grab bar isn’t a one-size-fits-all exercise. Rather, it’s a matter of approximating the motions you want someone to make. Try out the path of transfer on yourself by taping off a mock-up bar (at the recommended location) and sitting down, standing up, and shuffling around. It’ll be awkward for you. Imagine how awkward it would of been for somebody with impaired mobility!
You’re aiming for a sense of security and naturalness. You want a support system that stays out of the way during everyday activity but becomes quietly dependable when called upon. With careful measurement and this sort of bodily confirmation, you turn an otherwise mundane object into a real-life safety net. That’s what a well-designed bit of accessibility feels like.