Garage Lighting Layout Calculator
Plan fixture count, row spacing, bay coverage, workbench task light, and lumens per sq ft from garage dimensions, ceiling height, fixture type, reflectance, overlap, and vehicle bay count.
Load a real garage scenario, then adjust the target foot-candles, fixture lumens, workbench zones, and row direction for your space.
Enter zones that need better-than-parking light. Leave unused zones at zero.
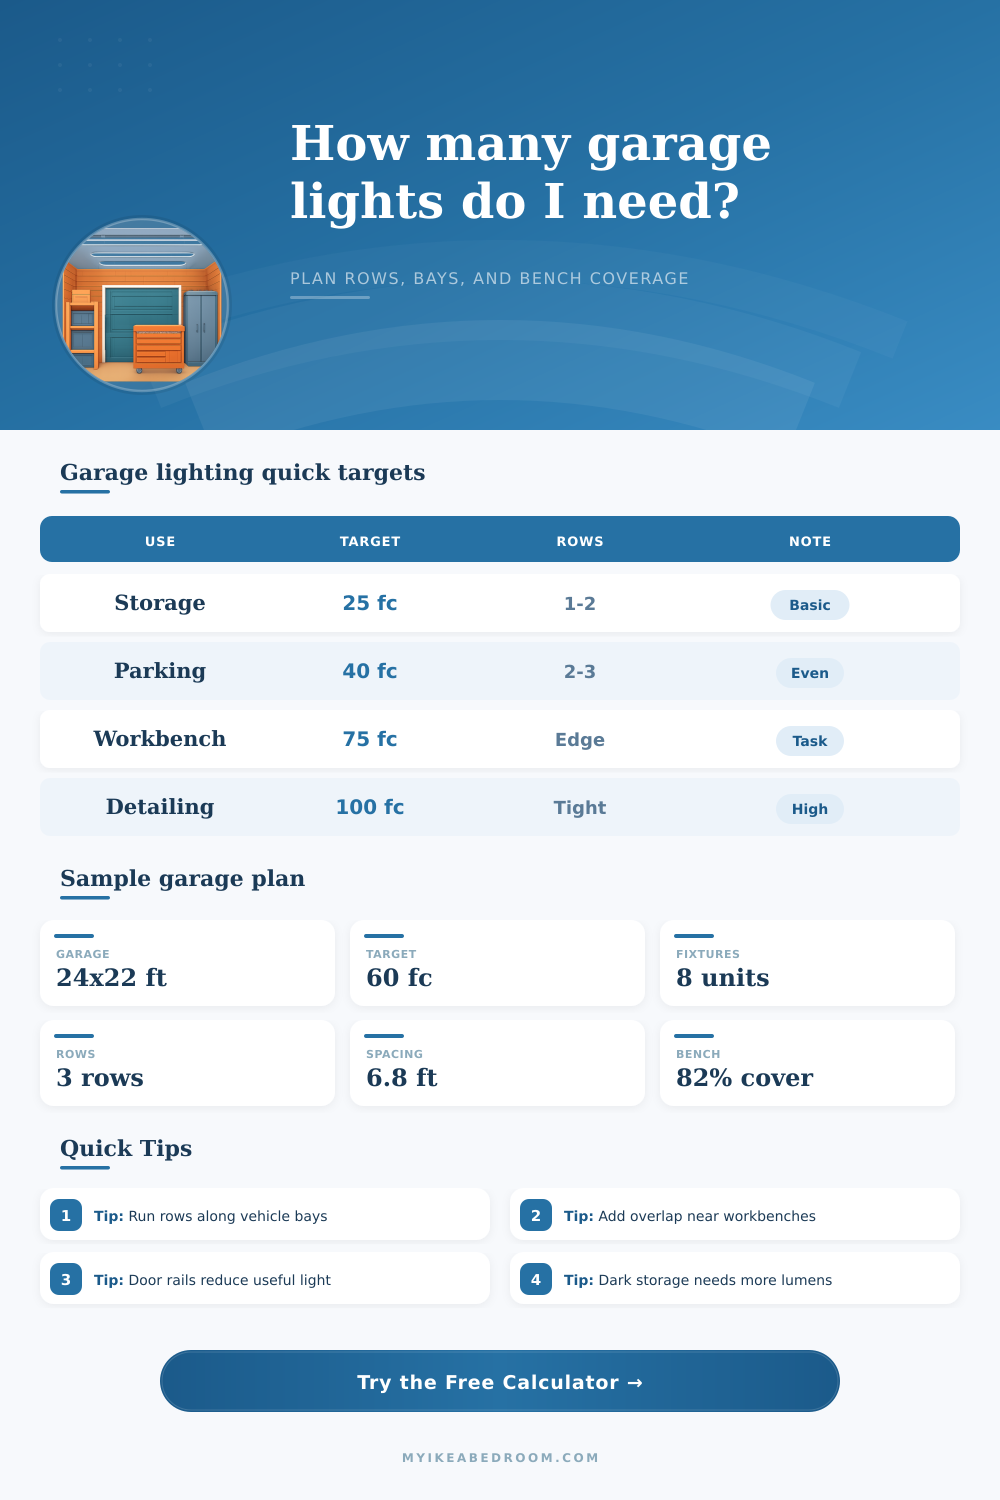
Bay rows: For parking garages, start with rows that run front to back along the vehicle bays. This keeps light on both sides of the car instead of only down the center aisle.
Bench zones: A ceiling layout can meet the room average and still miss the work surface. Put at least one row close to the bench edge when tools, paint, or parts matter.
Many people use they garage for only parking there car or storing their trash cans. However, by installing the proper lighting in your garage, it can become a functional workspaces. Installing only one light bulbs in the center of the ceiling of your garage is insufficient for the work space it will create shadows.
When working in the garage, the body will block the light from the center of the ceiling from the work area, creating shadows where the work needs to be done. Proper lighting in the garage will allow people to see their work without moving portable lights in and out of the work area. The number of light bulbs in the ceiling of the garage will not determine the proper lighting for the garage.
How to Light Your Garage for Work
Each individual area in the garage will have a differently light requirement. For example, the parking area will not require the same lighting as a work area. A person must understand the unit of measurement called foot-candles to properly plan the lighting in the garage.
Foot-candles are a unit of measurement that will determine how much light shine on a specific work area. Areas like a parking lot will have fewer foot-candles than work areas because of the need for increased lighting. Too much light will create blindingly glare on areas like the hood of a parked car.
Too little light will make the garage too dark to work in any tasks. To determine the number of light fixtures needed for the garage, it is first important to calculate the light levels. This involve converting the lumens of the light fixtures to the level of brightness that will fall on the work areas in the garage.
Another important factor in lighting design is the concept of reflectance. Reflectance is the degree to which the walls and ceiling of the garage will reflect the light into the work area. If the walls are white, the garage will appear brighter with less light installed than if the walls are dark.
Dark colors will absorb the light instead of reflecting it back into the work area of the garage. Thus, if the garage features dark walls or dark beams of wood into the ceiling, you will have to install more light fixtures. The placement of the light fixtures in the garage is another important aspect to consider.
Many people will place the light fixtures in row down the center of the garage. However, this is a mistake in many cases. When a car is in the garage, the car will block the light from reaching the side of the bay where the car is parked.
Therefore, the rows of the light fixtures should be placed to align with the bays where the cars will be parked. This will ensure that the light fixtures remain beside the cars instead of the cars’ roofs blocking them. The areas within the garage where work will be done, such as the workbench, will require a different lighting plan to the general parking area of the garage.
The work area may have plenty of light in the general area of the garage, but the individual workbench may be in the shadows created by the body of the individual who wish to work at that task zone. In this case, a row of light fixtures need to be installed near the workbench so that the work area is properly illuminated. This will ensure that there are no shadows at the task zone and that the individual can properly see the work to be done.
Creating a hierarchy of light will allow the work area to have increased brightness relative to the parking area of the garage. Other physical obstacles in the garage must be considered when installing the light fixtures. For example, the garage door rails will create obstacles.
Another physical obstacle is the need to account for the amount of light that will be blocked by the dust that will accumulate on the lenses of the light fixtures. Over time, the lenses of the light fixtures will become dimmer with the accumulation of this dust. Thus, another consideration for the planning of the light fixtures is that more light is needed when the light fixtures are new than are required after years of accumulation of dust on the lenses of the light fixtures.
There are different types of light fixtures that can be installed in the garage. For example, flush panel light fixtures will provide a wide beam of light that is suitable for the general area of the garage. Linear strip light fixtures will provide directional lights that are helpful in performing tasks with the vehicle in the garage.
It is also important to ensure that the beams of light from the different types of light fixtures overlap in the garage. If the light fixtures are too far apart, zebra striping will occur. The placement of the light fixtures creates zebra striping when there are bright spots of light followed by dim spots of light.
Overlapping light from the light fixtures will ensure that there is a seamless blanket of light in the garage. A seamless blanket of light is necessary to be able to see the details of the vehicles in the garage. Finally, the layout of the light fixtures in the garage should be planned before any of the light fixtures are installed.
By planning the layout, each zone in the garage can be considered separately. The type and intensity of the light can be tailored to each different area in the garage. By planning the layout of the light fixtures and ensuring that each task zone is covered by light, the garage can be transformed into a functional workspace.