🖼️ Gallery Wall Layout Calculator
Calculate spacing, frame counts, and arrangement dimensions for your perfect gallery wall
10 x 15 cm
13 x 18 cm
20 x 25 cm
28 x 36 cm
41 x 51 cm
46 x 61 cm
61 x 91 cm
30 x 30 cm
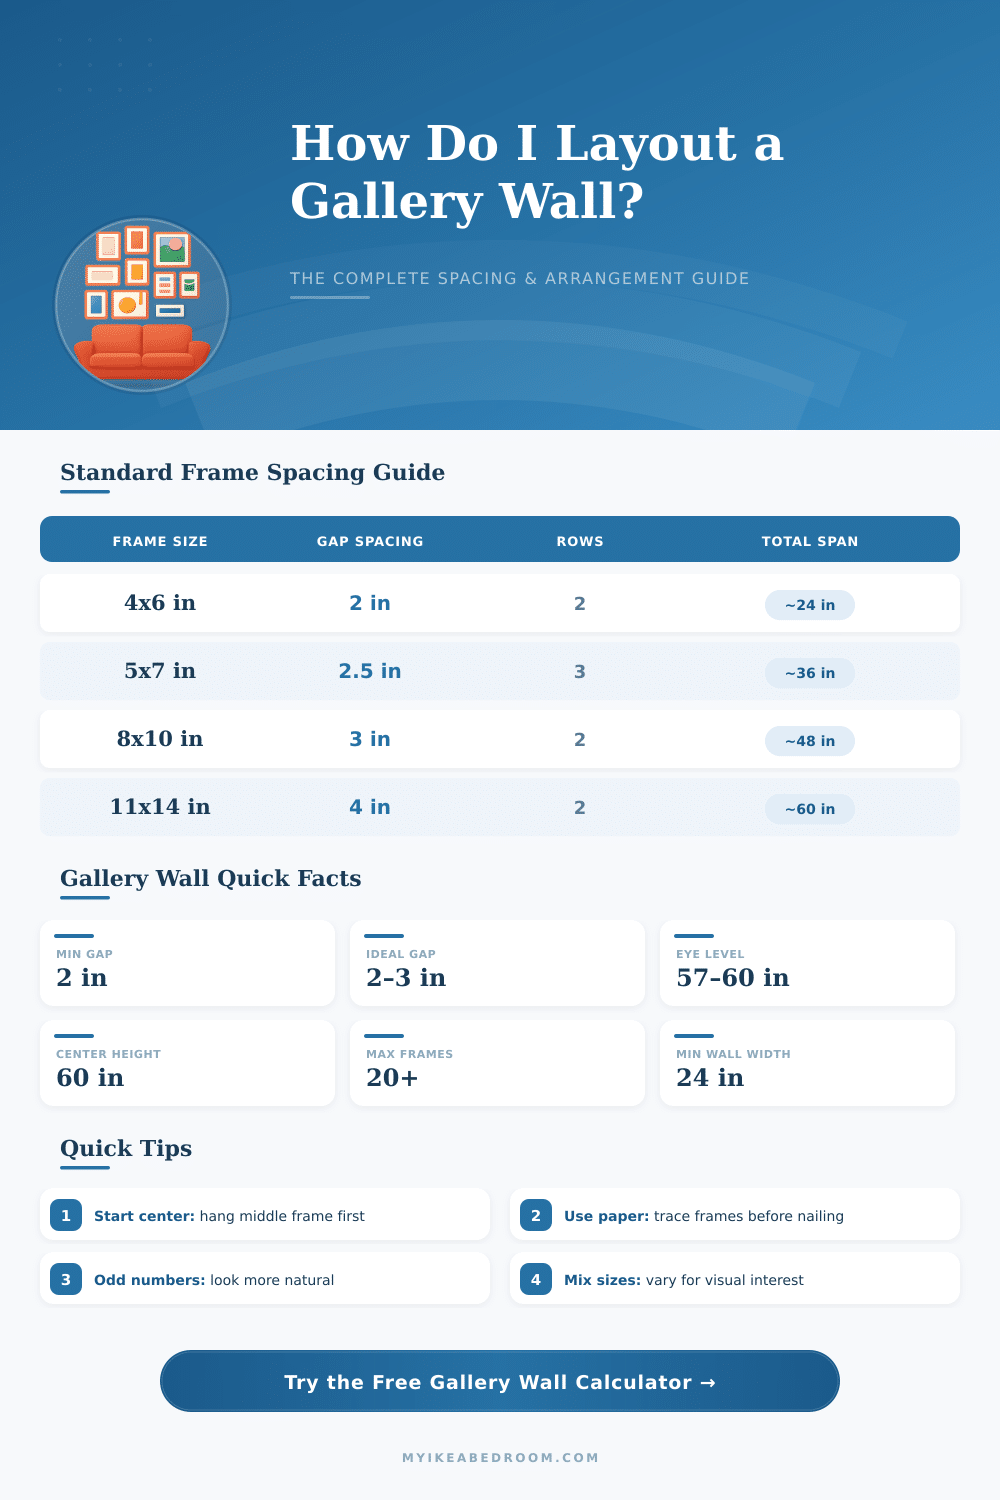
| Frame Size | Min Gap | Ideal Gap | Max Gap | Notes |
|---|---|---|---|---|
| 4x6 in (10x15 cm) | 1.5 in (4 cm) | 2 in (5 cm) | 2.5 in (6 cm) | Tight grouping works well |
| 5x7 in (13x18 cm) | 2 in (5 cm) | 2.5 in (6 cm) | 3 in (8 cm) | Most popular size |
| 8x10 in (20x25 cm) | 2 in (5 cm) | 3 in (8 cm) | 4 in (10 cm) | Standard gap rule applies |
| 11x14 in (28x36 cm) | 3 in (8 cm) | 4 in (10 cm) | 5 in (13 cm) | Breathing room needed |
| 16x20 in (41x51 cm) | 3 in (8 cm) | 4 in (10 cm) | 6 in (15 cm) | Statement pieces |
| Mixed sizes | 2 in (5 cm) | 3 in (8 cm) | 4 in (10 cm) | Use consistent gap throughout |
| Wall Area | 4x6 Frames | 5x7 Frames | 8x10 Frames | 11x14 Frames |
|---|---|---|---|---|
| 24x18 in (60x45 cm) | 6 | 4 | 2 | 1 |
| 36x24 in (90x60 cm) | 12 | 8 | 4 | 2 |
| 48x36 in (120x90 cm) | 20 | 12 | 6 | 3 |
| 60x40 in (150x100 cm) | 28 | 18 | 9 | 5 |
| 72x48 in (180x120 cm) | 40 | 24 | 12 | 6 |
| 96x60 in (240x150 cm) | 60 | 36 | 18 | 9 |
| Room / Context | Recommended Center Height | Metric Equivalent | Notes |
|---|---|---|---|
| Standard room (standing) | 57–60 in from floor | 145–152 cm | Average eye level |
| Above sofa / furniture | 6–8 in above back | 15–20 cm | Measured from top of furniture |
| Above fireplace mantel | 4–6 in above mantel | 10–15 cm | Centered on mantel width |
| Hallway / corridor | 57–60 in from floor | 145–152 cm | Maintain consistent height |
| Staircase gallery | Step up 4–6 in per step | 10–15 cm | Follow stair angle |
| Children's room | 48–54 in from floor | 122–137 cm | Lower for child eye level |
Gallery Wall helps to display art, photographs and prints, while it adds to room charm, style and atmosphere. In any home it easily becomes a topic for chat. This guide is made up of tips and advice that makes the planning much easier than one hopes.
A useful method is to use an online program, in that you enter the height and width of the wall together with the sizes of every framed image. That program later forms a visual preview and even a hanging plan. Some of them allow that you move frames colour plates and ideas for wall decoration on a virtual surface, to create your own plan.
How to Plan a Gallery Wall
There are also apps that project the final plans of Gallery Walls directly on your real wall and point, how to set them according to the kind of used hanging system.
For those that like a hands-on approach, first arrange the frames on the floor is a wise idea. Like this one gets a good idea about the final look of the wall before hanging anything. When the Layout on the floor pleases, simply photograph it with your phone for use as a guide while you switch the parts upward.
A helpful tip is to cut paper according to teh size of every frame and stick them to the wall with tape. This means to mix everything freely before beating nails.
A grid Layout answers for a small group of frames of same size, laid in order, in a balanced mode. It is ideal for showing some liked photographs, for example travel memories or household moments, while one leaves free spaces around the display. Rather, combining various elements in a Gallery Wall also works.
Prints, floating shelves and wall decorations can mingle with framed images.
Choosing a colour scheme for the main artistic prints gives a clean impression. One chooses one to three prints as chief and adds some more small ones, that match by means of colours or themes, to tie everything. Printing everything in black and white creates a unique atmosphere.
Using frames of same size and colour brings a uniform look.
During hanging, point the upper corners of the biggest frame on the wall and lay hooks in half between them is a good starting point. When the central element is set, it serves as a base to add medium bits first, later the smaller ones. The center of the art should be at eye height, around 57 inches from the floor.
Extend the Gallery Wall until the ceiling can give the illusion of a hire room. Some Gallery Walls come with a full-size template for the wall, that shows exactly where to beat nails, likethis you skip all measuring.