Triangle flag cutting planner
Fabric Bunting Triangle Quantity Calculator
Estimate how many triangle flags to cut, how many triangle pieces are needed for single-sided or double-sided bunting, how the pieces fit across your fabric width, fabric yardage, bias tape length, and layout waste.
Load a common project, then adjust the finished bunting length, triangle width, triangle drop, seam allowance, flag gap, fabric width, side choice, tape on hand, waste buffer, and units.
Quilting cotton
Best for: crisp indoor triangles and easy pressing.
Stable for single-sided birthday, mantel, classroom, and nursery bunting.
Poplin
Best for: sharp points and clean printed patterns.
Works well when many matching triangle faces need tidy alignment.
Linen blend
Best for: softer room decor and neutral banners.
Add buffer if the weave shifts while stacking or cutting triangles.
Canvas duck
Best for: patio, market, and stair rail bunting.
Use fewer layers per cut and allow more tape fold room.
Felt
Best for: no-fray single-sided flags.
Seam allowance can be set to zero when edges stay raw.
Oilcloth
Best for: wipeable outdoor party runs.
Use a larger gap if stiff flags need room to hang flat.
Double-sided cotton
Best for: backdrops and rails seen from both sides.
The calculator doubles triangle pieces and fabric area automatically.
Directional print
Best for: themed banners with readable motifs.
Increase buffer because nested triangles may not rotate cleanly.
| Finished flag | Typical gap | Good use | Cutting note |
|---|---|---|---|
| 4 x 5 in / 10 x 13 cm | 1 to 1.5 in | Mini shelves, small windows, crib corner banners | Use a small seam or raw felt edge. |
| 5 x 7 in / 13 x 18 cm | 1.5 to 2 in | Nursery banners, classroom lines, mantel flags | Good balance for double-sided cotton. |
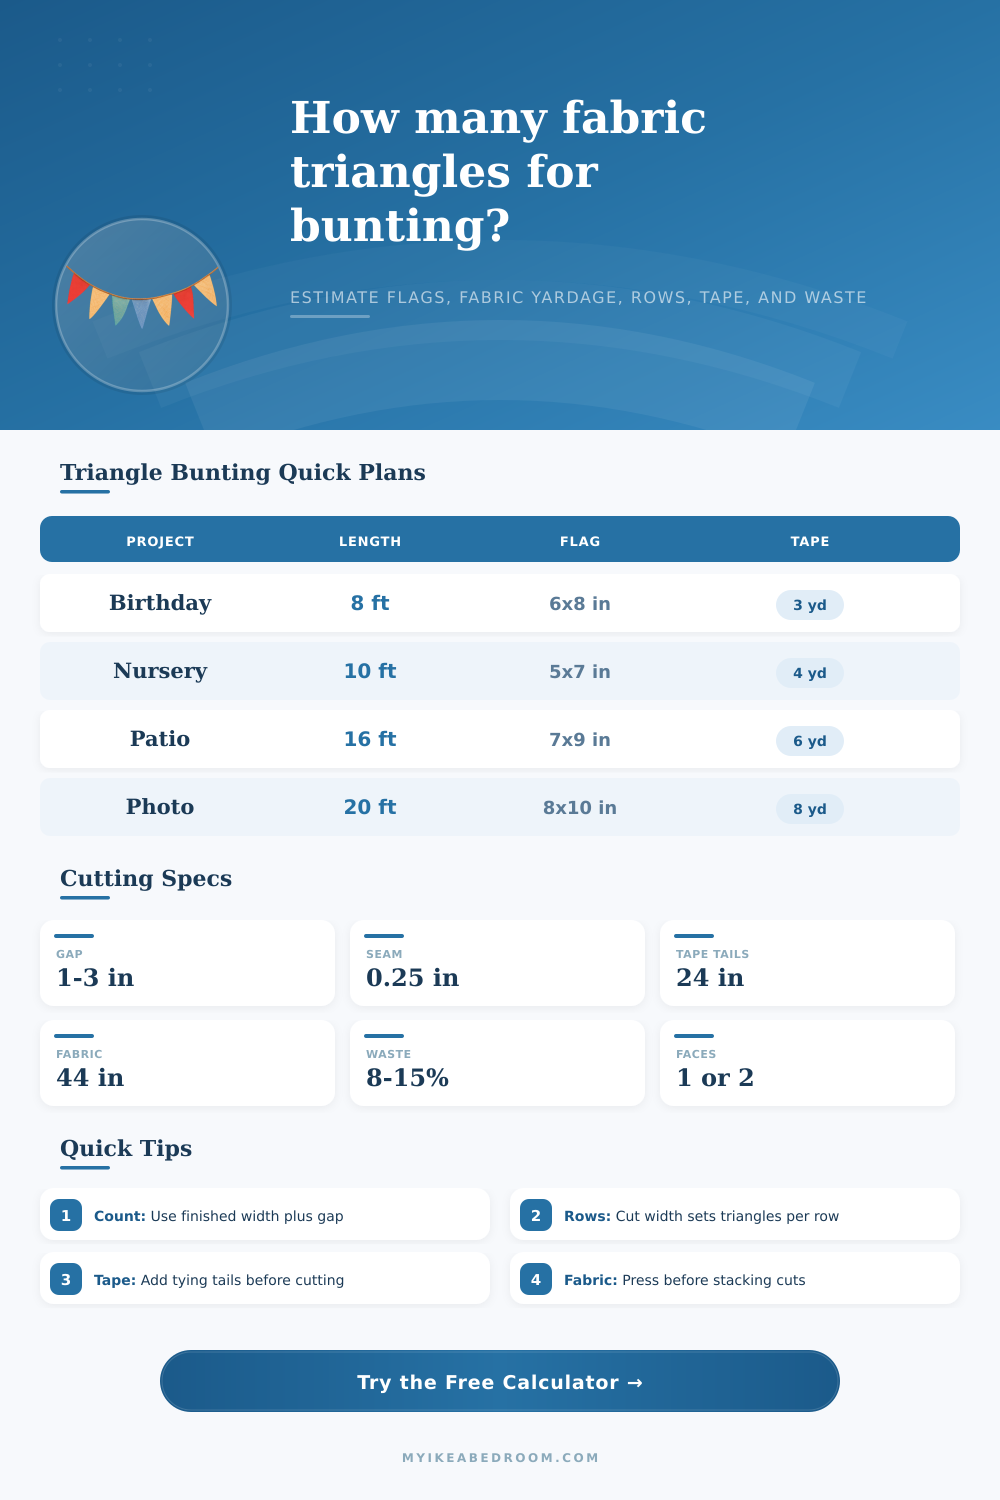
| 6 x 8 in / 15 x 20 cm | 2 to 3 in | Birthday bunting, party table fronts, room walls | Most common indoor pennant size. |
| 8 x 10 in / 20 x 25 cm | 3 to 4 in | Patio rails, photo backdrops, market stall trim | Use wider tape and check point alignment. |
| Usable fabric width | 6.5 in cut width | 8.5 in cut width | Planning note |
|---|---|---|---|
| 36 in / 91 cm | 5 per row | 4 per row | Common craft felt and narrow fabric widths. |
| 44 in / 112 cm | 6 per row | 5 per row | Typical quilting cotton and poplin planning width. |
| 54 in / 137 cm | 8 per row | 6 per row | Decorator fabric may reduce yardage for larger flags. |
| 60 in / 152 cm | 9 per row | 7 per row | Useful for photo backdrops and long double-sided runs. |
| Finished bunting line | Suggested tape before trimming | Why it differs | Best use |
|---|---|---|---|
| 4 to 6 ft / 1.2 to 1.8 m | Line length + 24 in / 60 cm | Short tying tails keep the display adjustable. | Mantel, shelf, and small window bunting. |
| 8 to 10 ft / 2.4 to 3 m | Line length + 24 to 30 in / 60 to 75 cm | Extra tape helps center the flags after sewing. | Birthday, nursery, and table-front banners. |
| 12 to 16 ft / 3.7 to 4.9 m | Line length + 30 to 36 in / 75 to 90 cm | Longer runs need more anchor flexibility. | Patio rails and stair rails. |
| 18 ft+ / 5.5 m+ | Plan in sections | Sections are easier to sew, store, and hang straight. | Photo backdrops, classrooms, and market stalls. |
| Project | Length range | Typical triangle | Fabric choice |
|---|---|---|---|
| Birthday bunting | 6 to 10 ft / 1.8 to 3 m | 6 x 8 in / 15 x 20 cm | Quilting cotton or poplin. |
| Nursery banner | 8 to 12 ft / 2.4 to 3.7 m | 5 x 7 in / 13 x 18 cm | Double-sided cotton or linen blend. |
| Patio party | 12 to 20 ft / 3.7 to 6.1 m | 7 x 9 in / 18 x 23 cm | Canvas, oilcloth, or heavier cotton. |
| Photo backdrop | 16 to 24 ft / 4.9 to 7.3 m | 8 x 10 in / 20 x 25 cm | Double-sided fabric for front and side views. |
You buy some fabric, grab a pair of scissors, and cut out a few triangles. Panic sets in as you realize there isn’t enough left at the end or they don’t fit into the space. Bunting seems easy right? But it’s more of a geometry problem bound inside of cotton and bias tape. Plug in how big you want each flag to be and how big the room is and let the calculator work out the rest. Avoid the waste of guessing at conversions and coefficients.
People get tripped up on the main variable: the gap between flags. It seems so tiny (the design is all about aesthetics!) but it determines the whole rhythm of the banner. If you have an inch between them, it’s really dense; great for tight mantel spaces or nursery sized room. If you go with a three inch gap, then each triangle has some space to call their own, they’re able to cast their own shadows and breathe. This is key if you’re doing a long run on your patio. You don’t want the bunting to feel too heavy; you want it to feel airy.
How to Plan Your Bunting Project
Most novices think they can simply divide total length by the width of each flag. And that’s where people mess up! Since there is nothing in between, you need to add that space too, or else your finished banner will be surprisingly short. Another thing to think about is triangle height compared to fabric width. Quilting cotton typicaly is sold in forty-four inch widths. For example, if you want to make triangles that finish at eight inches deep after nesting and seam allowance, each triangle will take up about one fourth of the fabric. You can fit four or five across. How tight you nest triangles makes a difference here. By nesting, I mean turning every other triangle upside down so the points nest together like puzzle pieces. That’s a big time saver in terms of waste. You can enter your fabric width into the calculator which then estimates your layout based off that. It calculates the number of triangles per row and the number of rows needed. That gives an idea of whether to purchase three yards or half a yard. So knowing your fabric width beforehand prevents you from buying too little material only to find out your flags is too wide to nest efficiently.
Bunting also has another interesting twist: it is double sided. This means you get to see the pattern on both sides, which gives it more of a professional look, but also doubles the amount of fabric you need and cuts you will have to make. Double sided is worth it if you’re making a banner that’s going across some kind of wide open area where people walk behind it. But if you’re just making something for a nursery mobile that hangs low so people only see one side, or even a kitchen backsplash, single sided construction are the way to go. It saves money and time without losing any visual appeal. When you turn this on, it automatically adjusts the number of pieces to cut. This prevents you from accidentally getting too many pieces for just one side instead of an equal amount for both.
The way you cut also depends on the fabric that you choose. Some fabrics such as heavy canvas or oil cloth will be more bulky and stiff so won’t nest together as well as something like a light cotton. Sometimes those might has to be cut out individually or in smaller groups in order to line up properly when there is several layers. Something like a light quilting cotton slides around nicely making it possible to cut bigger groupings that can be nested into each other. For felt, you don’t add any seam allowance at all, as felt doesn’t fray along the edges. That makes math easier, though it will alter the finished dimensions of your triangle cuts. If you are working with felt, just remove the seam allowance from your template entirely.
Where most people get tripped up is with planning bias tape. You should of plan on having more tape than your final length of bunting. Why? Because you want to tie knots on each end, secure it to your hook or nail, AND have enough left over for the folding process. As a general rule of thumb: Plan on adding 2 feet of additional tape to the total length. That way you are covered if you are just an inch short at the final flag. It also covers the folding portion of the project. The calculator will add this buffer automatically. Then you’ll have the exact yardage for your fabric, and for your tape.
The one rule: you must cut one test triangle before anything else happens. Sew it, press it, and take a measurement of actual final width and drop. Fabric doesn’t behave like numbers do on your screen. One tiny difference in turning under a little more or less, or pressing in one direction instead of another, can change the final size. This can throw off your whole number of rows to sew. Adjust accordingly, and remember it’s based on what actualy happened with your real world test piece, not some idealized version in your head.
And then after you know for sure that one flag works, everything else just falls into place, because it’s just assemble, assemble, assemble. The result? It is a banner that actually looks like it belongs in the space it hangs in, and that fits exactly right. You will have no more embarrassing moments where you come up short at the last second. THAT is the level of detail that takes this from “quick craft” to “polished decoration.”