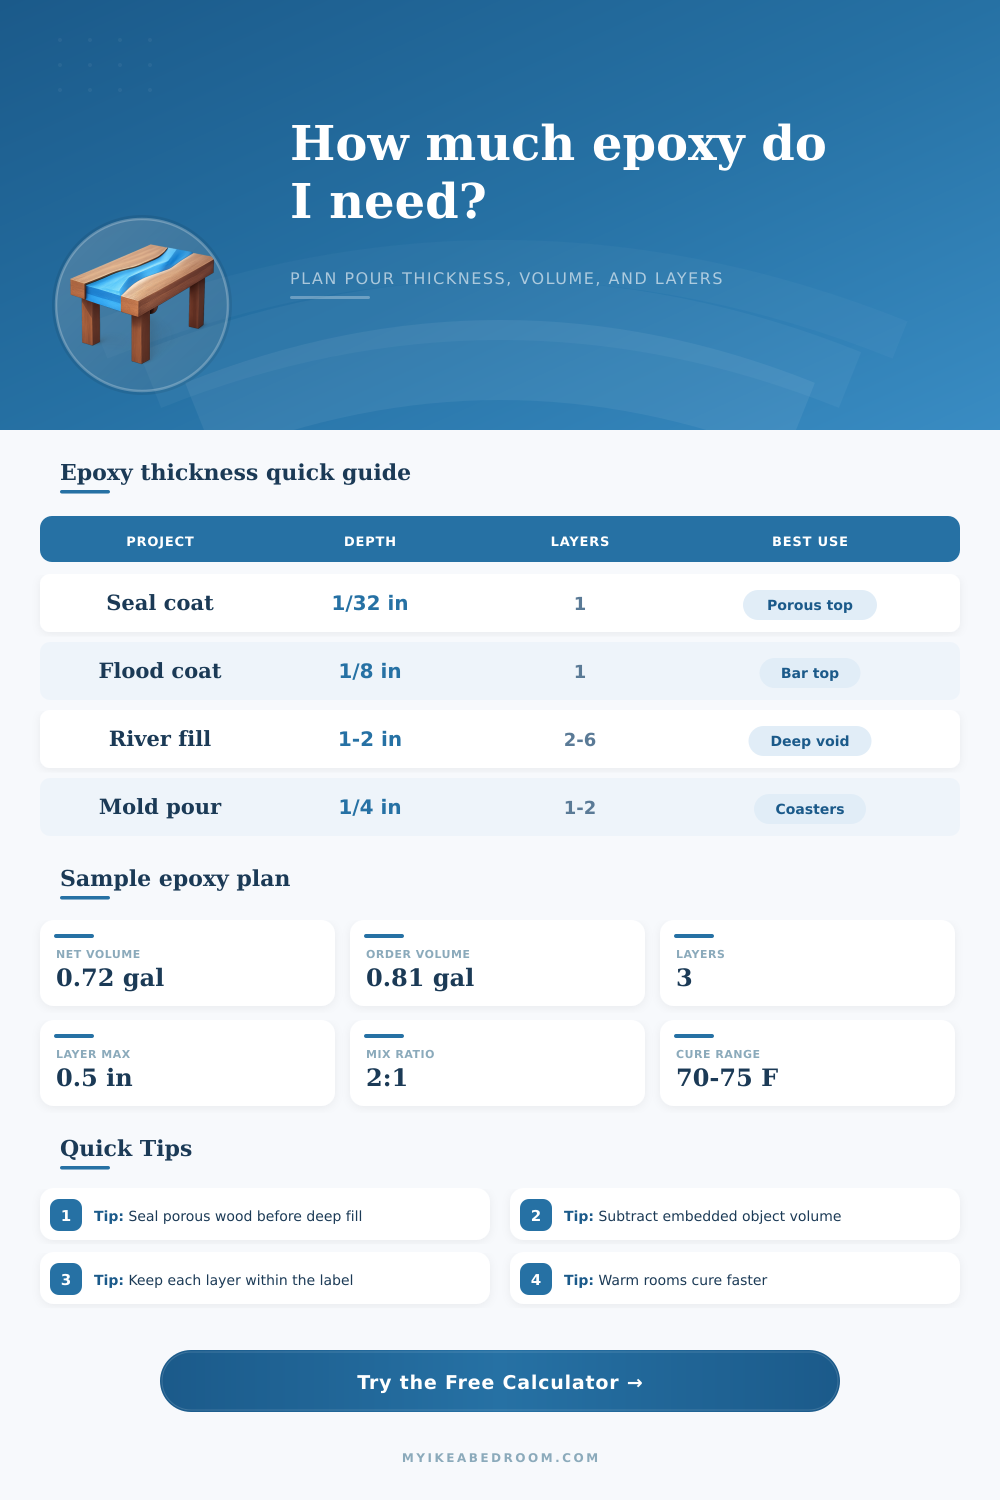
Epoxy Thickness Calculator
Estimate pour thickness, adjusted resin volume, kit count, layer schedule, mix-part breakdown, seal coat allowance, edge loss, embedded-object displacement, and temperature cure timing for tabletop, mold, river, and coating work.
Use a preset as a realistic starting point, then adjust dimensions, thickness, layer limit, mix ratio, waste, and temperature allowance for your exact pour.
Epoxy pour breakdown
| Project type | Usual thickness | Layer approach | Planning note |
|---|---|---|---|
| Seal coat over porous wood | 1/64 to 1/32 in | One brushed pass | Reduces bubbles and thirsty spots before the main pour. |
| Tabletop or bar flood coat | 1/16 to 1/8 in | Usually one coat | Edge runoff is often the largest adjustment. |
| Coaster and tray molds | 1/8 to 1/2 in | One or two layers | Use layer limits for pigments, inclusions, and heat control. |
| River table or deep void | 1/2 to 2 in+ | Multiple lifts | Deep-pour epoxy still needs maximum lift discipline. |
| Thickness | Coverage per gallon | Gallons per sq ft | Best fit |
|---|---|---|---|
| 1/32 in | About 51.3 sq ft | 0.0195 gal | Seal coat and wet-out passes |
| 1/16 in | About 25.7 sq ft | 0.0390 gal | Thin decorative topcoat |
| 1/8 in | About 12.8 sq ft | 0.0779 gal | Standard flood coat |
| 1/2 in | About 3.2 sq ft | 0.3117 gal | Small molds and shallow fills |
| Room condition | Typical range | Recoating allowance | Full cure allowance |
|---|---|---|---|
| Cool room | 60-67°F | 18 to 24 hr | 96 hr or longer |
| Ideal room | 68-75°F | 10 to 16 hr | 72 hr typical |
| Warm room | 76-84°F | 6 to 10 hr | 48 to 60 hr |
| Hot shop | 85°F+ | 3 to 6 hr | Watch exotherm and pot life |
| Mix ratio | Resin share | Hardener share | Where it is common |
|---|---|---|---|
| 1:1 | 50.0% | 50.0% | Craft coating, simple molds, quick tabletop kits |
| 2:1 | 66.7% | 33.3% | Many tabletop, art, and medium-depth systems |
| 3:1 | 75.0% | 25.0% | Selected casting and specialty systems |
| 4:1 | 80.0% | 20.0% | Some marine, coating, and high-solids products |
Tabletop epoxy
Best for: flood coats, counters, bars.
Layer habit: thin, glossy coats.
Watch: runoff and edge dams.
Deep-pour epoxy
Best for: river tables and voids.
Layer habit: thicker controlled lifts.
Watch: maximum label depth.
Casting resin
Best for: molds, trays, blanks.
Layer habit: low-bubble slower cure.
Watch: object displacement.
Art resin
Best for: panels and pigments.
Layer habit: shallow decorative coats.
Watch: open-edge loss.
Calculating the correct amount of epoxy resin is a necessary step in the project completion process. Calculating the correct amount of epoxy resin will prevent a person from running out of the necessary material for there project. When epoxy resin level drop during a project, people usually experience considerable stress.
This is because epoxy resin is an expensive material and difficult to purchase again in the middle of a project. To calculate the total amount of epoxy resin necessary for a project, a person must consider several variable. These variables include the absorption of the wood, the displacement caused by objects within the resin, the loss of resin at the edges of the project, and the depth at which you will pour the epoxy resin on the object.
How Much Epoxy Resin You Need
One of the variables to consider when calculating the total amount of epoxy resin is the absorption of the wood. Raw wood will absorb some of the epoxy resin that is poured onto it. Because the raw wood absorbs epoxy resin, the thickness of the poured epoxy resin will be less than that calculated for the project.
To avoid the absorption of epoxy resin by the raw wood, a person should apply a seal coat of epoxy resin to the wood prior to pour the epoxy resin. The seal coat will lock the grain of the raw wood and ensure that the poured epoxy resin maintains the calculated thickness and volume of epoxy resin. Another variable to consider when calculating the total amount of epoxy resin is the displacement caused by the objects that will be placed within the resin.
Objects like stones, coins, and other wooden objects will take up the volume of space within the resin. Because these objects take up space within the resin, the total amount of epoxy resin to be poured will be less. For instance, a large wooden object will displace more epoxy resin than a small pebble will displace.
The volume of the objects within the epoxy resin must therefore be calculated and subtracted from the total amount of epoxy resin that you will purchase for the project. The third variable to consider when calculating the amount of epoxy resin is the loss of epoxy resin at the edges of the project. When poured, epoxy resin will flow to the lowest point in the project.
If the project involve a flood coat of epoxy resin, the epoxy resin will run off the edges of the object. This loss of epoxy resin must be planned for in the calculation of the total amount of epoxy resin necessary for the project. Otherwise, a person may find themselfs without epoxy resin to complete the project.
The fourth variable to consider when using epoxy resin is the depth of the pour. Depending on the type of epoxy resin that will be used, there will be a maximum depth to which the resin will be poured. This maximum depth is referred to as the pour depth.
The pour depth is the maximum thickness of the epoxy resin pour that will not cause the resin to undergo an exothermic chemical reaction. An exotherm reaction will produce heat that may lead to the epoxy resin crack, yellow, or even smoke. A layer schedule can be used to ensure that the epoxy resin cures proper.
A layer schedule involves pouring the epoxy resin in thick layers that are thin enough to avoid an exotherm reaction. The temperature at which you will pour the epoxy resin is another variable that may affect the project. If the room in which the epoxy resin will be mixed and poured is exposed to a high amount of heat, the chemical reaction of the epoxy resin will occur at a rapid rate.
A rapid chemical reaction will shorten the amount of time during which the epoxy resin can be mixed with the hardener; this period of time is referred to as the pot life. If the resin is exposed to low temperatures in the workspace, the chemical reaction will occur at a slower rate. The epoxy resin will remain tacky for a longer period of time.
The recoat window of the epoxy resin must be understood. The recoat window is the amount of time that a person has to mix a new layer of epoxy resin onto a previous layer of poured epoxy resin. If the time limit for the recoat window is exceeded, the layers will not chemically bond to one another, and the layers may delaminate from one another when the epoxy resin dry.
The last variable to consider when calculating the amount of epoxy resin that will be used in a project is the precise mix ratio between the resin and hardener components of the epoxy resin. The mix ratio cannot be approximated. Using the wrong amount of resin and hardener will lead to the failure of the project.
An incorrect ratio between resin and hardener may cause the epoxy resin to remain soft or sticky once the project has dried. Measurements for both the resin and the hardener must be made and used to ensure that the epoxy resin will cure proper. By considering and calculating for the amount of resin that will be lost due to the seal coat, the displacement of objects, the loss of resin at the edges of the project, and the depth of the layers that will be poured, a person can prepare the proper amount of epoxy resin to complete there project successful.