Drawer Organizer Calculator
Plan a fitted bedroom drawer organizer from inside drawer dimensions, clearance, divider thickness, target compartment size, folded item depth, and the number of storage zones.
Choose a bedroom drawer scenario, then adjust the exact inside measurements before cutting dividers or choosing trays.
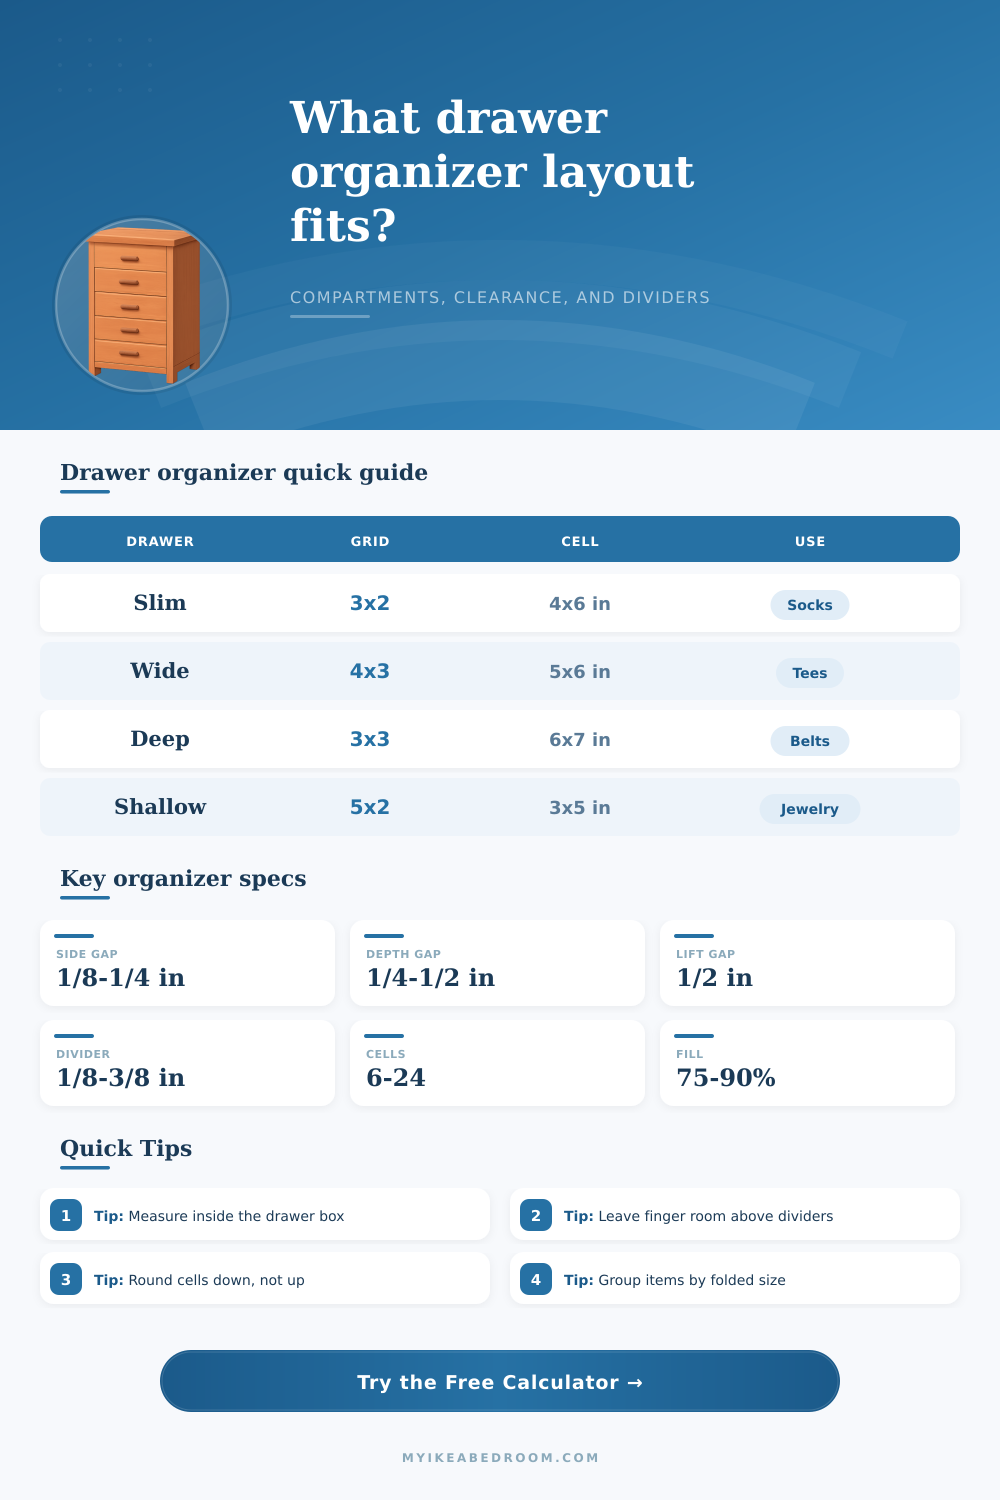
| Item group | Typical clear cell | Recommended depth | Best grid pattern |
|---|---|---|---|
| Socks and underwear | 3.5 to 5 in wide | 4 to 6 in front to back | Many small equal cells |
| Folded tees | 5 to 7 in wide | 6 to 8 in front to back | Medium cells with extra height |
| Jewelry and watches | 2 to 4 in wide | 2.5 to 5 in front to back | Shallow cells, more columns |
| Belts and ties | 4 to 6 in wide | 6 to 10 in front to back | Long channels or mixed grid |
| Bulky linen or sweaters | 7 to 10 in wide | 8 to 12 in front to back | Few large compartments |
| Fit style | Side clearance total | Front/back clearance total | Use when |
|---|---|---|---|
| Tight drop-in tray | 1/8 to 1/4 in | 1/4 in | Drawer box is square and smooth |
| Everyday removable insert | 3/8 to 1/2 in | 3/8 to 1/2 in | You lift the organizer for cleaning |
| Fabric bin set | 1/2 to 3/4 in | 1/2 to 1 in | Soft sides bow outward when full |
| Lined drawer only | 1/8 in | 1/8 in | Dividers sit directly on liner |
| Drawer type | Inside size example | Useful grid | Organizer note |
|---|---|---|---|
| Nightstand top drawer | 13 x 12 x 3 in | 3 x 2 or 4 x 2 | Keep cells shallow and easy to scan |
| Standard dresser drawer | 27 x 16 x 5 in | 4 x 3 or 5 x 3 | Works well for socks and folded tees |
| Wide dresser drawer | 31 x 17 x 6 in | 5 x 3 or 4 x 4 | Use thicker dividers to reduce flex |
| Deep wardrobe drawer | 28 x 19 x 8 in | 3 x 3 or 4 x 3 | Leave more top clearance for stacks |
Best for: socks, underwear, small folded items.
Uses repeated cells and the simplest divider cuts.
Best for: scarves, belts, ties, and cables.
Uses fewer cross dividers so long items stay visible.
Best for: drawers with several item groups.
Match the zone count first, then refine cell sizes.
Best for: jewelry, watches, or seasonal sets.
Needs larger side and top clearances for lifting.
Measure the box, not the front. Drawer faces are often wider than the clear inside box, so the organizer should be sized from the inner side walls and back panel.
Check the top rail. A divider can fit the drawer height but still rub the frame above it, so keep lift clearance in the calculation.
Use cell size for the item, not the drawer. The calculator rounds the grid to practical compartments after subtracting gaps and divider thickness.
Leave one flexible compartment. If the grid gives more cells than item groups, keep the spare cell for seasonal accessories or overflow.
Drawer organization require planning, as a drawer that is not organized can make it dificult for a person to find they items. Items tend to get lost in a drawer if it is not organized because items like socks, belts, and charging cables tend to become tangle up within the drawer. Many people try to solve this problem by purchasing plastic tray for organizing items within a drawer.
However, these plastic trays may not fit within the dimensions of the drawer. To properly design a drawer organizer, it is important to take precise measurement of the inside of the drawer. The inside width of the drawer and the inside depth and height of the drawer are all important measurements.
How to Plan and Measure a Drawer Organizer
The box inside the drawer is of a different size then the front of the drawer. The front of the drawer may extend beyond the box, the sides of the box may bow, and the rail above the drawer may block a divider from being placed within the drawer. Therefore, a small amount of space must be allowed for the sides and front to back of the drawer for these imperfections within the drawer.
Additionally, a small amount of space should be allowed above the divider to prevent shirts from catching on the rail of the drawer. Another factor to consider when designing a drawer organizer is the thickness of the divider that will be placed within the drawer. Using thin divider allows for more space within the drawer.
However, thin dividers may bend when there are items within the drawer that is heavy or take up alot of space within the divider. Using a thick divider will allow the divider to hold it shape when the drawer is full of items. Furthermore, more space will be left for items to be place within the divider.
This thickness of the divider will be entered into an online calculator that will calculate the space that is needed within the divider. Another determination that will be entered into the online calculator is the target size of the compartments within the divider. A person can usually determine the size of the compartments for items like socks or shirts.
The calculator will tell a person how many row and columns of compartments will fit within the divider based on the target size of the compartments for the items that will go into the drawer. The style of the items within the drawer will help determine the type of cell that will be created within the divider. For example, items like socks and underwear will fit well in small square cells.
However, folded shirts will need more depth to the cells so that the shirts will not fall forward into the drawer when the drawer is opened. Items like jewelry will require shallow cells so that the items can be easily view within the divider. Next, the clearance of the divider will determine if the organizer will stay within the drawer or shift within the drawer.
If the divider is to be used within a tight drop-in tray, then there will be a small allowance on the sides of the divider. However, people may want more clearance to easily lift the divider out of the drawer. Furthermore, if the divider is to be used as a fabric bin, an extra allowance must be made on each side of the divider for the fabric bins to bow when filled with clothing.
The height of the items within the drawer and the height of the dividers must be less than the distance of the items to the rail above the drawer. The calculator will indicate if there is enough space above the divider by showing the spare height above the divider. This spare height will make it easy for the person to reach into the back of the drawer to recieve items.
The number of zones within the drawer will be entered into the online calculator to determine the total number of compartments that will be within the organizer. For example, if there are six categories of clothing that will be stored in the drawer, the organizer will have at least six compartment for each category of clothing. This number can be compared to the total number of compartments that will be within the organizer to make sure there is not a shortage of compartments.
If there is a shortage, then the individual will have to rethink the design of the organizer prior to cutting the materials for the organizer. Finally, the allowance of the liner that will be placed within the divider will prevent the liner from curl. If the liner is too thin and allowed too much space on each side of the divider, the liner will begin to curl on the bottom of the drawer.
Therefore, a small amount of space will be cut from each side of the liner so that the liner will remain flat on the bottom of the drawer. The calculator will determine the dimension of the liner that needs to be cut. While many people may think that drawer organization is a process of purchasing organizers for a drawer, drawer organization is actualy a process of designing an organizer that will fit within an individual’s drawer.
To properly make an organizer for a persons drawer, the individual must take the dimensions of the inside of the drawer, decide on the thickness of the divider, and determine how many zone he or she would like within the divider. These decisions will lead to an easy calculation of how many compartments will be within the divider, how large each compartment will be, and what the finished dimensions of the organizer will be. Furthermore, if these dimensions are carefully considered, the drawer that is organized will reveal each category of items within its own compartment.