Door Casing Calculator
Estimate side casing lengths, head casing length, plinth blocks, header pieces, total linear feet, waste allowance, and a cut list for single, bifold, French, and craftsman-style door trim.
Start with a common opening, then adjust the slab, rough opening, reveal, casing width, plinth height, and corner style from your actual door.
Calculation breakdown
| Cut item | Qty | Each length | Total length | Notes |
|---|
| Casing style | Common width | Common reveal | Corner type |
|---|---|---|---|
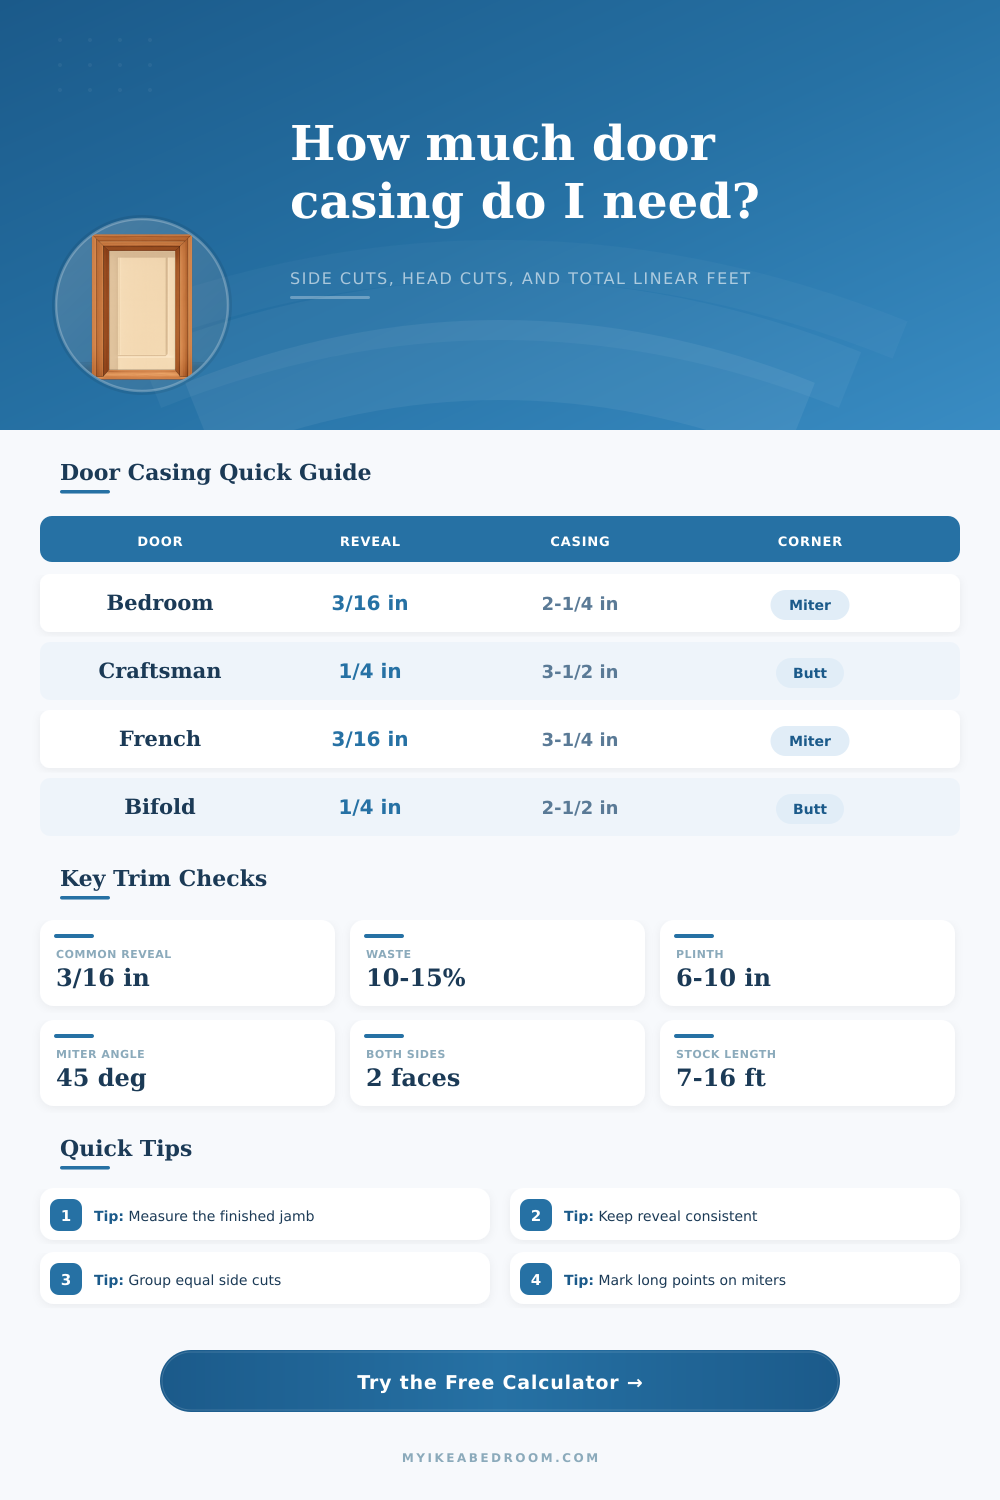
| Colonial or ranch casing | 2-1/4 in to 2-1/2 in | 3/16 in | Mitered 45 degree corners |
| Modern flat stock | 2-1/2 in to 3-1/2 in | 3/16 in to 1/4 in | Mitered or square butt |
| Craftsman side boards | 3-1/2 in to 4-1/2 in | 1/4 in | Square butt with header |
| Backbanded casing | 2-1/4 in plus backband | 3/16 in | Mitered or butt with returns |
| Header style | Main head piece | Extra pieces | Best fit |
|---|---|---|---|
| Standard single head casing | One top casing piece | No added header parts | Most interior mitered door trim |
| Craftsman frieze plus cap | Frieze board over side boards | One cap rail, slightly wider | Flat stock and square profiles |
| Casing with backband return | Main casing plus backband | Backband on both sides and head | Thicker traditional trim build-ups |
| Header with small top cap | Standard head casing | One cap rail above casing | Simple upgrade over plain casing |
| Door slab setup | Typical rough width | Typical rough height | Calculator use |
|---|---|---|---|
| Single 30 in x 80 in slab | 32 in | 82-1/2 in | Checks framing, estimates jamb size |
| Single 36 in x 80 in slab | 38 in | 82-1/2 in | Wider casing head piece |
| French pair, two 30 in slabs | 62 in | 82-1/2 in | One wide head, two side casings |
| 96 in tall interior slab | Slab plus 2 in | 98-1/2 in | Long side casing stock needed |
| Stock length | Useful for | Watch point | Cut planning note |
|---|---|---|---|
| 7 ft casing | 80 in doors, no tall plinth | Too short for 96 in doors | Often one side piece per stick |
| 8 ft casing | 80 in doors with moderate plinth | Check miter long points | May leave short offcuts |
| 10 ft casing | Tall sides or paired head pieces | Transport length | Useful for wide French openings |
| 14 ft to 16 ft casing | Batching multiple doors | Keep profiles straight | Best for optimizing repeated cuts |
Mitered casing
Cut logic: side and head pieces are measured to long points, with the casing width added at each mitered corner.
Good for profiled colonial casing where the shape wraps around the top corners.
Square butt casing
Cut logic: vertical sides stop below the head, and the head spans across the outside of both side boards.
Good for flat stock, fast layout, and trim that will be painted.
Craftsman header
Cut logic: the calculator adds a frieze board and a longer cap rail above the main opening.
Good when the doorway needs a heavier visual top without complex profiles.
Backband trim
Cut logic: an added backband length follows the two sides and top casing perimeter.
Good for thicker jamb build-ups and older trim profiles.
Door casing are installed around the doorway in such a way that the door casing must be installed correct so that the door casing is square and the door casing lines up with an door jamb. If the door casing doesnt line up with the door jamb, the door casing will not create a consistent shadow line at a reveal. The reveal is the small space between the door jamb and the door casing.
The calculator can calculates the measurements that is required for the door casing installation in that it can process the slab size, the jamb opening, the reveal, the casing width, and the corner style. Using the calculator will help to avoid errors in the measurements of the door casing and it will help to avoid wasting material in the installation. The two method of joining the door casing at the corners involve either mitering the corners or using butt corners.
How to Measure Door Casing and Use the Calculator
Mitered corners involve cutting the door casing at the corners so that the two pieces of door casing line up in a square shape, and these types of corners are typically used in profiled colonial casing for doors. Because these corners requires the side pieces of the door casing to be longer than the casing width, more material is required to create these corners. Butt corners involve the placement of the pieces of door casing against each other without cutting them at the corners.
Butt corners use less of the required material than miter corners, and they are used for flat stock of trim for doors, such as Craftsman style trim. For these types of doors, the head piece of the door casing will extend beyond the side piece of the door casing. The depth of the reveal is one of the measurements that has an impact on the length of the door casing; the reveal width must be added to the width of the door jamb in both sides of the doorway and the top of the doorway.
A 3/16-inch reveal width is a popular choice for mitered interior doors so that the door casing will not interfere with the hinge barrel of the door. For Craftsman-style doors, a quarter-inch reveal is used so that the flat door casing will pair with the reveal. The actual width of the installed door jamb need to be measured before the door casing is installed because the width of the door jamb may have been affected by an uneven floor or drywall mud.
Plinth block are additional pieces of door casing that can be installed at the bottom of the door casing. These plinth blocks will raise the door casing in a square shape off of the finished floor of the door casing. These plinth blocks protects the end grain of the door casing, and they provide a substantial base to the door opening.
In the calculation of the amount of door casing required for the doorway, the carpenter will subtract the height of the plinth blocks from the length of the side pieces of the door casing. Furthermore, the number of plinth blocks will be counted as separate piece of door casing; each plinth block requires one separate piece of door casing to support the doorway. Therefore, the number of plinth blocks must be accounted for in the purchase of the door casing.
Some door styles have headers that change the amount of door casing that will be required for each doorway. For example, adding a Craftsman frieze board with a cap rail to each doorway will require two extra lengths of door casing that is wider than the head piece of the door casing. Adding backband trim to the doorway will increase the total number of pieces and the total amount of linear feet of door casing that will be required to complete the installation.
The door casing calculator will account for these extra pieces of door casing when they are chosen for inclusion in the calculation. These extra pieces will be included in the total linear footage that the calculator determine will be required. The waste of the door casing will be purchased in addition to the total amount of linear feet of door casing that the calculator calculates.
A waste of between 10 and 15% of the total linear footage of door casing is usually sufficient for most interior door casing projects. More waste is required if the door casing includes ornate design elements or if the door casing is stain-grade so that the grain of the two side pieces will match. The waste will be calculated for the total run of the door casing in addition to the short pieces of door casing that will be cut from the side pieces to allow for the placement of the knots and sap lines along the door casing.
It is possible that the actual dimensions of the rooms in which the doors are to be installed may not match the dimensions required for the installation of the door casing. For example, the doorways may be adjacent to return walls, or the drywall may not be flat. In this situation, the measurements can be compared to the dimensions of the installed door jamb using a story pole.
The story pole will allow for a final check of the actual measurements of the door jamb. The measurements from the finished floor to the reveal line on each side of the doorway can be compared to the measurements that were determine with the calculator. If the measurements differ from each other by more than a sixteenth of an inch, the lengths of the side pieces of the door casing should of been adjusted prior to cutting the door casing.
The stock lengths of the door casing must be determined prior to the purchase of the door casing. Seven-foot sticks of door casing may be used for 80-inch doors, especially if plinth blocks are not used. For doors that are taller than 80 inches, or if a header build-up is to be used, longer stick will be required.
For doors that are the same height, the side pieces of door casing can be cut from one stick of door casing. By grouping doors together, there will be less waste in cutting the door casing, and the grain of the door casing will remain in the same direction along each door. The total linear footage of door casing will be displayed in the door casing calculator after the waste of the door casing is added to the total linear footage of the door casing.
This total linear footage can be compared to the lengths of the sticks of door casing available at the lumberyard. Small changes to any of the parameters will change the linear feet of door casing that is calculated for each doorway. Therefore, running the calculations for each doorway will allow the carpenter to determine how many stick of door casing will be purchased for each project.