💠 Diamond Accent Wall Calculator
Calculate exactly how many diamond shapes fit on your accent wall — with size, spacing, and layout planning
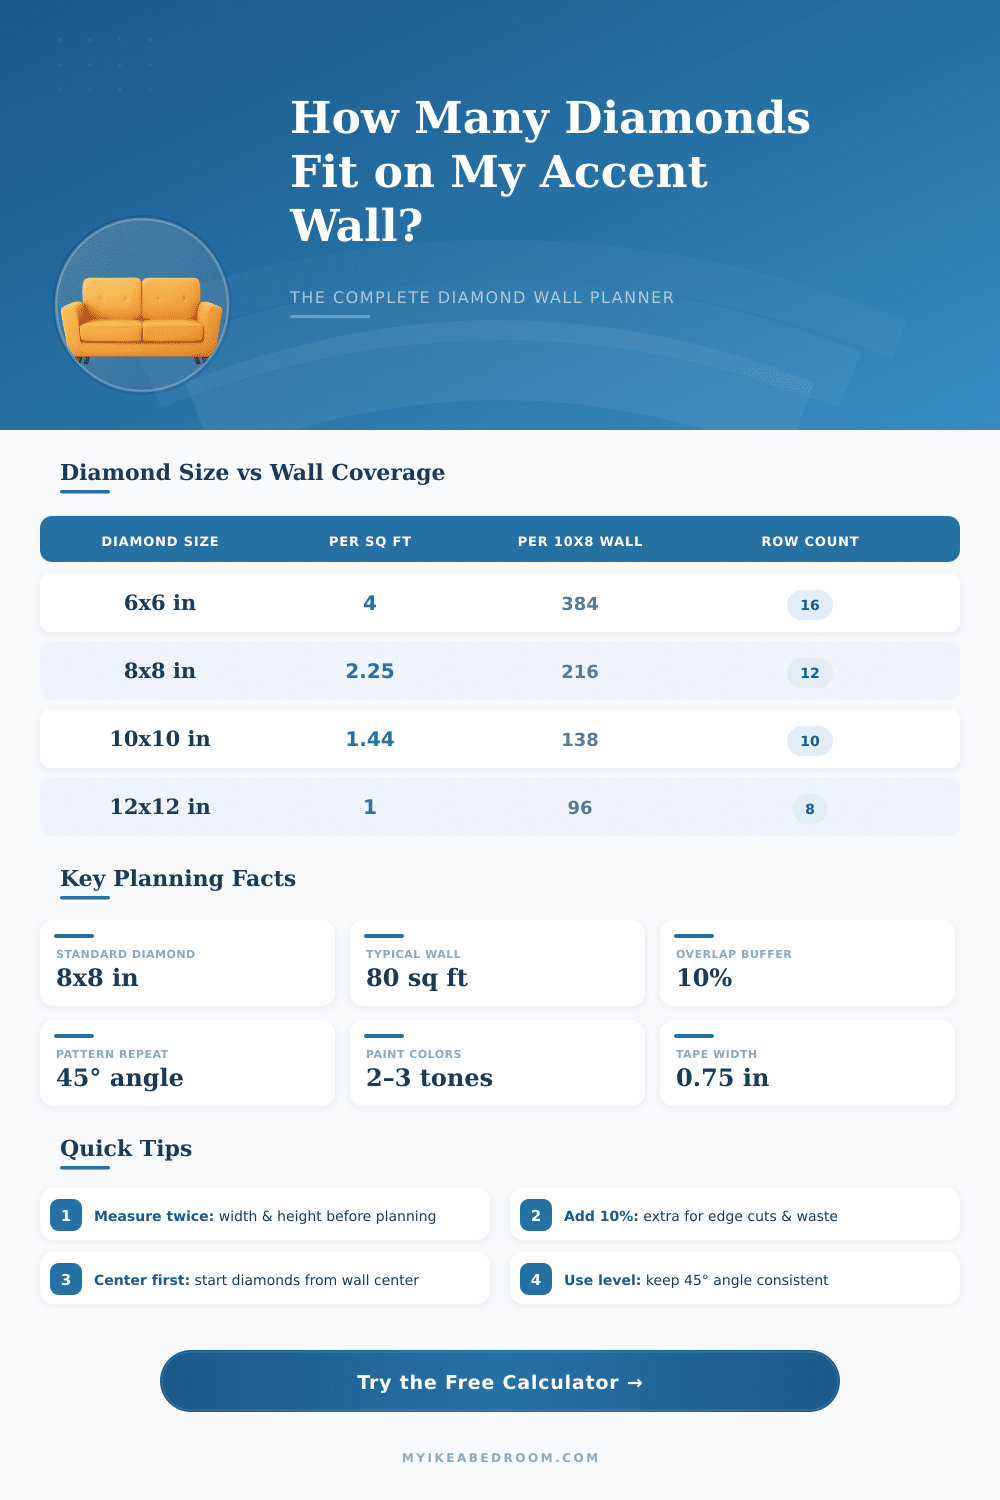
| Diamond Size (in) | Diamond Size (cm) | Diamonds per sq ft | Total on 80 sq ft Wall | Perimeter per Diamond (in) |
|---|---|---|---|---|
| 4 x 4 | 10 x 10 | 9.0 | 720 | 16 |
| 6 x 6 | 15 x 15 | 4.0 | 320 | 24 |
| 8 x 8 | 20 x 20 | 2.25 | 180 | 32 |
| 10 x 10 | 25 x 25 | 1.44 | 115 | 40 |
| 12 x 12 | 30 x 30 | 1.0 | 80 | 48 |
| 14 x 14 | 36 x 36 | 0.74 | 59 | 56 |
| 16 x 16 | 41 x 41 | 0.56 | 45 | 64 |
| Wall Width | Diamond Size | Columns (grid) | Rows @ 8ft height | Total Diamonds |
|---|---|---|---|---|
| 8 ft (96 in) | 8 x 8 in | 12 | 12 | 144 |
| 10 ft (120 in) | 8 x 8 in | 15 | 12 | 180 |
| 12 ft (144 in) | 8 x 8 in | 18 | 12 | 216 |
| 10 ft (120 in) | 10 x 10 in | 12 | 10 | 120 |
| 12 ft (144 in) | 10 x 10 in | 14 | 10 | 140 |
| 15 ft (180 in) | 12 x 12 in | 15 | 8 | 120 |
| Room / Project | Wall Size | 8x8 Diamond Count | 10x10 Diamond Count | 12x12 Diamond Count |
|---|---|---|---|---|
| Small Bedroom | 8 x 8 ft | 144 | 92 | 64 |
| Nursery Feature Wall | 10 x 8 ft | 180 | 115 | 80 |
| Standard Bedroom | 12 x 8 ft | 216 | 138 | 96 |
| Living Room Accent | 15 x 9 ft | 304 | 194 | 135 |
| Master Bedroom | 14 x 9 ft | 284 | 181 | 126 |
| Dining Room Wall | 12 x 9 ft | 243 | 155 | 108 |
Diamond Accent Wall add immediate visual charm to any room, it belongs to those ideas that seems much more impressive than they really are. The shape creates a fresh surprisingly clean feel that works great as a close spot. The best part?
One can do it without too much spend, if you are ready to work on it.
How to Make a Diamond Accent Wall
One can reach firm results with wood, that one arranges to create the Diamond pattern. Take something like one-inch-thick board, measure its location and use a miter saw to cut the bits according to your wall sizes. Later set them directly on the wall in that Diamond layout.
The number of pieces that you need depend on the size of your wall and on the wanted size of the diamonds. Strips can give a similar look, if that anwsers more to your time.
Square trim opens another way to reach Diamond style. For instance, striking pink Accent Wall combine well with square trim, cut and arranged in a steady Diamond pattern. If you like old details in spaces, that main wall sounds all the right notes.
When everything is in place, caulk levels the banks and gives a polished, finished look.
So here are the easy option. Panels, designed just for Diamond patterns, come ready to use, with locking Diamond forms exactly done. Mount them and enjoy; you receive strong 3D look and visual depth without reinventing the wheel.
For a painted version, the painters tape becomes your best friend. You mark the bottom of your design, and hear starts the magic. One draft, that I found, started with painters tape two feet from the wall below, later creating one-foot Diamond sections from there.
The color mix, that they used, were turquoise with light pink. Use painters tape to help keep costs low and the work easy. While you remove it, you receive those clear lines, that make everything seem planned.
The colors, that you choose, matter a lot. That same draft one did with vivid turquoise shade, Turquoise Waters. For the main Accent Wall part, covering the central Diamond part with two whole outer coats.
During the process, the wall itself looked like shibori fabric before the final design appeared. A close piece like a sun mirror sets the finished wall well. Leaving the mirrorframe blank ties the whole look together.
Paint also works for a more modest look. One can form strips, squares, diagonals, or diamonds with the same color in different textures; flat paint against satin, for instance. That tone-on-tone look is tender, but clearly visible.
Always start by painting your base color first, before you tape the Diamond design up. Such a clear base makes everything, that follows, more easy to read.