Crown Molding Spring Angle Calculator
Convert wall drop, ceiling reach, profile width, and room corner angle into spring angle, nested miter, flat compound miter, and bevel settings for crown molding cuts.
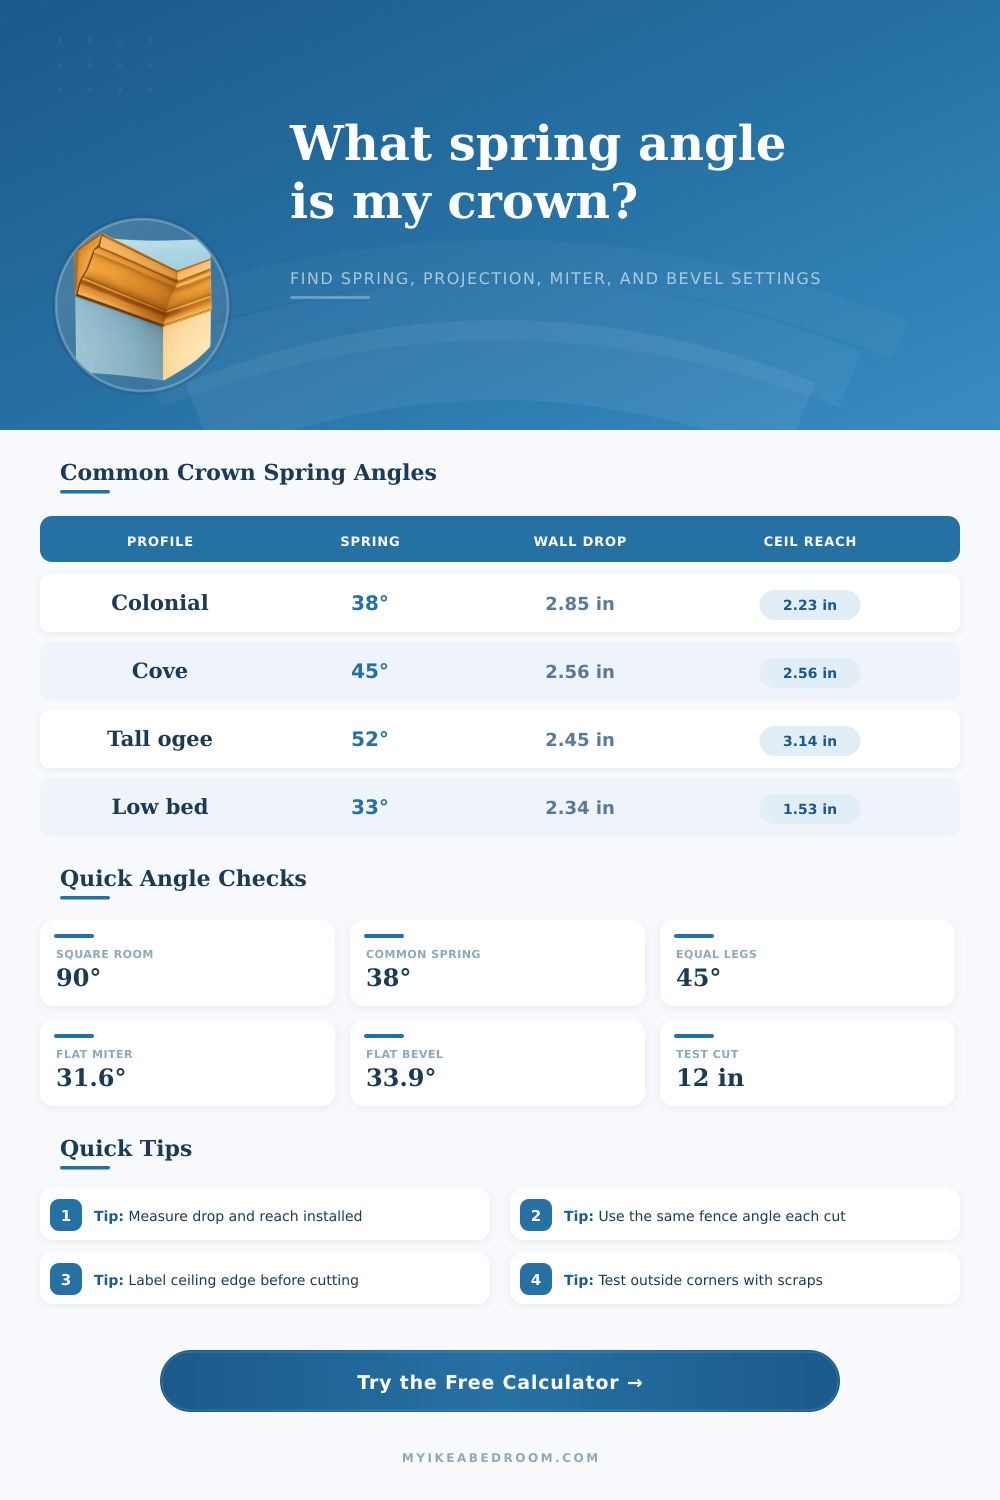
Crown angle results
| Profile | Spring | Wall drop | Ceiling reach |
|---|---|---|---|
| 2 3/4 in cabinet crown | 38° | 2.17 in | 1.69 in |
| 3 5/8 in colonial crown | 38° | 2.85 in | 2.23 in |
| 3 5/8 in cove crown | 45° | 2.56 in | 2.56 in |
| 5 1/4 in tall ogee crown | 52° | 3.23 in | 4.14 in |
| Corner | Nested | Flat miter | Flat bevel |
|---|---|---|---|
| 88° | 44.0° | 31.1° | 34.5° |
| 89° | 44.5° | 31.4° | 34.2° |
| 90° | 45.0° | 31.6° | 33.9° |
| 91° | 45.5° | 31.9° | 33.5° |
| 92° | 46.0° | 32.1° | 33.2° |
| Joint | Nested position | Left piece | Right piece |
|---|---|---|---|
| Inside corner | Ceiling edge down | Miter right | Miter left |
| Outside corner | Ceiling edge down | Miter left | Miter right |
| Scarf joint | Flat or nested | 22.5° face | Opposite 22.5° |
| Return end | Nested preferred | Main miter | Short cap miter |
| Drop | Reach | Spring | Profile clue |
|---|---|---|---|
| 2.85 in | 2.23 in | 38.0° | Standard colonial |
| 2.56 in | 2.56 in | 45.0° | Equal cove |
| 2.45 in | 3.14 in | 52.0° | Projecting crown |
| 2.34 in | 1.53 in | 33.2° | Low bed crown |
Crown molding is an trim that is placed along the edge where the wall meets the ceiling. These two planes, the wall and the ceiling, dont form a perfect right angle at most corners. There is a profile to the crown molding, and this determine the spring angle of the molding.
The spring angle is a measurement of how the molding angles against the wall and the ceiling. Without knowing the spring angle of the molding, it is likely that the miter saw cut will not form the molding properly. The spring angle will help to indicate how the molding will rest in the corner, as well as show the settings for the miter and the bevel saws.
How to Measure and Cut Crown Molding
The vertical drop and the horizontal reach of the molding establish the spring angle. The vertical drop is the distance that the molding drop down against the wall. The horizontal reach is the distance that the molding extends out against the ceiling.
If the vertical and horizontal reaches is the same, the spring angle will be forty-five degrees. If the molding is tall and thin, the spring angle will be greater than fifty degrees. If it is short and wide, the spring angle will be less than thirty-five degrees.
Given the vertical and horizontal reach, it is possible to calculate the spring angle. Additionally, you can use the face width of the molding to calculate the spring angle with the help of a catalog that list spring angles for various face widths. The spring angle impacts the settings for the miter saw.
There are two different method for cutting crown molding. One method is the nested method, which involves placing the molding against the saw fence at the spring angle. This method only requires adjusting the miter saw’s miter angle.
The other is the flat method, which requires laying the molding flat on the saw table. With this method, you will have to adjust both the miter and bevel angles. The calculator will reveal both sets of measurements so that you can choose the method you would prefer to use with your saw.
The nested method requires the use of a stop block to hold the molding at the same angle. The flat method requires tilting the saw blade and the saw table at the same time. The corners in a room are rarely exactly ninety degrees.
An eighty-nine degree angle is not the same as a ninety-two degree angle. The saws saw blades can create small gaps in the corners. These gaps can be filled with caulk, but it is better to cut the molding to ensure the corner is even.
The calculator allows you to enter the angle of the corner. Based off that measurement, the calculator will split that angle between the two piece of molding. Using forty-five degree miters for a corner that is not ninety degrees will cause the molding to not but into place correctly.
Therefore, you will have to calculate the miter and bevel angles specific to the corner. Additionally, you can measure the spring angle on existing crown molding. To do so, use a measuring tape to measure the vertical drop of the molding and the horizontal reach of the molding.
Hold the molding in place in the corner when you take these measurements. To calculate the vertical and horizontal measurements, measure from the ceiling to the bottom edge of the molding. For the horizontal reach, measure from the wall to the top edge of the molding.
Divide the horizontal measurement by the vertical measurement, then take the arctangent of that number. The crown molding calculator will make these calculations for you. The vertical and horizontal measurements will allow you to calculate the face width of the molding, which will help you purchase additional molding of the same dimensions.
The spring angle will affect the visual appearance of a room. Different spring angles will create different visual impacts on a room. For instance, a thirty-eight degree spring angle will cause the molding to extend farther down the wall then across the ceiling.
A forty-five degree angle means the molding will have equal vertical and horizontal reaches. If the spring angle is fifty-two degrees, the molding will extend farther across the ceiling than down the wall. These varying degrees will create different visual impacts on a room.
You can compare these options with the molding calculator to determine the spring angle that you like most. When determining the cutting method, you will have to consider the capacities of your miter saw. Miter saws have limitations in the tilt of the saw blade and the table of the saw.
Some saws have a maximum tilt of forty-five degrees. If the angle of the cut crown molding requires an angle beyond the saws tilting capacity, it cannot be used with that saw. In this case, it is necessary to use the nested method of cutting crown molding instead of the flat method.
Additionally, you may have to build the saw into a jig to allow for the required tilting of the saw. The calculator will allow you to enter the tilting capacity of your saw. Based on the spring angle of the molding, the calculator will inform you whether or not the cut can be made with your saw.
Test cuts will help ensure that the final installation is accurate. Using scrap pieces of crown molding before installing the final molding will help you to verify your measurements. You can use the scrap molding to ensure that your spring angle is accurate, your corner measurements are accurate, and the saw settings are correct.
By performing test cuts, you will avoid wasting the crown molding that you purchase for the installation. By including an allowance field for test cuts in the calculator, you can plan for the additional length that will be required for the test cuts. By taking the time to make test cuts, you can ensure that the final installation of the crown molding is accurate and even.