📐 Crown Molding Vaulted Ceiling Angle Calculator
Calculate precise miter & bevel angles for crown molding on vaulted, cathedral & sloped ceilings
| Pitch (Rise/Run) | Slope Angle | Miter (38° Spring) | Bevel (38° Spring) | Miter (45° Spring) | Bevel (45° Spring) |
|---|---|---|---|---|---|
| 1/12 | 4.8° | 44.5° | 34.1° | 44.3° | 35.5° |
| 2/12 | 9.5° | 43.5° | 34.5° | 43.2° | 35.8° |
| 3/12 | 14.0° | 42.1° | 35.1° | 41.7° | 36.4° |
| 4/12 | 18.4° | 40.3° | 36.0° | 39.8° | 37.3° |
| 5/12 | 22.6° | 38.1° | 37.0° | 37.5° | 38.4° |
| 6/12 | 26.6° | 35.8° | 38.2° | 35.0° | 39.5° |
| 7/12 | 30.3° | 33.2° | 39.5° | 32.3° | 40.9° |
| 8/12 | 33.7° | 30.5° | 40.9° | 29.5° | 42.3° |
| 9/12 | 36.9° | 27.8° | 42.3° | 26.7° | 43.7° |
| 10/12 | 39.8° | 25.0° | 43.5° | 23.9° | 44.8° |
| 12/12 | 45.0° | 19.5° | 45.6° | 18.4° | 46.8° |
| Pitch | Spring Angle | Left Inside Miter | Left Inside Bevel | Right Inside Miter | Right Inside Bevel |
|---|---|---|---|---|---|
| 4/12 | 38° | 40.3° L | 36.0° | 40.3° R | 36.0° |
| 4/12 | 45° | 39.8° L | 37.3° | 39.8° R | 37.3° |
| 6/12 | 38° | 35.8° L | 38.2° | 35.8° R | 38.2° |
| 6/12 | 45° | 35.0° L | 39.5° | 35.0° R | 39.5° |
| 8/12 | 38° | 30.5° L | 40.9° | 30.5° R | 40.9° |
| 8/12 | 45° | 29.5° L | 42.3° | 29.5° R | 42.3° |
| 12/12 | 38° | 19.5° L | 45.6° | 19.5° R | 45.6° |
| 12/12 | 45° | 18.4° L | 46.8° | 18.4° R | 46.8° |
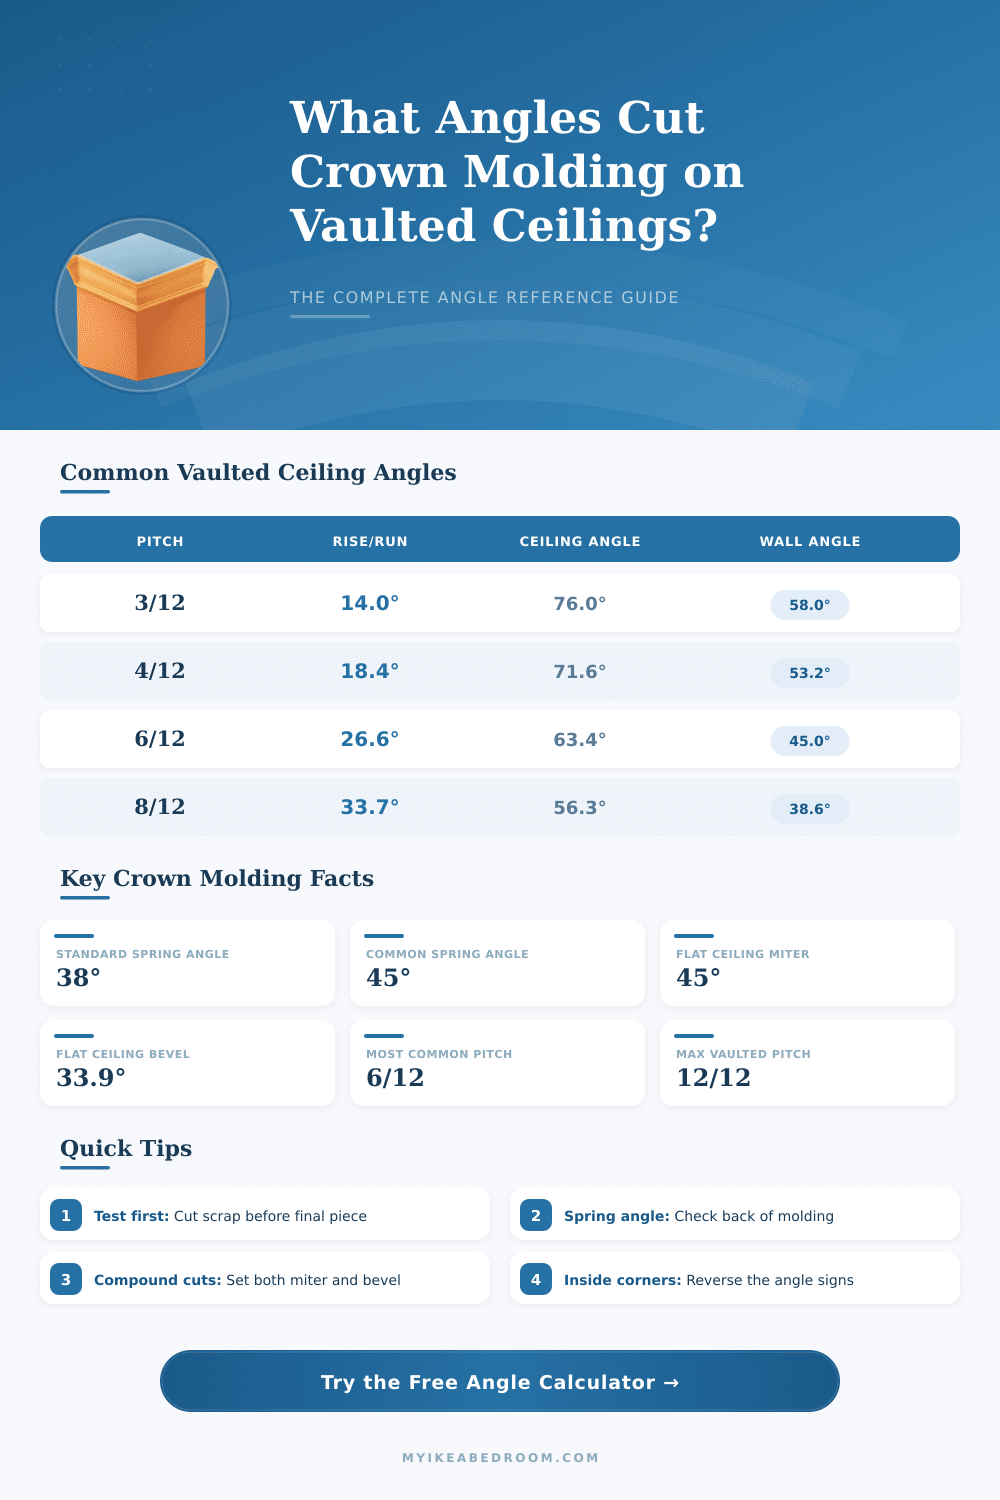
| Rise/Run | Decimal | Angle (degrees) | Description |
|---|---|---|---|
| 1/12 | 0.083 | 4.76° | Very shallow slope |
| 2/12 | 0.167 | 9.46° | Shallow vault |
| 3/12 | 0.250 | 14.04° | Low vault |
| 4/12 | 0.333 | 18.43° | Standard vault |
| 5/12 | 0.417 | 22.62° | Moderate vault |
| 6/12 | 0.500 | 26.57° | Common cathedral |
| 7/12 | 0.583 | 30.26° | Steep vault |
| 8/12 | 0.667 | 33.69° | Steep vault |
| 9/12 | 0.750 | 36.87° | Very steep |
| 10/12 | 0.833 | 39.81° | Very steep |
| 12/12 | 1.000 | 45.00° | Equal rise/run |
Get precise corners for crown molding is surprisingly difficult. The most common crown molding that you find in stores, have three different possible spring corners: 38, 45 or 52 degrees. Basically the spring corner shows how steep the crown molding is when it rests against the wall.
This matters a lot, because it totally changes the way you cut the bits.
Easy Guide to Cutting Crown Molding Corners
Here is where it becomes really key: standard American crown molding with 52- and 38-degree corners come with charts, that show the right miter and bevel settings that you need. Those charts assume that you work with a standard 90-degree wall angle. Even so many folks simply take a 45-degree angle and hope for the best, warning: that does not work.
For a real 90-degree angle, the miter angle is around 31.6 degrees, and you must also mind the bevel angle on the blade.
Working with a 38-degree spring angle on a 90-degree wall, you need almost 31.62 degrees for the miter and around 33.86 degrees for the bevel. Switching to a 45-degree spring angle on the same 90-degree wall, the miter must be around 35.26 degrees with a 30-degree bevel. The most common saws have marks close to those numbers, which certainly helps.
Here is a fast way that skips the whole trouble of miter headaches: hold the crown molding upside down and tight against the fence and the table, so that it looks already installed on your wall. Then simply cut a straight 45-degree angle. No need for math.
Angled or sloped ceilings? Here things get tricky. To create a 120-degree wall angle, each bit needs a 15-degree slice.
The crown molding rests flat on the saw table for those slices. Internal corners have a longer base then top, while outside corners reverse that, the base is shorter.
Some folks simply cut at 45 degrees and later set between 42 and 46 degrees, until something fits. That trial-and-error commonly ignores the spring angle. The real way is setting the miter angle to half of the wall angle.
For 90-degree walls, that is 45 degrees on the miter with no bevel, but only when the crown molding is placed against the fence, as it would sit on the wall.
Weird corners, like 135-degree internal corners, add extra trouble. For two-sided cuts, a hack-saw with a front-cut at 22.5 degrees saves much time. Wood glue belongs in corners or wherever bits meet.
Charts and guides found online for counting combined corners in odd cases. Getting laser-precise numbers like 30.95 miter and 33.4 bevel from a chart sounds great, but can you really reach thoseprecise spots on a saw with little marks and too big gaps? Here reality ruins the plan.