Blind Valance Length Calculator
Calculate valance front span, side returns, total board length, wrap fabric cut length, miter allowance, stock joins, section gaps, and final fit clearance for blinds and shade headrails.
Pick a common window or door setup, then fine-tune the exact headrail width, returns, and fabrication allowances.
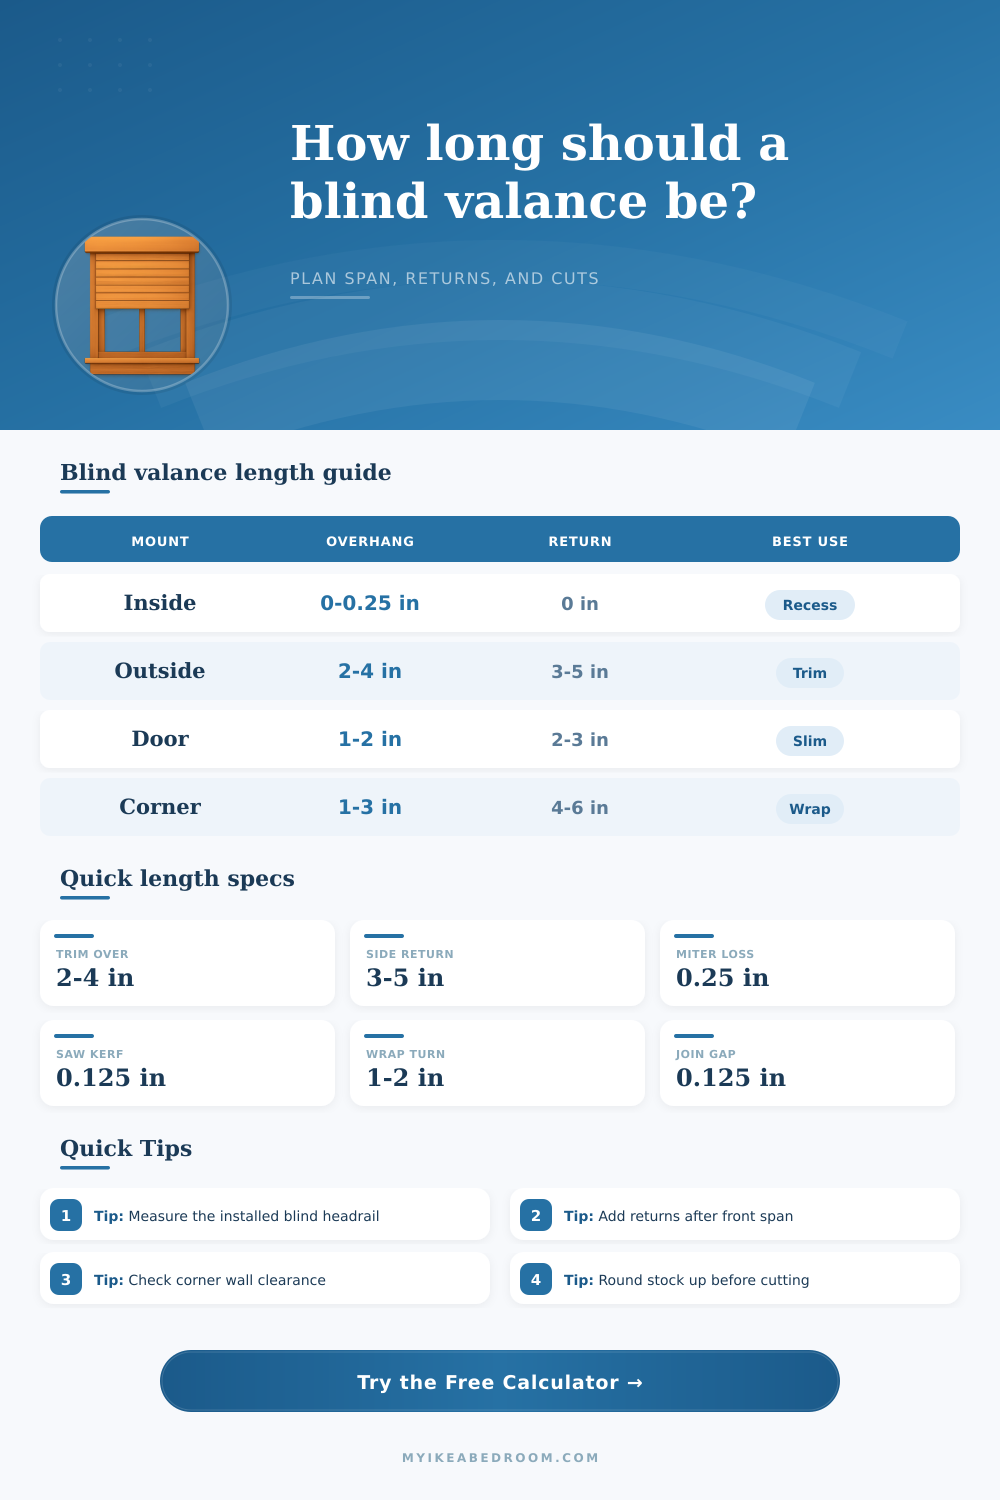
| Mount type | Front span formula | Return depth | Planning note |
|---|---|---|---|
| Inside mount | Opening width minus 1/8 to 1/4 in | 0 in | Keep the valance inside the recess without rubbing side jambs. |
| Outside mount | Blind width plus both side overhangs | 3 to 5 in | Returns hide brackets and cover the projected blind headrail. |
| Door blind | Headrail width plus 1 to 2 in | 2 to 3 in | Compact returns reduce door-swing interference. |
| Corner wrap | Main opening plus overhang | 4 to 6 in | Measure both walls because one return may need to be longer. |
| Bay window | Panel widths plus section gaps | 0 to 3 in | Use separate fronts when angles make one straight rail impractical. |
| Stock length | Best fit | Join guidance | Cut allowance to remember |
|---|---|---|---|
| 48 in | Small bath or door valance | Usually one piece | Add end trimming before final cut. |
| 60 in | Standard bedroom blind | Usually one piece | Check outside returns before cutting. |
| 72 in | Wide single window | One piece or short splice | Include saw kerf for separate returns. |
| 96 in | Patio door or double blind | Useful for continuous fronts | Plan where the joint will be least visible. |
| 120 in | Large picture window | Often needs support | Recheck straightness and handling clearance. |
| Material | Typical max span | Join behavior | Allowance focus |
|---|---|---|---|
| Painted wood or MDF | 72 to 96 in | Can be spliced and filled | Miter loss, kerf, and support spacing. |
| Fabric-wrapped board | 72 to 96 in | Hide seams at returns or folds | Turnback and pattern repeat. |
| Aluminum valance rail | 96 to 120 in | Use rail clips or couplers | End cap allowance and bracket clearance. |
| PVC or faux wood | 60 to 84 in | More visible joint line | Leave slightly more expansion clearance. |
| Veneer or laminate strip | 72 to 96 in | Match grain or pattern | Repeat allowance and clean end trim. |
| Scenario | Opening or blind | Typical total length | What drives the extra length |
|---|---|---|---|
| Inside bedroom blind | 34 to 48 in | Opening width only | Small side clearance keeps it from rubbing the jamb. |
| Outside mount over trim | 36 to 60 in | Front plus returns | Side overhang and projection returns hide hardware. |
| Double blind window | 72 to 96 in | Continuous front | Section gaps and stock joins affect the final cut plan. |
| Sliding door shade | 72 to 96 in | Long straight front | Long stock reduces visible seams across the opening. |
| Fabric-wrapped valance | Any width | Board plus wrap | Turnbacks, seams, and repeat matching add fabric length. |
Measure the finished blind, not only the glass. The valance normally covers the installed headrail and its mounting brackets.
Return depth is a projection check. It should clear the headrail face, bracket thickness, and any moving shade roll.
Keep joins away from the center. A joint near a bracket, return, or section break is usually less visible.
Round after allowances. Add overhang, returns, kerf, seams, and wrap first, then round the cut length.
It seems like valances are all straightforward geometry. You just has to figure out where the headrail is hiding and how much fabric you will be wasting. Then there are sight lines. You never get a perfect opening on your window, so you have to plan for that too.
The one thing that tends to throw off your cut list is the secret extra space that eats into your stock before you even pick up your saw. After specifying your installation, the calculator does the math. No more guesswork about coefficients. Takes into account factors that trick homeowners who try to do it themselves.
## How to Use the Valance Calculator
If there is a headrail on your blind, you specify its width. Not the width of the window framing; and the valance will cover the headrail. Next, determine how much overhang you want on each side to prevent light leakage. Many people underestimate return size here. A narrow return create a void when the blind extends beyond the wall. The calculator ensures these clearances is met automatically; no need for 3D visualization.
These dimensions vary depending of material. For example, wood and mdf boards can shrink and swell based on humidity. Because of that, you want to leave some wiggle room in your final cut. Valences made from fabric also has to allow for the turn back at both ends. And if there’s a repeating pattern, you’ll need more than that as well (which will add a bit to the total). That’s why the calculator includes an allowance for wrapping up the valance. So you don’t find yourself short of fabric just as you get to the corner. Small detail, but important when you are paying by yard!
A second problem in valence planning is the stock length. You might be measuring a span of forty-eight inches. Standard lumber lengths is either seventy-two or ninety-six inches long. How do you know what size stock match your scenario? Here’s a reference table. Does your calculated total exceed the length of the board you want to use? Then you’ll have to join the boards. How many? The tool knows and takes that into account.
It does include the kerf, the wood that gets cut away from the blade as the saw cuts through the wood. Kerf is a small amount, but we commonly ignore it. When we forget about it, then there’s a gap where there shouldn’t of been. For larger bay set ups and windows, you don’t want to try to stretch one long board across. Sectioning the valance is a better idea because wood will warp over time. If you section the front part evenly, the small space between each section act as natural expansion joints. The lines of your joins are hidden inside these gaps on purpose. That way they won’t be sticking out right in the middle where you’d notice it more.
Take your time with first numbers for the outside mount measurement. It’s not as easy as it seems, especially when you need to match the trim. The best way to do this is with a tape measure that doesn’t snap back in. Measure the inside of your window at the top, middle & bottom. Walls don’t tend to be straight lines. Once you have all of the variables lined up, the calculator will help you put together a plan. No amount of clicking on the calculator can make up for poorly measured dimensions.
After running the numbers, double check and compare the final length with what you have on hand. When you’re within a couple inches of what’s in your inventory, always round up versus down. A missing 1/4″ is far better than having to use some wood putty to fill a void. You want this blind to be part of the overall design so it doesn’t stick out like a sore thumb. That means clean lines, no gaps, nothing more than a seamless look. Making it long enough the first time will ensure a pro looking finish.