Roman Shade Quantity for Bay Window Calculator
Estimate shade count, finished widths, corner gaps, fabric face area, brackets, and control grouping for angled, box, and bow bay windows.
🏠Bay window presets
📏Roman shade and bay inputs
Roman shade quantity result
🧵Shade specification grid
⚖Bay shade comparison grid
📋Reference tables
| Bay layout | Face sequence used | Shade count cue | Best measuring note |
|---|---|---|---|
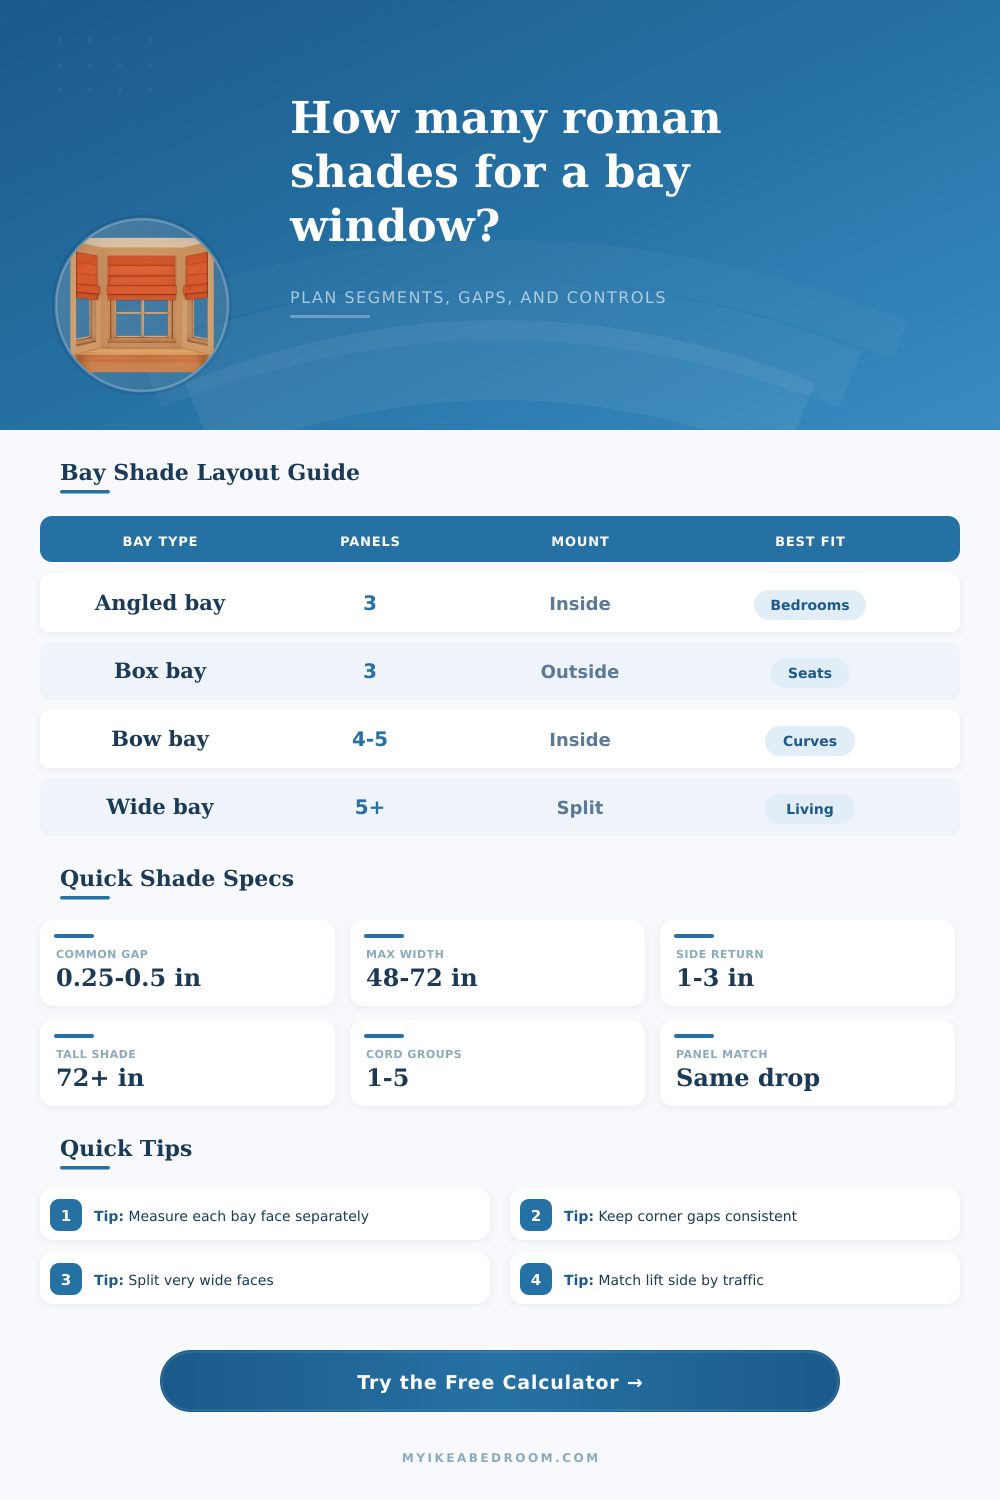
| 3-panel angled bay | Side, center, side | Usually 3 shades unless center is wide | Measure each flat face across the frame |
| 3-panel box bay | Side, center, side | Often works with outside returns | Check window-seat lid and handle clearance |
| 4-panel bow bay | Outer, center, center, outer | Four shades or more if center faces split | Keep visible gaps even around the curve |
| 5-panel bow bay | Outer, side, center, side, outer | Five shades gives the smoothest arc | Label every face before entering widths |
| Custom equal faces | Repeated equal width | One shade per face unless width limit is exceeded | Use the same deduction on every segment |
| Mount method | Width adjustment | Depth cue | Quantity effect |
|---|---|---|---|
| Inside each opening | Subtract side clearances | Needs usable headrail depth | Usually one shade per bay face |
| Outside on trim or wall | Add outside returns | Works over shallow frames | Can make wide faces exceed split limit |
| Ceiling or soffit mount | Use face width minus angle gaps | Best with level bay ceiling | Clean count with consistent headrail line |
| Hybrid mount | Center outside, sides inside | Useful for projection differences | May create mixed finished widths |
| Finished face width | Roman shade plan | Control note | Bracket cue |
|---|---|---|---|
| 18 to 36 in | Single narrow shade | Side lift works well | Two brackets are usually enough |
| 36 to 48 in | Single standard shade | Choose lift side by room traffic | Add center support when specified |
| 48 to 60 in | Single wide shade or split pair | Consider fabric weight and drop | Three brackets helps keep level |
| 60 to 84 in | Two matched shades | Mirror the controls or group motors | Two supports per split shade minimum |
| 84 in and up | Three or more matched shades | Keep equal widths where possible | Plan brackets from each shade width |
| Control layout | Control groups counted | Best use | Bay planning cue |
|---|---|---|---|
| Individual lifts | One per shade | Most flexible light control | Alternate lift sides away from corners |
| Paired side shades | Side pairs plus center | Symmetrical 3-panel bays | Keep side shade widths matched |
| Left, center, right groups | Three groups where possible | Bow bays with many faces | Good balance of control and clean look |
| Motorized group | One scene group | Tall or hard-to-reach bay windows | Physical shade quantity stays unchanged |
💡Bay roman shade tips
The calculator estimates physical roman shade quantity and planning dimensions. Final fabrication should follow the headrail, lift system, and fabric workroom limits for the exact product being made.
Roman shades for bay window require you to measure each face of the bay window separately. The reason that measuring the entire bay window are incorrect is because each face of the bay window has a different angle and each face requires its own measurement. If you dont take the time to correctly measure the bay window faces separately, then the Roman shades will not fit the angles of the bay windows glass and they will not function in the way that you may require.
The width of each face of the bay window will determine the width of headrail for each of the Roman shades. When measuring the width of the bay window, you must account for the gaps that will exist in the corners of the shades. These gap will allow the Roman shades to move without hitting each other.
How to measure Roman shades for a bay window
Three eighths of an inch is the most common gap for Roman shades, and using this gap will ensure the shades will stack proper when raising the Roman shades. Roman shades can be mounted in different ways, and each mounting style will change the measurement that you must use for the shades. Roman shades can be mounted inside of the window frame, but only if the frame is deep enough to take the shade.
Roman shades can also be mounted on the trim outside of the bay window‘s frame. When using outside mountings, you can ignore small depth difference in the bay windows glass. However, Roman shades mounted outside of the bay window frame will add to the amount of fabric in the returns of the shades, and this may make one Roman shade too wider to operate correctly.
There are also different control system for the Roman shades. You can use individual cords for each Roman shade or choose to use groups of cord. Using groups of cords will reduce the number of cords necessary in the room, but using individual cords will allow for more flexibility in the amount of light that enter the bay window.
Additionally, using motorized control system allows you to use a button to control the Roman shades, which is especially useful for bay windows in locations that you cant reach easily. The weight of the fabric for the Roman shades also has an impact on the width of the shade. Roman shades made of lightweight fabric can span a wider distance than Roman shades made out of heavy fabrics like velvet.
Additionally, using a calculator to determine the finished width of the Roman shades will ensure that you dont order shades that are the same size as the bay window. This calculator will account for the extra fabric need for Roman shades to be constructed correctly. Finally, once you have all of the above measurements and information, you can create a layout for the Roman shades.
You will use the mounting styles for the shades to determine which control group you will use for the bay window. Once you have chosen the Roman shade layout, provide the final measurement to the manufacturer of the shades. By following each of these step for measuring the Roman shades for your bay window, you can ensure that the shades will not only function correct but will also correctly fit the bay window.