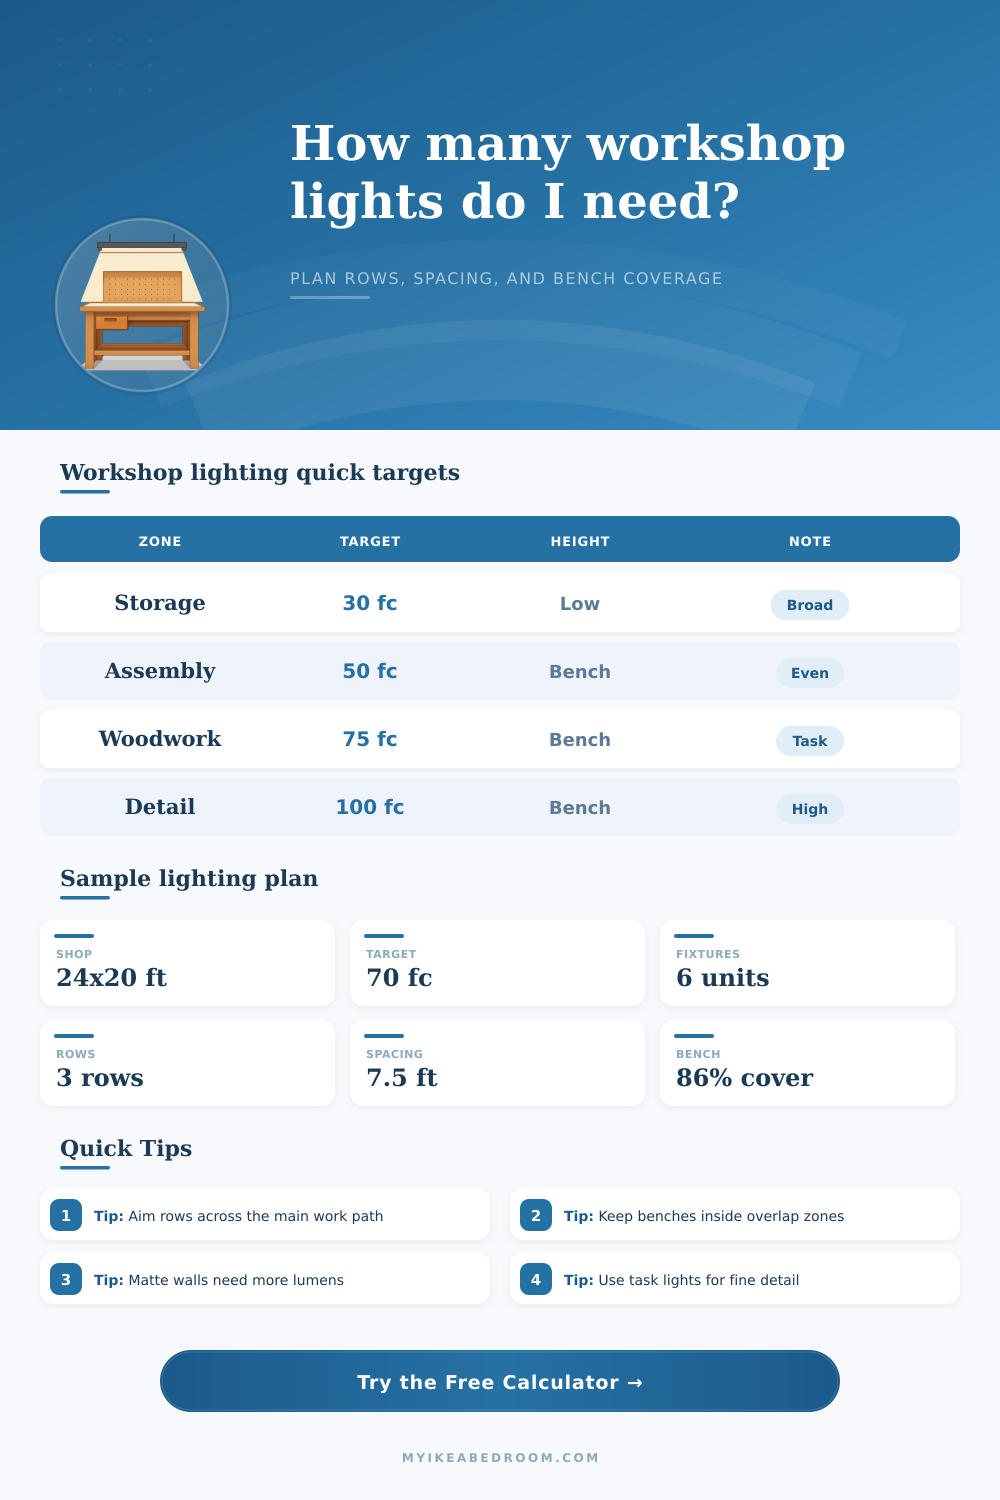
Workshop Lighting Layout Calculator
Size fixture rows for benches, tool walls, sewing tables, garage bays, and maker spaces using shop dimensions, mounting height, fixture output, reflectance, overlap, and task-zone coverage.
Load a starting point, then adjust the target foot-candles, fixture output, bench zones, and overlap for your actual room.
Describe up to four focused areas. The calculator estimates how much of those zones sits inside the useful row overlap band.
Bench rows: Place one row close enough to wash the front edge of the main bench, not only the aisle behind it. This improves shadows from hands, clamps, sewing machines, and small parts.
Reflectance: Open shelves, lumber stacks, dark pegboard, and unfinished ceilings absorb useful light. Choose a lower reflectance setting when the room feels visually busy or shadowed.
Lighting a workshop require a systematic approach because improper lighting within the workshop will create shadow that will obstruct your view of your work. Many people may want to install a single bright light fixture in the center of the ceiling. However, a single light will create shadows and glare that will make it difficult for you to proper view your work.
Furthermore, the high-contrast glare may cause eye strain. Therefore, you need to consider each of the areas of your workshop and how much light each area require. Some areas of a workshop may require more light than others.
How to Light Your Workshop Without Shadows
For instance, an area used to store tools will require less lighting than an area used for detailed work. A lighting calculator is a tool that can help you to determine how many light fixture are required for each area of the workshop based off the dimensions of that area and the lighting goal that you can establish for the workshop. The lighting calculator will provide you with a number of required fixtures that will ensure that your workshop maintain a consistent light level throughout the area.
Some of the surfaces within the workshop will absorb some of the light that the fixtures create. For instance, if your workshop is filled with dark walls and ceilings, those surface will absorb some of the light. When light is absorbed, it cannot illuminate the workshop.
Therefore, if you have dark walls, you may need to install more light fixture in your workshop to compensate for the light that the dark walls absorb. The reflectance of a surface will determine how much of the light is reflected back into your workshop. In addition to the task zone that you will use within your workshop, you need to make sure that you are lighting that area.
When lighting your workshop, many people makes the mistake of lighting the center of the room rather than the task zone where you will perform your work. You want to aim for light overlap in your task zone. Light overlap occur when the light from one light fixture overlaps with the light from another fixture.
If you do not have light overlap in your workshop, you will have bright spots in your task zone as well as dim area in your workshop. Another consideration is the height of the ceiling in which your workshop is establish. In a basement with a low ceiling, your light fixtures will need to be closer to your workbench.
The closer your light fixtures are to your work area the more light will shine onto your workbench. In areas with high ceilings, however, the light will travel a greater distance to your workbench. The farther the light travels the less light will shine onto your workbench.
Therefore, the distance between the ceiling and your workbench will be the most important measurement for lighting your workshop. In addition to the distance between the ceiling and your workbench is the issue of light loss. The fixtures that you use within your workshop will accumulate dust and grime over time.
The accumulation of this dust will reduce the amount of light that the fixtures emit. If you plan your workshop with the assumption that the light fixtures will remain clean, you will experience to little light within your workshop. You must account for light loss by plan for additional light fixture.
Another important consideration is the orientation of the rows of the light fixtures. The rows of light fixture should be installed in a way that they run in parallel to your main workbench. Furthermore, if the light runs in parallel to your workbench, it will allow the light to reach the front edge of the workbench without obstruction.
Installing the rows of lights in this manner will prevent your body from casting a shadow onto your workbench. Installing the rows of lights in this fashion is one of the most common way to prevent the formation of shadows within your workshop. Finally, one of the goal of your workshop lighting plan is to ensure that there is a consistent level of light throughout the workshop.
When you balance the light within your workshop, your eye will not have to constantly adjust to the contrast between light and dark areas of the workshop. Maintaining a consistent level of light within your workshop will prevent mental fatigue. Furthermore, calculating the light need of your workshop will ensure that you properly illuminate the workshop and that you can focus on your tasks without any shadows obstructing your view.