12x24 Tile Calculator
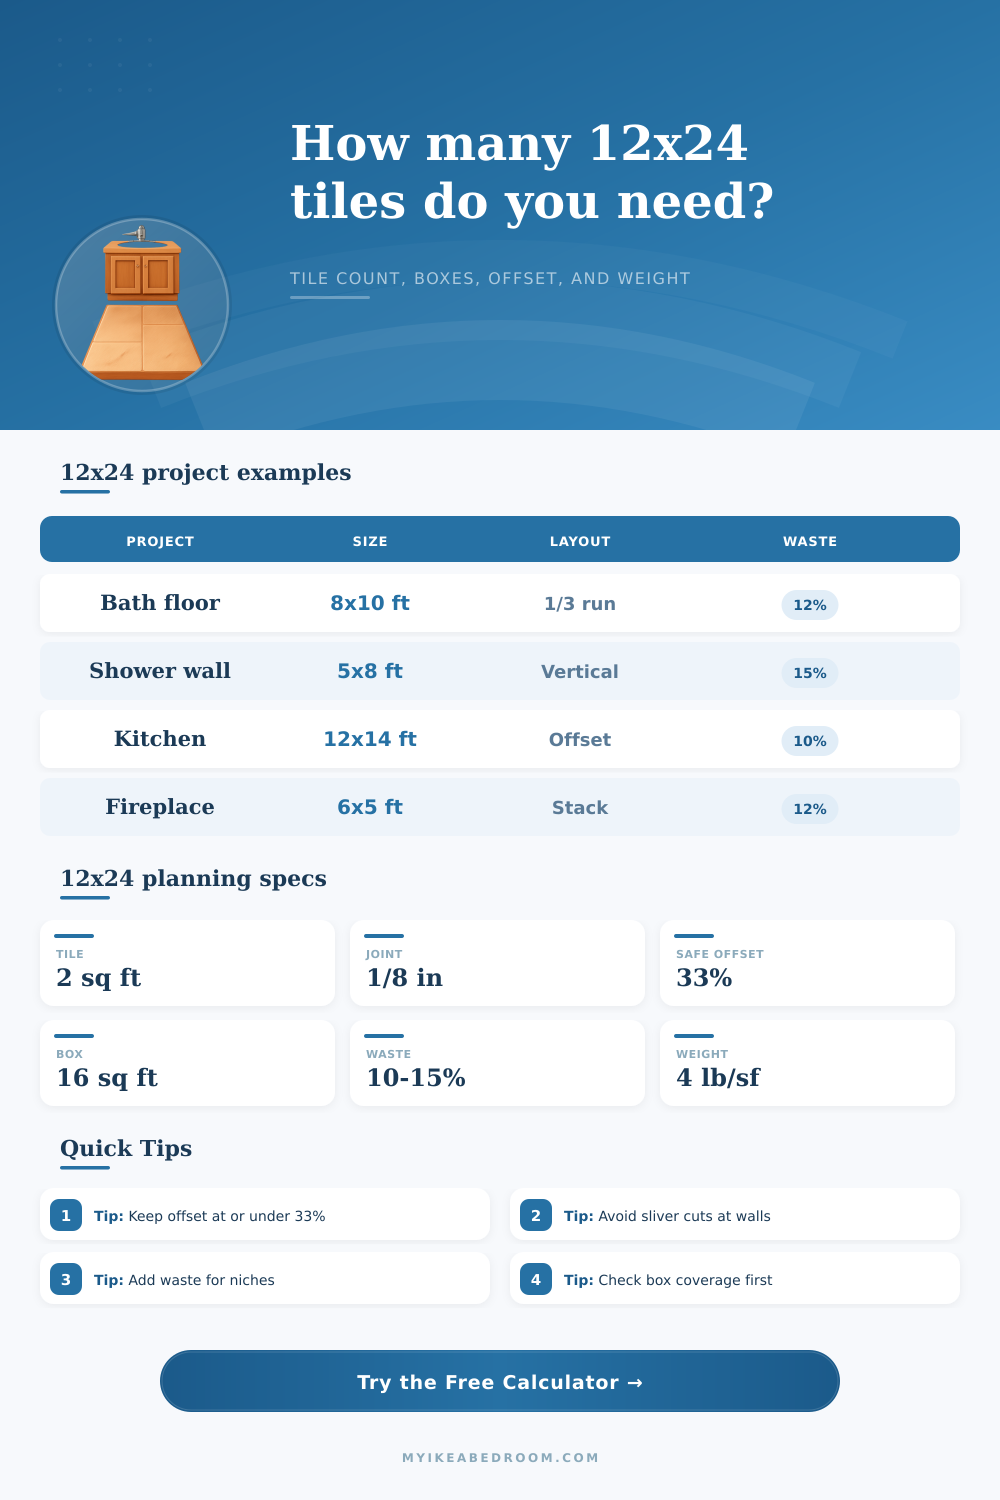
Plan a 12x24 tile floor or wall with fixed tile size logic, layout offset, lippage-friendly offset limits, grout joint, orientation, cut border, waste, box coverage, thickness, and installed weight.
Load a common large-format tile layout, then adjust the surface size, offset, waste, box coverage, thickness, and weight to match your material.
12x24 layout breakdown
Stacked grid
Best for: rectified 12x24 walls, modern shower stacks, and fireplace faces.
Lowest lippage pressure because tile high points do not meet at midpoints.
1/3 offset
Best for: large-format floors where movement and tile bow need a friendlier offset.
Usually the safer running-bond option for 12x24 porcelain.
50% brick
Best for: tiles confirmed flat enough by the manufacturer and installer.
The calculator scores this lower when max offset is set to 33%.
Vertical stack
Best for: shower walls, laundry backsplashes, and narrow feature walls.
Tall orientation changes border cuts and often needs careful top alignment.
| Planning item | Value | Calculator use | Practical note |
|---|---|---|---|
| Nominal tile size | 12 in x 24 in | Fixed tile logic | Each tile covers 2.00 sq ft before grout spacing. |
| Box coverage 12 sq ft | 6 tiles per box | Small box input | Common for thicker or heavier large-format tile. |
| Box coverage 16 sq ft | 8 tiles per box | Default input | Good default when the carton lists 16 sq ft. |
| Box coverage 24 sq ft | 12 tiles per box | Large box input | Check weight before moving full boxes upstairs. |
| Offset choice | Percent input | Lippage pressure | When to use |
|---|---|---|---|
| Stacked | 0% | Lowest | Flat walls, rectified edges, and clean grid layouts. |
| Small offset | 20% to 25% | Low | Subtle running layout when tile flatness is uncertain. |
| One-third offset | 33% | Moderate | Common recommendation for large rectangular porcelain. |
| Half offset | 50% | Highest | Use only when tile warpage and substrate flatness support it. |
| Project type | Suggested waste | Cut difficulty | Reason |
|---|---|---|---|
| Open floor, stacked | 5% to 8% | Low | Few interruptions and simpler border cuts. |
| Offset bathroom floor | 10% to 12% | Medium | Toilet flange, doorway, and row starts add cuts. |
| Shower or tub walls | 12% to 15% | Medium high | Niches, valves, ledgers, and edges create more cuts. |
| Fireplace or herringbone | 15% to 20% | High | Feature faces need alignment and more visible waste. |
| Spec | Common input | Result impact | Check before setting |
|---|---|---|---|
| Grout joint | 1/16 to 3/16 in | Changes module grid | Use wider joints for less consistent tile edges. |
| Tile thickness | 5/16 to 1/2 in | Shown in spec summary | Match trim depth and transitions. |
| Porcelain weight | 3.8 to 4.8 lb/sq ft | Estimates total tile weight | Check wall substrates and handling plan. |
| Cut border | 3 in or more | Improves border score | Shift layout to avoid narrow slivers at visible edges. |
Start with layout, not only area: A 12x24 tile covers 2 sq ft, but the row grid, grout joint, and border cuts decide whether you need extra full tiles.
Treat 50% offset as a check item: If your tile or substrate is not very flat, enter a 33% max offset and compare the score before committing to a brick pattern.
When you use the 12×24 tile project calculator, you need to give some consideration to how the 12×24 tile will fit onto the floor or walls. Each 12×24 tile cover two square feet. Therefore, if you know the total area that needs to be covered, you can get a sense of the total numbers of 12×24 tiles that will be needed.
In addition to considering the total area and the size of the 12×24 tiles, you must also consider other elements of the project, such as the layout of the tiles, the grout joint, and the flatness of the 12×24 tiles. For instance, a running bond layout for 12×24 tiles will produce cut at each wall. Additionally, a 50 percent offset layout may produce problems with 12×24 tiles that isnt very flat; any lippage that may occur on a 12×24 tile will be more prominantly when the tile is part of a 50 percent brick layout.
How to Use a 12×24 Tile Calculator
The calculator math is based off the dimensions of the area to be covered, the offset percentage for the 12×24 tiles, the width of the grout joint for the project, and the waste percentage for the project. The calculator will apply the waste percentage after it determines the initial layout of the 12×24 tiles. The calculator will arrange the 12×24 tiles into a grid in order to determine the number of 12×24 tiles that will be needed, given the dimension of each 12×24 tile.
The waste percentage is an important figure to enter into the calculator. In projects that use 12×24 tiles in a simple stacked floor layout, 5 or 8 percent waste may be sufficient. However, projects with an offset pattern, doorways, or other features that require the removal of 12×24 tiles will require a higher waste percentage.
For example, showers have niches for the shower heads that will require the removal of some 12×24 tiles during installation. The number of 12×24 tiles that will be required to complete the project will be determined once the waste percentage has been entered. Once the number of 12×24 tiles is determined, the user will enter the coverage and weight of the 12×24 tiles into the calculator.
12×24 tiles are among the heaviest of the available tiles. The weight of the 12×24 tiles will be important to enter because it will help to determine if the area where the tiles will be installed can support the weight of the completed project. For example, a small floor area with a large number of 12×24 tiles can create a significant load on a structure that has limited structural supports.
The coverage of each 12×24 tile box and the weight of each square foot of 12×24 tile will be entered into the calculator to determine the total load of the 12×24 tiles. The grout joint will be important to enter because it will have an impact on the appearance of the completed project. For example, if the grout joint is very wide, the straightness of each 12×24 tile will be more forgiving.
Narrow grout will magnify any misalignment of 12×24 tiles. The width of the grout joint will also impact the total number of 12×24 tiles that will be required for the project. The calculator will incorporate the grout joint into the size of the 12×24 tiles in the grid that is created.
If the grout joint is altered in any way, the number of 12×24 tiles will be automatically updated. Borders are another consideration. 12×24 tiles will often be placed into borders in order to surround areas that are tiled with other colors of 12×24 tiles or other type of tiles.
In many instances, the contractor will enter the width of the border into the calculator. If the width of the border is less than two inches, the calculator may indicate a need to make a cut of a sliver of a 12×24 tile. The starting point of the 12×24 tiles within the project can be shifted.
For many projects, shifting the starting point will not have a significant impact upon the total number of 12×24 tiles. The areas of any interruptions in the project can be entered into a field within the project calculator. Any area that is interrupted by an element that does not allow for placement of 12×24 tiles will reduce the number of full 12×24 tiles that will be placed into the project.
These interruptions will be subtracted from the total number of 12×24 tiles that would otherwise be placed into the area. For example, a doorway will interrupt the placement of 12×24 tiles. The area of the doorway will be subtracted from the total number of 12×24 tiles.
Any field that is interrupted by an element that cannot be tiled will reduce the number of 12×24 tiles that are placed into that field. Even with the calculations by the project calculator, an additional quantity of 12×24 tiles should of been purchased in case of any additional issues within the fields. The calculator will calculate the total weight of the project.
The total weight will be important in determining if the structure upon which the 12×24 tiles will be placed can support the additional load that the 12×24 tiles will create. For example, small areas such as showers or fireplaces that have a relatively small square footage will still have a significant load if the 12×24 tiles are attached to the drywall or subfloor of the structure. By calculating the total weight of the 12×24 tiles prior to ordering them, the contractor can determine if any additional blocking of the area should be completed prior to placing the 12×24 tiles.
Different layout patterns can be tested. Patterns such as stacked grids, running bonds, and herringbone patterns all has different impacts upon the project. For example, stacked grids are considered to be less likely to create lippage than any of the other patterns.
However, many contractors consider running bonds to be more visually appealing then stacked grids. Similarly, herringbone patterns are visually interesting but lead to increased waste of 12×24 tiles. Each layout pattern will impact the total number of 12×24 tiles that will be needed for the project, the offset percentage of the 12×24 tiles, and the risk of border issues.
It is likely that some small adjustments will have to be made after the laying of the first row of 12×24 tiles. Elements such as doors and walls can be out of square with one another when the project is viewed in person. The adjustments that can be made to the 12×24 tiles can include cutting slivers of 12×24 tiles.
These alterations will be best made with having some extra 12×24 tiles purchased in addition to those that are ordered from the supplier. The calculator will indicate the total number of 12×24 tiles that will be needed for the project. Additionally, the calculator will display the layout of the 12×24 tiles to the contractor.
These features will help to avoid any surprises when the thinset is applied to the project.