Sewing Table Height Calculator
Find a sewing table height from seated or standing elbow height, chair seat height, machine bed height, relaxed shoulder drop, forearm angle, and metric conversions.
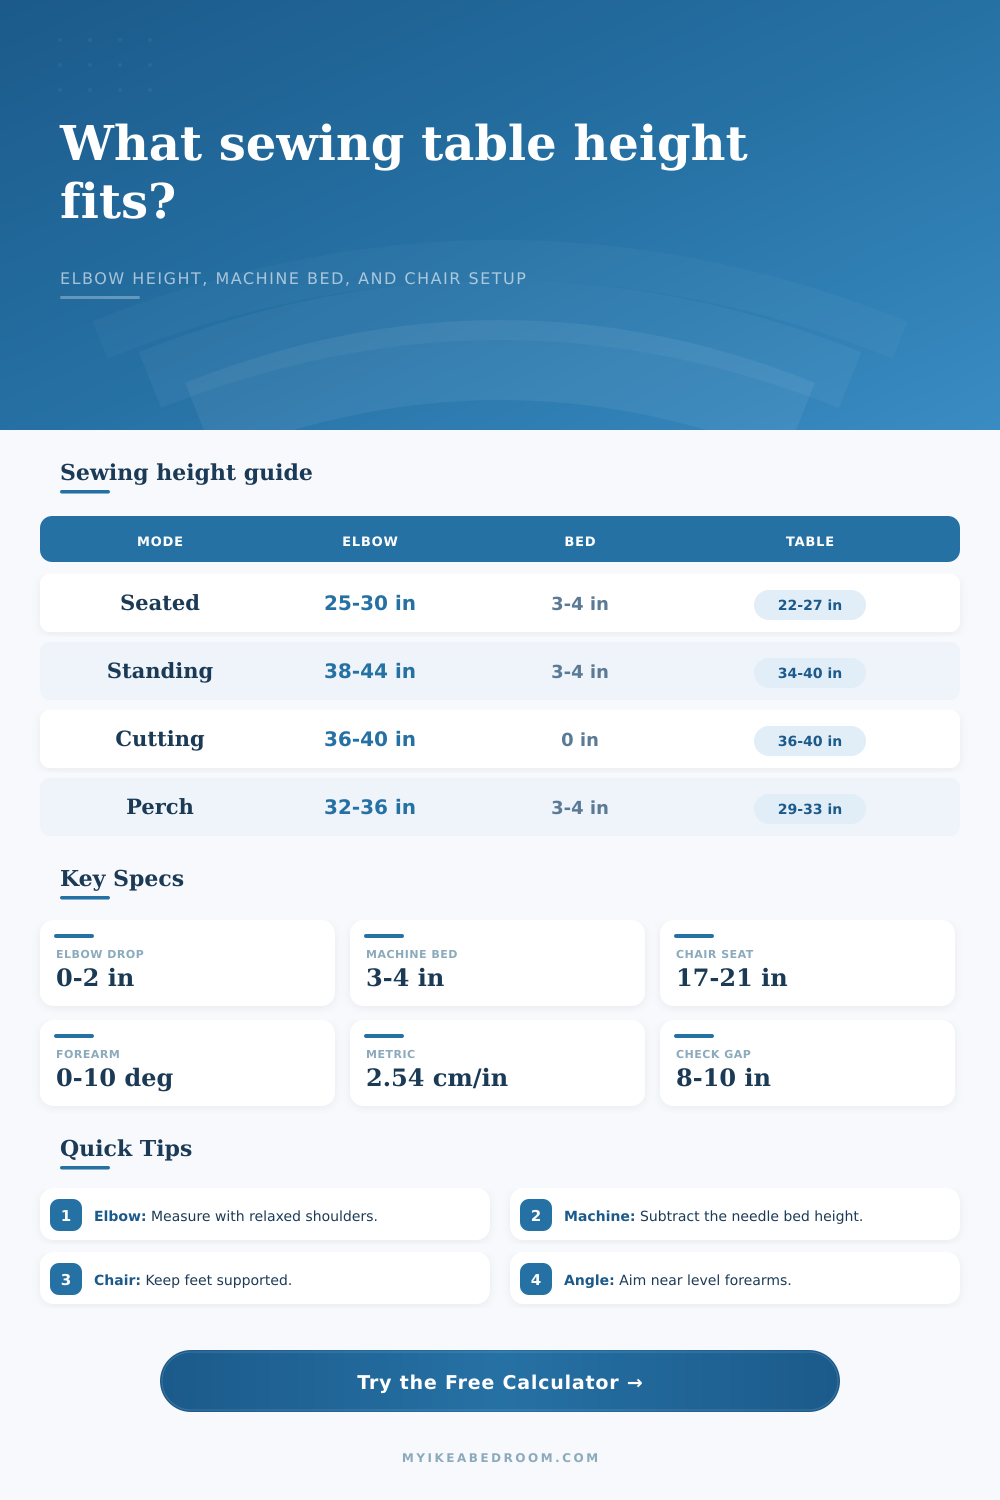
Choose the nearest sewing position, then fine tune the measured elbow height, machine bed height, chair, and forearm angle for your actual setup.
Measure elbow height from the floor while your shoulders are relaxed. The table surface is calculated below the sewing machine bed.
| Sewing mode | Elbow height reference | Machine bed allowance | Resulting table surface | Best use |
|---|---|---|---|---|
| Seated compact | 25 to 27 in / 64 to 69 cm | 3 to 4 in / 8 to 10 cm | 21 to 24 in / 53 to 61 cm | Petite users, low chair, narrow machine table. |
| Seated average | 27 to 30 in / 69 to 76 cm | 3 to 4 in / 8 to 10 cm | 23 to 27 in / 58 to 69 cm | Most garment sewing and everyday mending. |
| Seated tall | 30 to 33 in / 76 to 84 cm | 3 to 4 in / 8 to 10 cm | 26 to 30 in / 66 to 76 cm | Tall users, quilting, or higher chair positions. |
| Perching stool | 32 to 36 in / 81 to 91 cm | 3 to 4 in / 8 to 10 cm | 28 to 33 in / 71 to 84 cm | Short sessions with a high stool and foot support. |
| Standing machine | 38 to 44 in / 97 to 112 cm | 3 to 4 in / 8 to 10 cm | 34 to 40 in / 86 to 102 cm | Pressing, quick seams, and mixed standing work. |
| Forearm target | Angle input | Approx drop on 12 in forearm | How it feels |
|---|---|---|---|
| Level forearm | 0° | 0 in / 0 cm | Good starting point for light fabric handling. |
| Slight downward hand | 3° | 0.6 in / 1.6 cm | Often comfortable for steady machine feeding. |
| Moderate downward hand | 5° | 1.0 in / 2.7 cm | Useful when shoulders lift on a higher table. |
| Low hand position | 8° | 1.7 in / 4.2 cm | May help pressing down fabric, but check wrist bend. |
| Upward reach | -3° | -0.6 in / -1.6 cm | Usually a warning sign unless the work is unusually high. |
| Machine setup | Bed above table | Elbow height | Comfort offset | Table surface result |
|---|---|---|---|---|
| Flush insert or drop-in lift | 0 to 1 in / 0 to 3 cm | 28 in / 71 cm | 1 in / 3 cm | 27 in / 69 cm |
| Portable machine on top | 3 to 4 in / 8 to 10 cm | 28 in / 71 cm | 1 in / 3 cm | 23 to 24 in / 58 to 61 cm |
| Serger on tabletop | 3.5 to 5 in / 9 to 13 cm | 29 in / 74 cm | 1.5 in / 4 cm | 22.5 to 24 in / 57 to 61 cm |
| Standing portable setup | 3 to 4 in / 8 to 10 cm | 41 in / 104 cm | 1 in / 3 cm | 36 to 37 in / 91 to 94 cm |
| Seat height | Underside target | Tabletop thickness | Table height needed | Check point |
|---|---|---|---|---|
| 17 in / 43 cm | 25 to 27 in / 64 to 69 cm | 1 to 2 in / 3 to 5 cm | 26 to 29 in / 66 to 74 cm | Good for many dining-style sewing chairs. |
| 19 in / 48 cm | 27 to 29 in / 69 to 74 cm | 1 to 2 in / 3 to 5 cm | 28 to 31 in / 71 to 79 cm | Works when feet stay supported or pedal is raised. |
| 24 in / 61 cm | 32 to 34 in / 81 to 86 cm | 1 to 2 in / 3 to 5 cm | 33 to 36 in / 84 to 91 cm | Perching stool setups need a foot ring or rail. |
| Standing | No seated gap | 1 to 2 in / 3 to 5 cm | 34 to 40 in / 86 to 102 cm | Use elbow height rather than a chair reference. |
Elbow measurement: Sit or stand exactly as you sew, relax the shoulders, bend elbows about 90 degrees, and measure from the floor to the elbow point.
Machine bed adjustment: If the machine sits on top of the table, subtract the height from tabletop to needle plate so the fabric bed lands near your elbow target.
Chair and pedal check: A perfect table height still feels wrong if the chair is too high, feet dangle, or the pedal ramp changes ankle angle.
Fine tune in small steps: Test within the suggested range using scrap fabric, then raise or lower the table in half inch or one centimeter increments.
It’s not the needle that causes most sewing injuries. It’s the hunch. I know that may sound familiar, but somehow we keep setting up our workspaces with wrong dimensions even though we mean well. When left to our own devices (or when someone else sets it up) we often default to matching height of a standard dining table, or leaving it up to the sewing machine manufacturer to determine what feels right. Neither of these factors take into account your individual body shape or the unique thickness of your machine bed. Fighting gravity with your shoulder muscles for hours on end will make you gets the height wrong. It is tiring. It also messes up your stitches because your hands fight against the fabric rather than guiding it.
The most important number here, far more so than any other, actualy, is the height of your elbows. It is not your hips or your shoulders, but the height of your elbows when your shoulders are down and your arms hang relaxed by your sides. Plug it into the calculator above, and let the math do its work: no need for guesswork on how high your sewing machine’s bed needs to be.
How to Set Up Your Sewing Station Correctly
Make sure you’re taking a correct reading (if you hold your arms up, if you slouch) because whatever number you use will make all other calculations go wrong. Relax your traps, sit how you’ll be sitting while you sew and measure straight down. That’s what the rest of the numbers depend on.
From there, take in the machine. Yes, the base is off the table. The sewing machine sits on the table, but its needle plate is several inches higher than the tabletop. So if you don’t allow for that offset, your table will be to low. If you ignore the machine bed height, your table will be too low, forcing your hands below your elbows and making you lift your shoulders to reach the fabric. That may not seem like much, but after an hour or two quilting, all those inches add up and you’ll have a sore neck. The difference is that the table automatically subtracts the height of the machine bed. This means when you work on the fabric, it reaches your hands at the proper neutral position. All you have to do is determine how high (or low) your particular machine is from the table.
The third input to the Forearm Angle: Posture is dynamic. All ergonomic advice says the forearms should be pretty close to parallel with ground. But some people like to slant their hands down slightly when sewing (for example, to help feed fabric through the throat bar). When sewing heavy fabrics like denim, a little bit of negative slope, just a few degrees downward angle. Feels more comfortable. And that’s what the Forearm Angle input lets you dial-in. It turns those angles into a change in vertical position, and then adjusts the table height accordingly so your wrist stays straight instead of being bent up or down. It is a small difference, but it causes less repetitive strain on the carpal tunnel.
We also often neglect space underneath the table. It doesn’t matter how great the top is if your thighs are squished up against apron. You want a decent amount of knee clearance, enough so you can move your weight around and not hit your shin when moving fabric. To check for this, the calculator compares your chair seat height against the table’s underside. If you have a big, bulky base on your office chair, you’ll need a higher table than someone who sits on a lightweight stool. This is where people go wrong. They think about nothing but the top surface area, never considering the fact that their legs needs some breathing space.
Another one: I know several people who stand while they sew, which calls for yet another way of thinking. Your elbows are at roughly thirty-eight or forty-four inches off the ground if you sew standing up. That’s a lot taller then the average chair (see the reference table on the page). It means that everything changes dramatically when you go from sitting to standing; in fact, the target moves. For some, the reduced back strain of standing makes it easier. But you need a very high work surface if you’re going to do any standing. Don’t attempt to adapt a standing desk unless you’ve adjusted for that extra-high elbow.
And lastly, there is the foot pedal. Without proper support for your feet, a high pedal will put your ankle in an uncomfortable place. A thicker pedal or even a little ramp in it will change the geometry of your lower body. Again, it may seem small but you should of started from the floor up when it comes to comfort.
Run the numbers and adjust in 1/2 inch increments. Try it out on scraps of fabric. Where do your shoulders fall? Do they creep up towards your ears? If so, the table is too high. Are you stretching forward trying to touch the needle? Then it’s too low. You want to find that neutral zone where the machine becomes part of your arm. Use the numbers as a starting point but listen to your shoulders more than anything.