Tile Edge Profile Length Calculator
Estimate exposed tile trim length for wall edges, shower returns, niches, backsplashes, bedroom vanity splash zones, outside corners, and fixture interruptions.
Detailed Breakdown
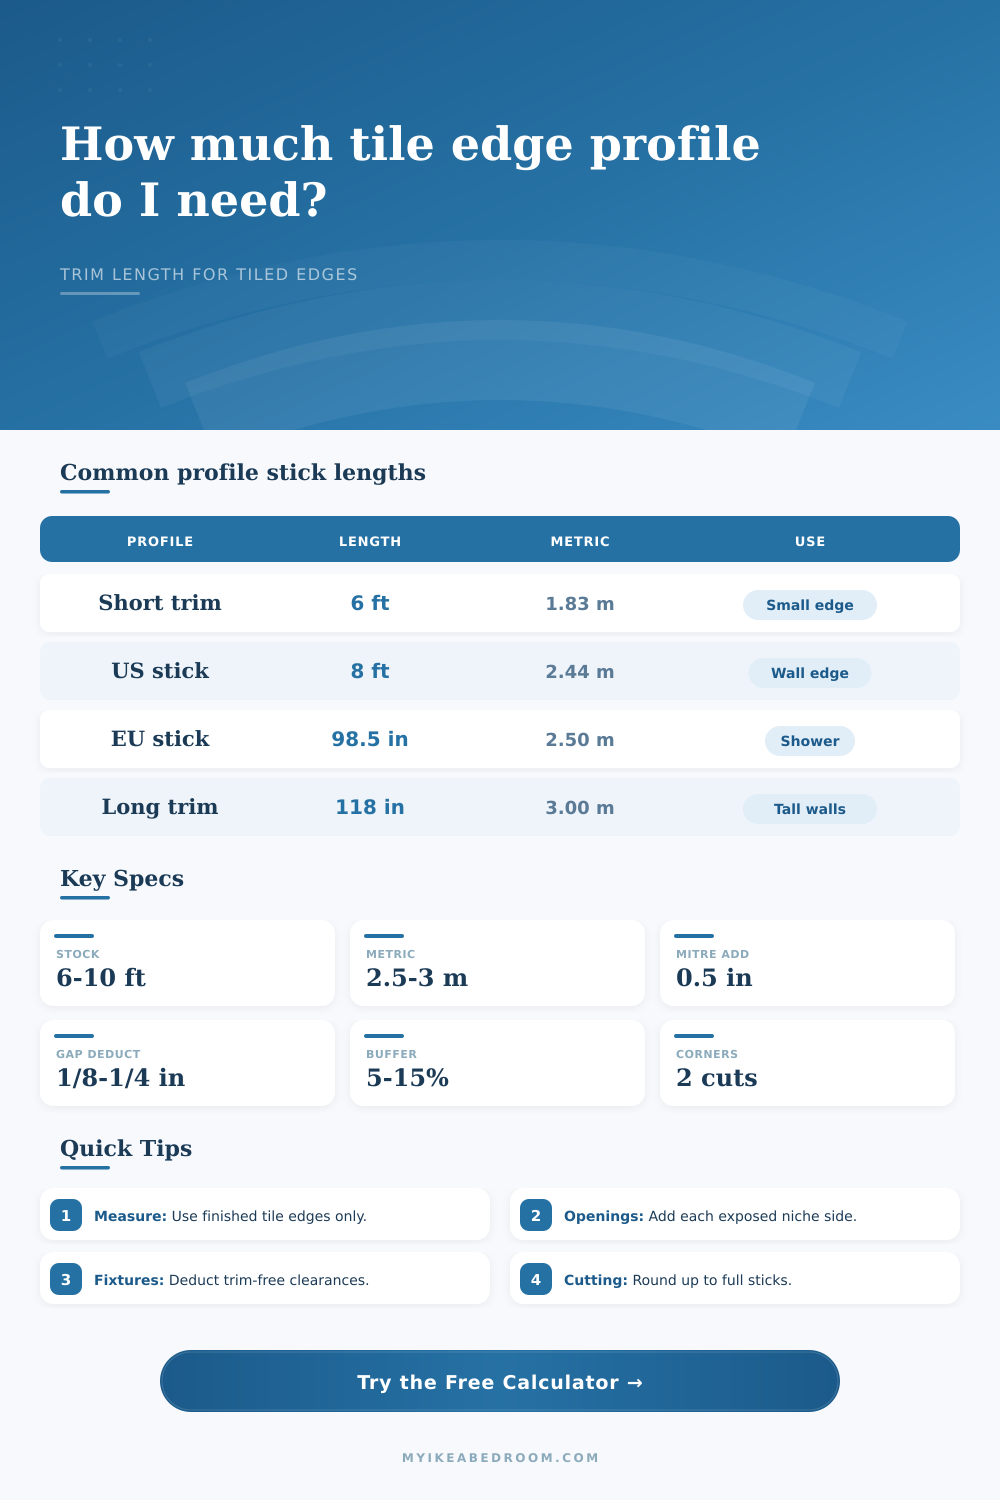
| Stock profile length | Imperial equivalent | Metric equivalent | Best use |
|---|---|---|---|
| Short trim stick | 6 ft / 72 in | 1.83 m | Small vanity splash, shelf edge, short niche return, or single bedroom accent edge. |
| Standard US trim stick | 8 ft / 96 in | 2.44 m | Backsplash top runs, shower jambs, half-wall caps, and most residential tiled wall edges. |
| Common metric profile | 98.5 in / 8.20 ft | 2.50 m | Metric tile profiles, shower niches, floor-to-ceiling wall returns, and bathroom reveal edges. |
| Long metric profile | 118 in / 9.84 ft | 3.00 m | Tall shower panels, full-height feature walls, wardrobe alcove borders, and fewer horizontal joins. |
| Long US trim stick | 10 ft / 120 in | 3.05 m | Long backsplash runs, uninterrupted vanity walls, laundry counters, and wider tile border strips. |
| Opening or perimeter shape | Length math | Example | Profile planning note |
|---|---|---|---|
| Rectangular shower niche | 2 × width + 2 × height | 24 in × 12 in = 6 ft | Add all four exposed inside edges unless one edge dies into a finished tile plane. |
| Window reveal in tiled wall | 2 × width + 2 × height | 30 in × 36 in = 11 ft | Measure the finished tile opening, not the rough framed opening. |
| Vanity backsplash top edge | Width only | 60 in vanity = 5 ft | Side returns are separate vertical edges if the tile stops in the open. |
| Mirror or medicine cabinet cutout | Perimeter minus hidden edges | 24 in clear side = 2 ft | Do not count edges covered by a flange, trim frame, or wall-mounted cabinet lip. |
| Half-wall tile cap | Top run + exposed ends | 72 in top + 2 ends | Outside corners usually need mitred profile ends or preformed corner pieces. |
| Fixture or room detail | Typical trim-free clearance | Where it appears | Calculator handling |
|---|---|---|---|
| Door casing beside tiled bedroom wall | 1/8 to 1/4 in movement gap | Bedroom accent tile beside wardrobe, door, or closet casing | Deduct the gap if the profile stops short of the casing instead of running behind it. |
| Vanity faucet or pipe escutcheon | 1/16 to 1/8 in visual reveal | Bathroom backsplash, makeup vanity, or wet-bar splash | Add only the exposed edge segments around the fixture; deduct covered trim-free arcs or gaps. |
| Shower mixer plate | 1/8 in around cover plate | Shower wall edge near control valve | Deduct interruption length when a profile is split around the plate or a trim flange. |
| Outlet or switch cover | 1/8 in reveal beyond tile cut | Vanity splash, desk alcove, or bedside tiled panel | Use the gap total for exposed trim breaks; plates that cover tile edges do not need profile. |
| Tub rim or shower tray edge | 1/8 to 1/4 in sealant joint | Bath surround, shower return, or tiled ledge | Do not count edges that are sealed to a tub, tray, or countertop instead of capped with profile. |
| Project edge type | Common selected sides | Allowance to check | Why it matters |
|---|---|---|---|
| Backsplash strip | Top, plus left or right returns | End caps, outlet gaps, mirror clips | Long top edges are simple, but short vertical returns can create extra cuts. |
| Shower opening | Left jamb, right jamb, header, niche perimeter | Mitred corners and valve gaps | Profiles often need clean continuous lines at eye level and around niches. |
| Wardrobe alcove feature tile | Two vertical sides and top | Casing gaps and plinth clearances | Bedroom tile borders should stop neatly before furniture, casing, and skirting. |
| Window reveal | Full inside perimeter | Sill, frame, and caulk joint | Counting the finished reveal perimeter prevents under-ordering short trim pieces. |
| Half-wall cap or ledge | Top run and exposed ends | Outside turns, wall returns | Cap edges usually need extra mitre allowance even when the visible run looks short. |
How do you figure out what’s needed? That’s easy, right? There are just those exposed stick lengths on your wall; you simply add them all up. Wrong! In real life there is mitred corners, interrupted fixtures, and waste resulting from cutting with a saw. The calculator above perform the calculations for you. It transforms an imprecise tiling layout into a clear shopping list.
The first step that most folks will take is to measure out their walls then divide by the length of a typical trim stick. Problem right there, they don’t consider how edges work. You’re not simply aligning linear pieces. You’re creating an exact angle to frame an irregular shape. For instance, a rectangular niche need four individual cuts just to match its profile around the opening. That means wasting material on every cut, which adds up fast in a big bath.
How to Measure Tile Trim Without Waste
To account for this, the tool let you choose exactly which sides gets exposed. And if there’s additional perimeter (like a window reveal or niche), you can tack that on, too. So it calculates what you’re actualy seeing, not the underlying wall.
This is the stock length. This part may surprise you, but the stock length option are important. By default, stock lengths are eight foot sticks. While this is nice when you need an extra-long back splash… it’s pretty wasteful on small cuts like shower returns and small vanity edges. And if most of your cut are short, and you buy full length sticks, you’ll be left holding scraps that you can’t use.
Enter the stock length. Here you can choose whatever length you want your stock to be. That could be a 3 meter European style stick or a shorter 6-foot trim. That way you won’t run out and order too much, assuming a typical size.
Fixtures and gaps also affects the calculation. Because the tiles goes right to the edge, there are no “runs” of profile. There’s the interruption of valves, outlet plates, mirror clips etc… If you have a wall mounted cabinet then there is no need for profile behind it. Same with a tub rim that is sealed….no need for profile inside it. By deducting those, you save money. This also eliminates bulky joints where the profile join the fixed item. That fixture clearance gap is where you make the deduction for those items. That way you purchase just enough for the edge parts that you’ll see. It is a little detail, but one that really makes a difference in the clean look of the finished product and your pocketbook.
The other important element that newbies tend to neglect is amount of buffer. If all cuts were perfect and all pieces fit perfectly then there would be nothing but perfection and your calculations would work out perfectly in theory. But life isn’t like that. Blades wander off course, profiles gets twisted, materials get measured wrong. A 10-15% buffer covers the range of errors we can expect.
There’s an option on the calculator where you can set the cut allowance. That will account for the extra material required to make mitred joints as well as the kerf from the cut. If you don’t allow enough, you’ll end up with less than you need on the final run. Or, you’ll discover that the batch you matched is now sold out.
To show, those reference tables on the page lays out typical scenarios, showing how various types of projects (e.g., shower entries; half-wall caps) combine certain allowances with certain edges. That lets you see what inputs you should of check off if your layout doesn’t match one of their templates. Again: it’s not about remembering all the coefficients. It’s about grasping the underlying principles of how to minimize waste and get the most out of material use.
Now for planning tile edges: It’s less math, more like anticipation, how does the tile stop? Where do I need the trim to smoothly dissapears? Each gap and each joint needs to be accounted for. The calculator takes out the guesswork on how much material you need around fixtures and other interruptions. The idea isn’t just to cover the edge; it’s to do it without waste.
At the end of your day, there shouldn’t be a bunch of leftover scraps that don’t fit anywhere, you’ll never find them again because they’re all mixed together in a closet somewhere. It’s what makes the difference between a good tiling project, and an expensive mistake.