Wall Mural Scaling Calculator
Size a bedroom wall mural from wall dimensions, image pixels, print bleed, panel width, and bed alignment before ordering artwork.
Scaled mural plan
| Mattress size | Standard width | Standard length | Useful mural framing note |
|---|---|---|---|
| Twin | 38 in / 97 cm | 75 in / 191 cm | A 60 to 72 in mural usually gives strong side overhang. |
| Twin XL | 38 in / 97 cm | 80 in / 203 cm | Use the same mural width as twin; allow taller art near desks. |
| Full | 54 in / 137 cm | 75 in / 191 cm | Try 78 to 96 in wide artwork for a balanced headboard wall. |
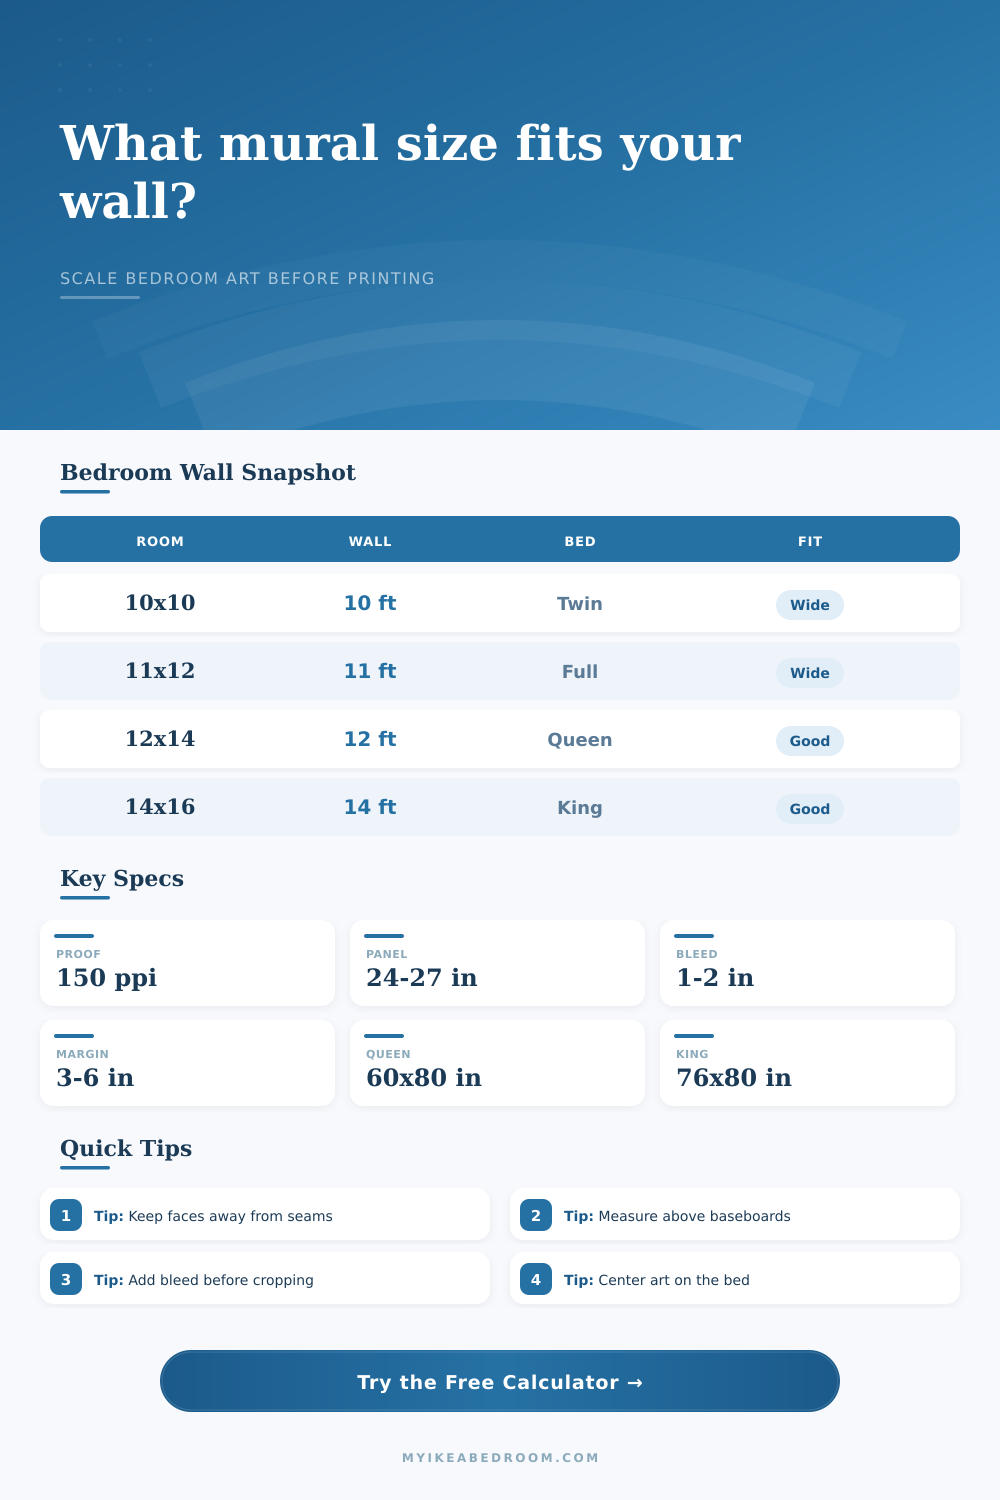
| Queen | 60 in / 152 cm | 80 in / 203 cm | Most accent murals feel centered at 90 to 108 in wide. |
| King | 76 in / 193 cm | 80 in / 203 cm | Use 108 to 132 in wide artwork for clear side extension. |
| California king | 72 in / 183 cm | 84 in / 213 cm | Wide landscape murals work well when height is limited. |
| Bedroom type | Typical room size | Common feature wall | Mural coverage range |
|---|---|---|---|
| Small bedroom | 10 × 10 ft / 3.0 × 3.0 m | 9 to 10 ft wide | 60% to 80% keeps edge space visible. |
| Standard bedroom | 11 × 12 ft / 3.4 × 3.7 m | 10 to 12 ft wide | 75% to 90% suits full and queen beds. |
| Primary bedroom | 14 × 16 ft / 4.3 × 4.9 m | 12 to 16 ft wide | 80% to 100% works for panoramic scenes. |
| Studio sleeping zone | 8 × 10 ft wall zone / 2.4 × 3.0 m | 7 to 9 ft wide | 50% to 75% avoids crowding shelves and lamps. |
| Nursery wall | 9 × 10 ft / 2.7 × 3.0 m | 8 to 10 ft wide | 45% to 70% leaves calm border around a crib. |
| Image ratio | Example pixels | Best bedroom use | Scaling caution |
|---|---|---|---|
| 3:2 landscape | 9000 × 6000 | Classic bed accent mural above a headboard. | May leave more top and bottom wall visible. |
| 16:9 panorama | 7680 × 4320 | Wide scenery behind queen, king, or sofa beds. | Can become shallow on tall walls. |
| 4:3 balanced | 8000 × 6000 | Murals with people, florals, maps, or centered art. | Check furniture overlap before trimming sides. |
| 1:1 square | 6000 × 6000 | Small feature areas, reading corners, and crib zones. | Often width-limited before it fills a broad wall. |
| 2:1 extra wide | 10000 × 5000 | Hotel-style mural bands across a long headboard wall. | Keep important detail away from panel joins. |
| Panel width | Metric width | Panels per 12 ft mural | Panel planning note |
|---|---|---|---|
| 18 in | 46 cm | 8 panels | Narrow panels are easier on uneven old walls. |
| 24 in | 61 cm | 6 panels | A common width for peel-and-stick mural panels. |
| 25 in | 64 cm | 6 panels | Useful when a printer uses 635 mm rolls. |
| 27 in | 69 cm | 6 panels | Fewer seams, but each strip is less forgiving. |
| 36 in | 91 cm | 4 panels | Good for smooth walls and simple artwork zones. |
Reference dimensions are planning aids. Always confirm the exact mural substrate, wall plumb, ceiling level, trim thickness, and printer panel specification before final production.
After spending weeks scouring the internet for just the right picture, you install it only to discover that nope, it still doesn’t work. You found a high res file, dreamt of having it behind your bed, but then you realize the horizon line end six inches above the nightstand. Or there’s a seam running across someone’s face! Why? Because walls aren’t frames. They have baseboards and outlets, and an uneven plaster surface.
The calculator help translate those pixels in a digital photo into drywall on the wall. It makes you double-check measurements before you print anything. It also mean less stress about where the seams will fall in relation to your furnitures.
How the Calculator Helps Your Wall Art Look Great
The first limitation is that large format printers generally print in a width between twenty-four and twenty-seven inches wide. This doesn’t mean that’s how your mural will be. This means you can dictate where the seam fall. The tool does all the math for you. All you need to do is input what are the actual sizes of your painted walls (not the size of the room). Don’t forget to deduct for any crown molding and baseboards. Not accounting for a few inches will make your mural either clipped from the ceiling, or running over onto floor.
Another variable that throws it off is source image resolution. If an image isn’t big enough, a large-scale mural would of been seen up-close (from 6 feet). The calculator look at effective pixels per inch and warns you if it’s not high enough due to too many pixels lost. You want sufficient data to hold the size. Nothing short of a larger original photo in the first place can rescue it from looking mushy and soft at that viewing distance. It tells you if your file have sufficient data to do the job…so you don’t end up with a blur.
Don’t let your furniture disrupt the art; instead, use it to frame it. Centering a 90-inch mural on the wall above your Queen bed leave fifteen inches of artwork on each side, creating a balanced and intentional look. Centering a 60-inch mural makes it look small, but by entering your headboard width into the calculator, you’ll know how far the art will extend past it. The result: no more awkward spots where the mural stops just as it reach the nightstand edge.
The amount of seams and strips depends on panel planning, and the more seams, the greater likelihood that something get out of whack. Your printer might be able to do a wider roll (say thirty-six inches) rather than twenty-four or twenty-seven, which will cut the seam count in half… But wide panels is also heavier and difficult to hang alone.
The reference tables will sort this by room sizes, since a fourteen-by-sixteen suite will require less coverage different than a ten-by-ten foot room to not feel small or cramped. Check your bleed; This is the excess inch or two of image that’s cut off on all sides. You’ll want some wiggle room in case things aren’t cut straight; it happens! So don’t be greedy with every last millimeter, let the calculator include a bit of padding, then use that padding as is. Running out of image and having to patch drywall is worse than having an extra strip of wall.
You want the wall to disappear and the only way that happens is if the scale is right, where the seams are invisible and the panels aren’t seen at all. And it’s not about seeing the seams or the panels…you just see the scene. It looks like the room has intention and it makes the room look bigger.
So the secret is getting the numbers right up front. Measure twice, print once. It’s the difference between a regret and a focal point. Let the tool do the work so you can focus on the look. Keep the horizon line intact, keep the faces whole, and have the nightstand frame the view. With the right scale, this is well within reach.