Weatherboard Overlap Calculator
Estimate weatherboard exposure, lap depth, courses, board lengths, waste allowance, and fasteners for bevel, shiplap, fibre cement, and composite cladding layouts.
Cedar Bevel
Best for: narrow visual courses and lighter wall sections.
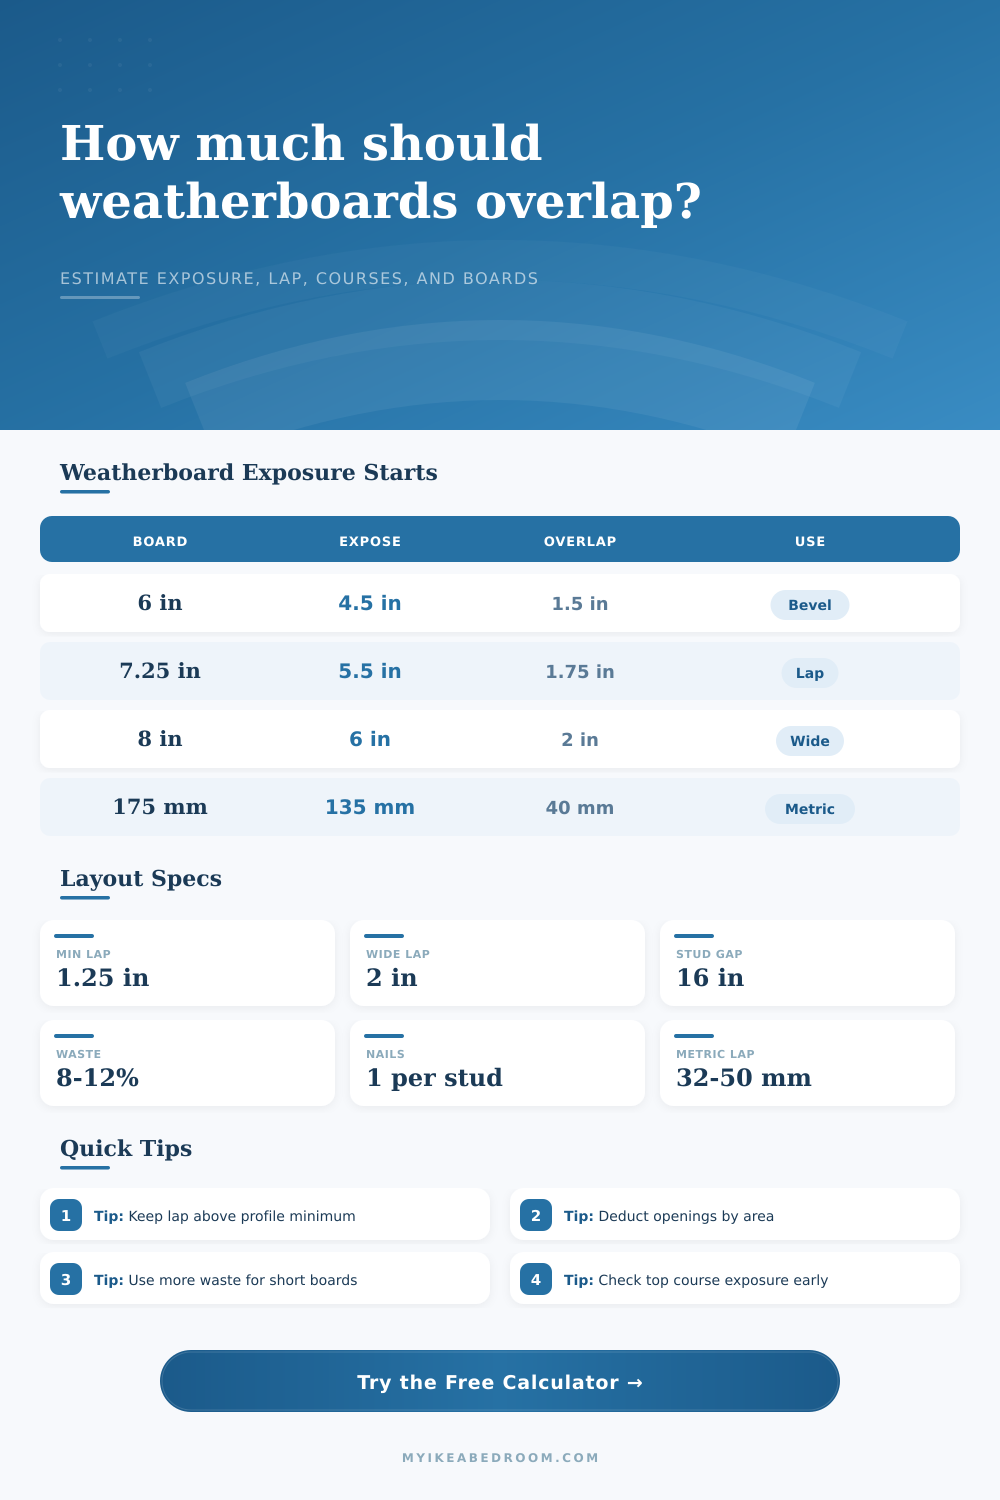
Use 4 to 4.5 in exposure on a 6 in board to keep a practical lap allowance.
Pine Or Softwood Lap
Best for: standard horizontal cladding with predictable course lines.
A 7.25 in board at 5.5 in exposure gives 1.75 in overlap and easy course planning.
Fibre Cement Lap
Best for: manufactured boards with published exposure limits.
Many 8 in boards are laid near 6.25 in exposure, leaving about 1.75 in covered.
Composite And PVC
Best for: stable profiles where thermal movement details matter.
Keep exposure inside the maker range; the calculator flags lap that is too small.
| Nominal board face | Typical exposure | Resulting overlap | Metric equivalent | Layout note |
|---|---|---|---|---|
| 6 in bevel board | 4 to 4.5 in | 1.5 to 2 in | 102 to 114 mm exposed | Good for tight course rhythm and small elevations. |
| 7.25 in lap board | 5.5 to 6 in | 1.25 to 1.75 in | 140 to 152 mm exposed | Common for exterior horizontal cladding. |
| 8 in lap board | 6 to 6.25 in | 1.75 to 2 in | 152 to 159 mm exposed | Often used for wider modern weatherboard lines. |
| 150 mm bevel board | 110 to 118 mm | 32 to 40 mm | 4.33 to 4.65 in exposed | Metric layout with moderate lap coverage. |
| 175 mm lap board | 130 to 140 mm | 35 to 45 mm | 5.12 to 5.51 in exposed | Useful where a wider board still needs enough cover. |
| Visible exposure | Coverage per 16 ft board | Boards per 100 sq ft | Linear ft per 100 sq ft | Metric coverage |
|---|---|---|---|---|
| 4.5 in | 6.00 sq ft | 16.7 boards | 266.7 linear ft | 0.557 m² per board |
| 5.0 in | 6.67 sq ft | 15.0 boards | 240.0 linear ft | 0.619 m² per board |
| 5.5 in | 7.33 sq ft | 13.6 boards | 218.2 linear ft | 0.681 m² per board |
| 6.0 in | 8.00 sq ft | 12.5 boards | 200.0 linear ft | 0.743 m² per board |
| 6.25 in | 8.33 sq ft | 12.0 boards | 192.0 linear ft | 0.774 m² per board |
| Fixing centers | Fixing points on 12 ft run | Fixing points on 16 ft run | Single nail course | Double nail course |
|---|---|---|---|---|
| 12 in centers | 13 points | 17 points | 1 per point | 2 per point |
| 16 in centers | 10 points | 13 points | 1 per point | 2 per point |
| 18 in centers | 9 points | 11 points | 1 per point | 2 per point |
| 24 in centers | 7 points | 9 points | 1 per point | 2 per point |
| Wall layout | Net area | Exposure used | Approx courses | Boards before waste |
|---|---|---|---|---|
| 10 ft by 8 ft porch return | 80 sq ft | 4.5 in | 22 courses | 14 boards |
| 18 ft by 9 ft bedroom wall, one window | 144 sq ft | 5.5 in | 20 courses | 20 boards |
| 24 ft by 10 ft facade, two openings | 204 sq ft | 6.0 in | 20 courses | 30 boards |
| 7.2 m by 2.7 m metric studio wall | 17.6 m² | 135 mm | 20 courses | 27 boards |
Here’s a situation you might encounter: you are standing on a blank wall of expensive cladding boards. How much can I lay without reaching the trim where the ceiling meets the wall? Or maybe that sounds familiar if you work in any construction site. You measure carefuly and start laying down the first course. Three feet up the wall you discover there’s a small gap at the top. The math in your head said it would fit, turns out reality have other ideas.
That’s where a calculator comes into play. Overlap vs. Exposure: That’s the name of the game. The overlap is the portion of the board that hides under next row to prevent water from entering. The exposure is what you see. That’s where most people gets stuck in their thinking. They only look at the exposed piece because that’s how it looks, but more of the exposed makes for less protection.
How to Use the Cladding Calculator
You put in your wall dimensions (width & height) and then select which type of board you want to use. It tell you how many courses will fit. This prevents short rows at the top like some DIYers do. Looks bad and you’ll be back. So think about material.
It could be light and thin like cedar bevel siding. It is flexible so tight overlaps aren’t a problem. Is it heavy and rigid like fibre cement? Needs a correct lap width to exclude both rain and wind. Profile selection determines the minimum overlap; which varies. If you expose more than the recommended amount on an eight inch fibre cement board, the system flags it. Go narrower than what’s specified by the manufacturer, and expect warranties to go up in smoke and invite moisture rot. Details matter if you want this stuff to last longly.
Then there’s the matter of waste (which is another intuitive failure). “I’ll just trim down my pieces to exactly what I need, no scraps!” Nope. Nobody considers material flaws like warped wood, or gravity (corners must be scribed), or that a saw has some thickness to it. A waste percentage is included in the calculator automatically. For most project with typical door/ window locations on regular walls, it comes out to roughly ten percent. If you’re doing gable/dormer wall, up that number to fifteen percent. Buying more boards today saves more money than going back to get them tomorrow. This buffer is also built into the tool so you don’t order short.
They’re easy to ignore, but out. They are out when needed. Use one screw or nail at each stud intersection. You need about ten to thirteen fastenings on a linear board if your studs is sixteen inches apart. It depends off the board length. Times that by the number of courses, and pretty soon it adds up. That’s what the calculator multiplies for you. No need to stand on a ladder and count the nails in your head.
There’s a handy reference table on the page that shows the effect of different spacings on final count. Fewer holes, a little more structure strength if over-drilling concerns you, narrower stud spacing. Consider the visual rhythm too. Five inches is traditional, while six inches seems moddern. Change that height, and all the boards above is changed. Altering the exposure by half an inch on a nine-foot wall alters the overall number of courses. This alters the number of boards required and amount of waste.
The visualizer will show you the rhythm of the layout. See whether the top course appears balanced before making any cuts. There’s carpentry involved with cladding, but there’s also geometry. A board is simply a rectangle with a task: to fit in somewhere bigger. The overlap plan makes them co-operate, not compete. No waste, no guessing around. And you get a wall that looks like the first and last lines were deliberate intended to be that way. It is the hallmark of a job well done.