Drapery Crown Height Calculator
Set the top crown, rod or track line, visible crown face, and finished drapery drop from real ceiling, window, and floor measurements.
🎯Room And Window Presets
📏Crown Height Inputs
Drapery Crown Height Results
📍Calculated Placement Diagram
📊Crown Style Reference Grid
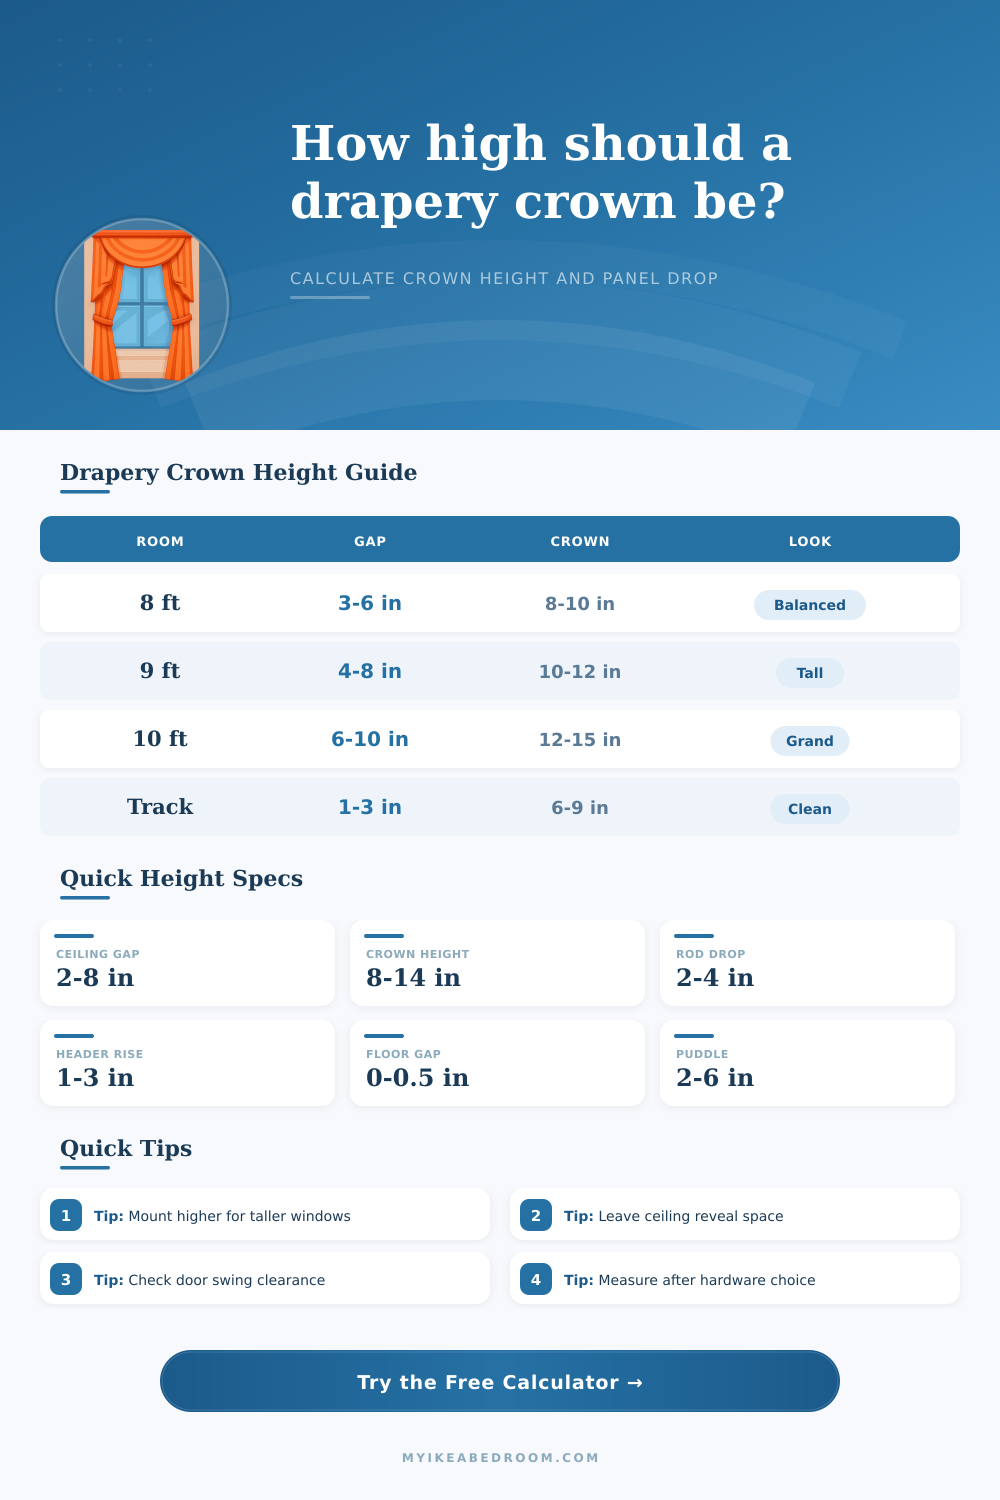
📐Ceiling Height Planning Table
| Ceiling Height | Typical Crown Top | Visible Crown Face | Design Intent |
|---|---|---|---|
| 7 ft 6 in to 8 ft | 2 to 5 in below ceiling | 7 to 10 in | Use a compact crown so the room still feels tall. |
| 8 ft to 9 ft | 3 to 7 in below ceiling | 8 to 12 in | Lift above the window trim for a taller bedroom look. |
| 9 ft to 10 ft | 4 to 9 in below ceiling | 10 to 14 in | Use a deeper crown face to balance the extra wall height. |
| 10 ft plus | 6 to 12 in below ceiling | 12 to 16 in | Keep the crown substantial enough for long drapery drops. |
| Ceiling track | 1 to 3 in below ceiling | 6 to 9 in | Prioritize a clean hidden track and shallow ceiling reveal. |
🪝Hardware And Header Table
| Hardware Setup | Drop Below Crown Top | Header Rise | Notes For Calculator |
|---|---|---|---|
| Decorative rod behind crown | 2 to 4 in | 1 to 3 in | Center rod so rings clear the crown face. |
| Hidden ceiling track | 0.5 to 2 in | 0 to 1 in | Use small drops for glider clearance and returns. |
| Pinch pleat on hooks | 2 to 3.5 in | 1 to 2 in | Hook insertion height controls fabric top line. |
| Grommet panel | 2.5 to 4 in | 1.5 to 2.5 in | Fabric normally rises above the rod center. |
| Ripplefold track | 1 to 2.5 in | 0 to 1 in | Check carrier stack and end-stop clearance. |
🖼Preset Comparison Table
| Preset | Ceiling | Crown Face | Best Use |
|---|---|---|---|
| 8 ft Bedroom Window | 96 in | 10 in | Balanced crown above standard bedroom trim. |
| 9 ft Tall Bedroom | 108 in | 12 in | Longer drop with a more architectural top band. |
| Ceiling Track Crown | 96 in | 8 in | Clean hidden track with minimal ceiling reveal. |
| Short Window Lift | 96 in | 9 in | Raises a shorter window visually without touching ceiling. |
| Formal Suite Crown | 120 in | 14 in | Deep crown face for stationary lined draperies. |
| Low Ceiling Balance | 90 in | 7 in | Compact crown for rooms below standard ceiling height. |
✂Panel Drop Reference Table
| Bottom Finish | Floor Allowance | Movement | Best Match |
|---|---|---|---|
| Float | -0.5 in / -1.3 cm | Easy daily use | Kids rooms, doors, washable panels. |
| Kiss | 0 in / 0 cm | Clean movement | Most bedroom draperies and tracks. |
| Soft break | 1 in / 2.5 cm | Light fold | Linen, cotton, and relaxed panels. |
| Light puddle | 2 in / 5.1 cm | Mostly stationary | Decorative side panels and sheers. |
| Classic puddle | 4 in / 10.2 cm | Stationary | Formal bedrooms and heavy lined drapery. |
💡Measuring Notes
The calculator gives layout heights for planning and marking. Confirm bracket, track, crown board, and drapery workroom specifications before drilling or cutting fabric.
Window treatments is one of those things most folks assume are simple. Pick out something you like and get some panel cut to hang on a rod that covers the width of the glass. Done. But here’s the thing: where you place those treatments vertically matter much more than how wide they are. It does way more to adjust the proportions of a room then horizontal placement ever could.
For example, the ‘feels right’ crown height in your head never look quite right when it meets the wall. Why? We usually measure down from the window trim rather than taking into account the actual ceiling line. The trick is to know where those lines align with each other. The calculator above figure this out so you don’t have to guess.
Why Vertical Placement Matters More Than Width
First, the starting point is your final ceiling height. Everything else flow from this figure. In a typical eight foot room, every inch matter. A crown that are too tall sucks the life out of the room; it makes the room look narrower and the window look shorter. Too low and the window appears short and the room feel cramped. Leave some reveal under the ceiling so the eye has somewhere to rest. Two to four inches tends to work best for most common heights, though higher ceilings can allow a greater distance without appearing disconnected. This tiny area keep the treatment from being glued to the room’s roof.
The visible crown face follow next. This is what covers the hardware above the track or rod and is the wood (or fabric) that caps off the window opening. A modest six-to eight-inch crown keeps it light in smallish room. Larger rooms, especially those with nine or ten foot ceilings, requires more visual weight to balance the expanse of the wall. A twelve inch crown in a tall room prevent the window from feeling like an afterthought. The tool accounts for how these elements are proportioned, adjusting how far out the hardware line is depending on the style you choose. Whether you have a hidden ceiling track or a decorative rod hiddden behind a valance, the math change just a bit so the carrier rings clear the face without touching.
Similarly, don’t forget about the bottom of the panel. Whether to float or puddle is a hotly contested topic. It all depends on how the area is used. A curtain with a floating hem (meaning it’s a half inch off the ground) or one that kisses the floor will move easily and stay relatively clean if you’re opening and closing them everyday to ventilate or let light in. A puddled hem offer more depth and richness but has a tendency to collect dirt and create drag. For stationary side panels in more formal rooms it is beautiful. In high traffic living spaces it’s not very practical. The tool outlines the allowances clearly in its reference tables so you’ll know which direction to go based off function and not just on trend.
Even seasoned DIY-ers gets tripped up by the hardware details. Depending on which way you mount it, a header rise above the hardware line, while the drop below the crown top change accordingly. Grommet panels sits higher on the rod than pinch pleats do because of how the fabric inserts into the eyelets. Tracks need different clearances than rods. Bunchy fabric at the top, or poking hardware beneath the valance, it happen when you ignore those mechanics. Calculating the drop length based off your own set-up guarantees that the length you recieve will fit on the hardware you choose.
And lastly, what about the window trim? Too much too near the casing can make it feel small and cheap. Raising the crown several inches past the window frame instantly makes it feel elegant and gives it some real height as well. Such a subtle change alter everything about the room for no extra cost. It forces you to think vertically rather than just covering the glass. The effect is powerful, surprising, and instant.
The trick is to get the height correct… which removes all the guesswork from installing them. No more hardware collisions, no more crooked hemlines, no more odd gaps. When we’re dealing with unmovable architecture it’s better to plan rather than wing-it. You should of planned ahead. Those verticals make things go on pretty easily once you have them locked-in. The rest of the room kind-of-falls-into-place after that.
Begin with the ceiling, then move downwards to the floors. And just let the numbers do the talking. It’s how pros create professional-looking treatments for free… without having to hire a contractor.