Curtain Overlap Allowance Calculator
Plan how far split curtains should pass each other at the center, then translate that overlap into per-panel lead, finished panel width, fullness, and cut-width allowance.
1 Real presets
2 Measurements and curtain behavior
Full breakdown
3 Reference cards
4 Overlap allowance table
| Closure goal | Base center overlap | Best fabric match | What to check before sewing |
|---|---|---|---|
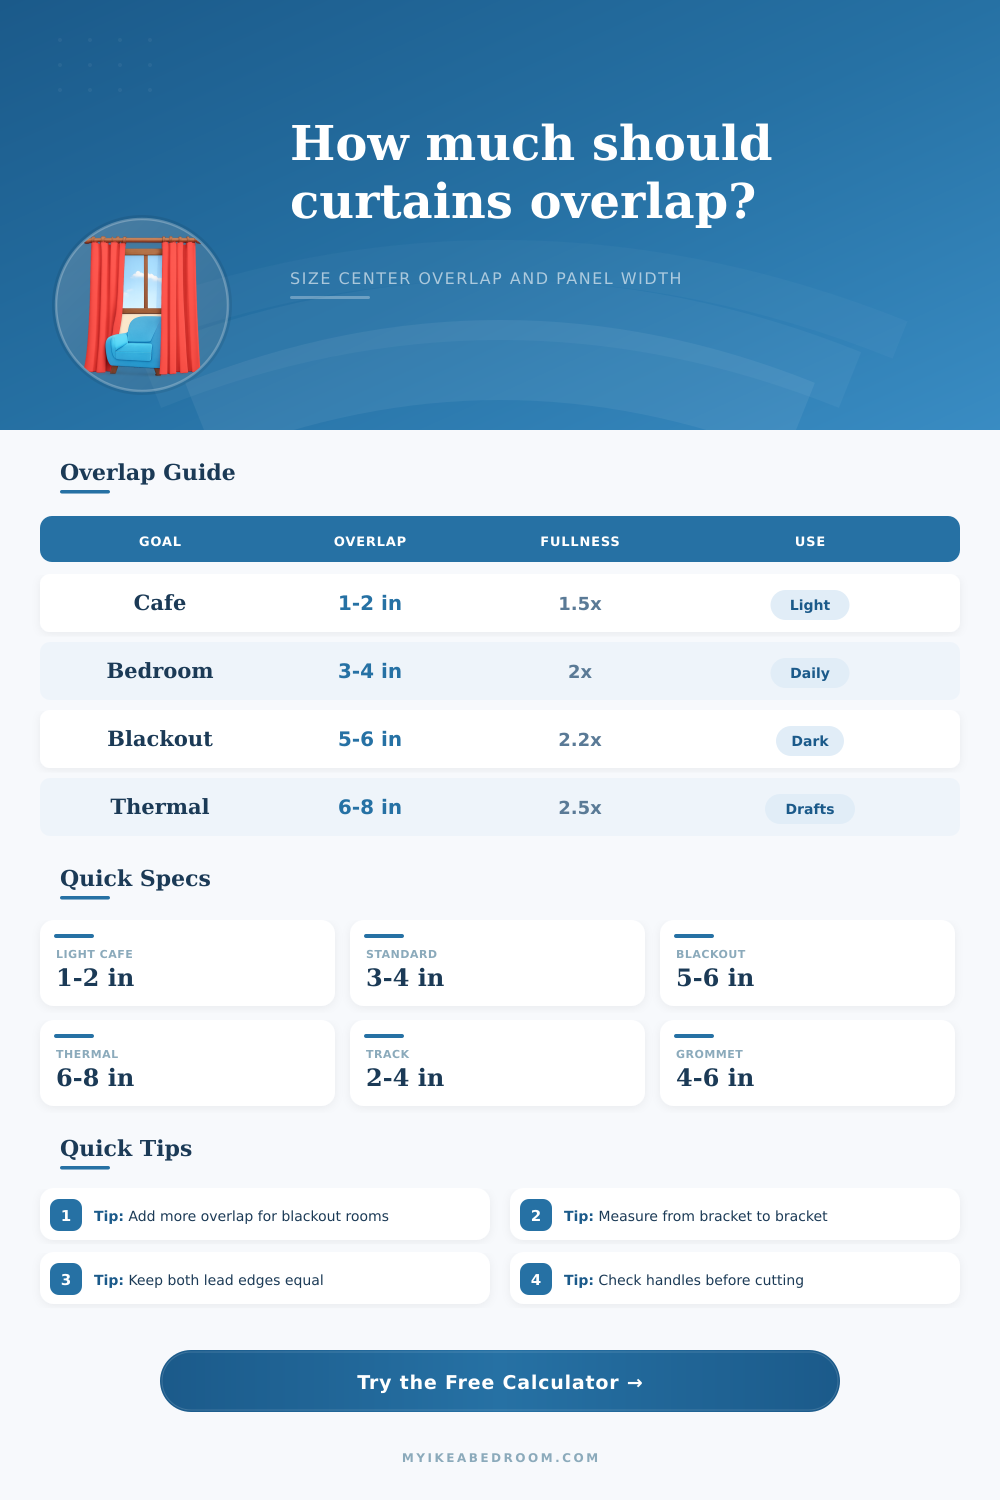
| Light privacy | 1.5 in / 3.8 cm | Sheer, cafe, light cotton | Confirm the panels still meet when drawn by hand. |
| Standard bedroom | 3 in / 7.6 cm | Linen blend, cotton, light lining | Check ring spacing so the lead edge does not pull open. |
| Blackout control | 5 in / 12.7 cm | Blackout lining, dim-out cloth | Test at night with room lights off and outside light present. |
| Thermal or draft control | 6.5 in / 16.5 cm | Heavy lined, velvet, thermal weave | Pair the center overlap with side returns and top control. |
5 Fullness and fabric behavior table
| Fabric or heading | Typical fullness | Overlap add-on | Why it changes the allowance |
|---|---|---|---|
| Sheer or voile | 1.5x to 2.0x | 0 in | Soft fabric collapses easily and does not spring away much. |
| Linen blend | 1.8x to 2.2x | 0.5 in | Relaxed waves need a little extra at the leading edge. |
| Cotton or medium drape | 2.0x to 2.2x | 0.75 in | Moderate body can expose a narrow center line. |
| Blackout lining | 2.0x to 2.4x | 1.25 in | Springy lining benefits from deeper crossing at the center. |
| Velvet or thermal | 2.2x to 2.5x | 1.75 in | Heavy fabric wants more lead to stay closed neatly. |
| Grommet top | 1.6x to 2.0x | 1.5 in | Fixed waves may stop before the center if overlap is tight. |
6 Hardware clearance table
| Hardware situation | Add to overlap | Measure from | Practical note |
|---|---|---|---|
| Plain rod with rings | 0 to 0.5 in | Inside ring edge | Usually closes cleanly when ring spacing is even. |
| Track carrier or baton | 0.5 to 1 in | Carrier stop | Carrier bodies can prevent a perfectly flat meeting edge. |
| Center window handle | 1 to 2 in | Handle projection | Let fabric bridge past the handle instead of resting on it. |
| Grommet wave heading | 1 to 2 in | Last wave peak | The final wave often holds the panel back from the center. |
7 Common setup table
| Window setup | Planning width | Suggested overlap | Panel note |
|---|---|---|---|
| 36 in cafe curtain | 42 to 48 in | 1.5 to 2 in | Use light fullness and small lead hems. |
| 60 in bedroom window | 76 to 84 in | 3 to 4 in | Two panels usually work cleanly. |
| 72 in blackout bedroom | 88 to 98 in | 5 to 6 in | Add returns if side light matters. |
| 96 in living room window | 112 to 124 in | 3 to 5 in | Four panels reduce each panel width. |
| 120 in sliding door | 136 to 152 in | 5 to 7 in | Allow for handle projection and heavier fabric. |
8 Comparison grid
Minimal meeting
Lowest fabric use, best for sheers or cafe curtains. It may show a line of light when panels relax.
Balanced bedroom
Uses 3 to 4 inches of crossing plus normal fullness. This is the safest everyday starting point.
Blackout center
Uses deeper crossing and a fabric add-on so lined curtains keep pressure at the center seam.
Thermal closure
Combines center overlap with side returns. Best when drafts or nighttime light leaks matter.
9 Practical tips
Measure the usable rod span between the side return points, then mark the midpoint on painter's tape. Each leading edge should travel beyond that center mark by the per-panel lead result.
If the fabric is heavy, clipped mock folds reveal whether the last ring, carrier, or wave heading pulls the center open. Increase the obstruction allowance before cutting final widths.
There’s nothing more disappointing then newly installed curtains that don’t quite meet in the middle. And what do you do? With pride, you close the curtains. Then you notice a sliver of light dividing them in half. Why is that? Everyone assumes that width of each panel is simply double the width of the window plus some additional fabric for effect. What they overlook are that two different pieces of material will not naturaly line up. Enter the curtain overlap allowance calculator.
Plug in your desired amount of fullness and how far out your rod extends and let it do the math. That way there are no conversions or coefficients to guess at, just a definite cut to follow to achieve an otherwise vague look. That’s easy enough in theory, but also frequently forgotten. You’re not just trying to cover the window with overlap. Instead, you’re aiming to create overlap by bringing together two separate piece of panel. This means the fabric has to account for however far apart those panels are.
How to Calculate Curtain Overlap
If there’s an eight-inch gap between the window frame and your curtain rod on either side, that’s an extra sixteen inches of total span. That’s how much your fabric need to reach, before any overlapping occurs. Many people forget to include this, or simply measure from glass outward, as if the curtain rod didn’t exist! That’s what the calculator will automatically take into account, along with any other side return. You want all of that wall space between brackets covered at the end.
Another factor is that fabric weight matter. Soft, draping linen would be okay with only an inch of center overlap, the cloth would still collapse down onto itself. But heavier velvet (or thermal lined blackout) doesn’t do that; they has some life and body and don’t want to get compressed. If you fold them up just as tight as you did the sheer voile, the force of those stacked layers will squeeze the leading edges away from each other. The calc takes that into account, factoring in more overlap for stiffer fabrics (because physics says so).
This number goes hand-in-hand with fullness ratio. Fullness means how many times wider than the window opening you want your finished curtain to be. A regular drapery will typically run double the width of glass, which looks luxurius and makes nice folds. Selecting a greater fullness (i.e. Two point five times) mean that you’ll have a lot more fabric, which uses up some of the space on the rod. The calculator considers this when calculating lead per panel. It will tell you exactly where to place each panel off the true center line in order to account for the bulk.
Other variables come into play depending on the hardware you choose: Fixed waveforms like grommets on curtain tops don’t budge once they’re drawn, and if the overlap is too tight, those hard arcs will fall short at the center. Bulky track system carriers can also keep the fabric from adhering tightly to the wall, where the slightest bump, like a protruding window handle stuck smack in the middle, can stop the close. The app has fields where you enter dimensions of any obstructions or lead-edges. It’s the real world of the install, and it’ll help ensure the remaining width of fabric provides enough length to span some odd piece of hardware or misshapen ring.
A dedicated bedroom or media space will require a more airtight seal than a casual living room, where some daylight coming through may be desirable. The calculator enables users to choose how tight they want their final closure to be. From basic light-blocking to thermal draft control. Depending on your choice, you will need a certain amount of baseline overlap; for thermal, this is about six to eight inches to properly prevent airflow. At first glance, this appears excessive. But again: for function.
Each scenario is a preset button that quickly lets you try it out. It loads actual world configurations and shows you how those variables play together before you put in your own figures. Compare the nursery blackout preset to the cafe curtain preset. The difference between what width panels they require is drastic. One calls for 90 inches of finished fabric per panel; another gets away with 60. That’s the reason a generic sizing chart never realy applies to something custom made.
That’s all you need to know to order online or take to the tailor. What you’ve calculated here is the final width, including hem allowance on the leading edge, and the finished width of the face. Why is knowing this final measurement important? Many people order panels that are too narrow (i.e. Wide enough to cover the window, but not wide enough to close properly). Having done this math beforehand allows you to calculate a good overlap so your curtains meets securely; in other words, they stay shut, not just because of tension, but also because of gravity.
You don’t see the center seam anymore, just a nice neat unified drape that does exactly what it was hired to do. That’s the true reward for getting the math right before cutting anything. You should of checked this earlier.