Roman Shade Ring Spacing Calculator
Plan ring rows, side columns, fold spacing, cord allowance, and sewing marks for a flat, relaxed, or blackout roman shade.
📌Real Window Presets
📏Shade Measurements
🧵Ring Layout Benchmarks
🗂Reference Tables
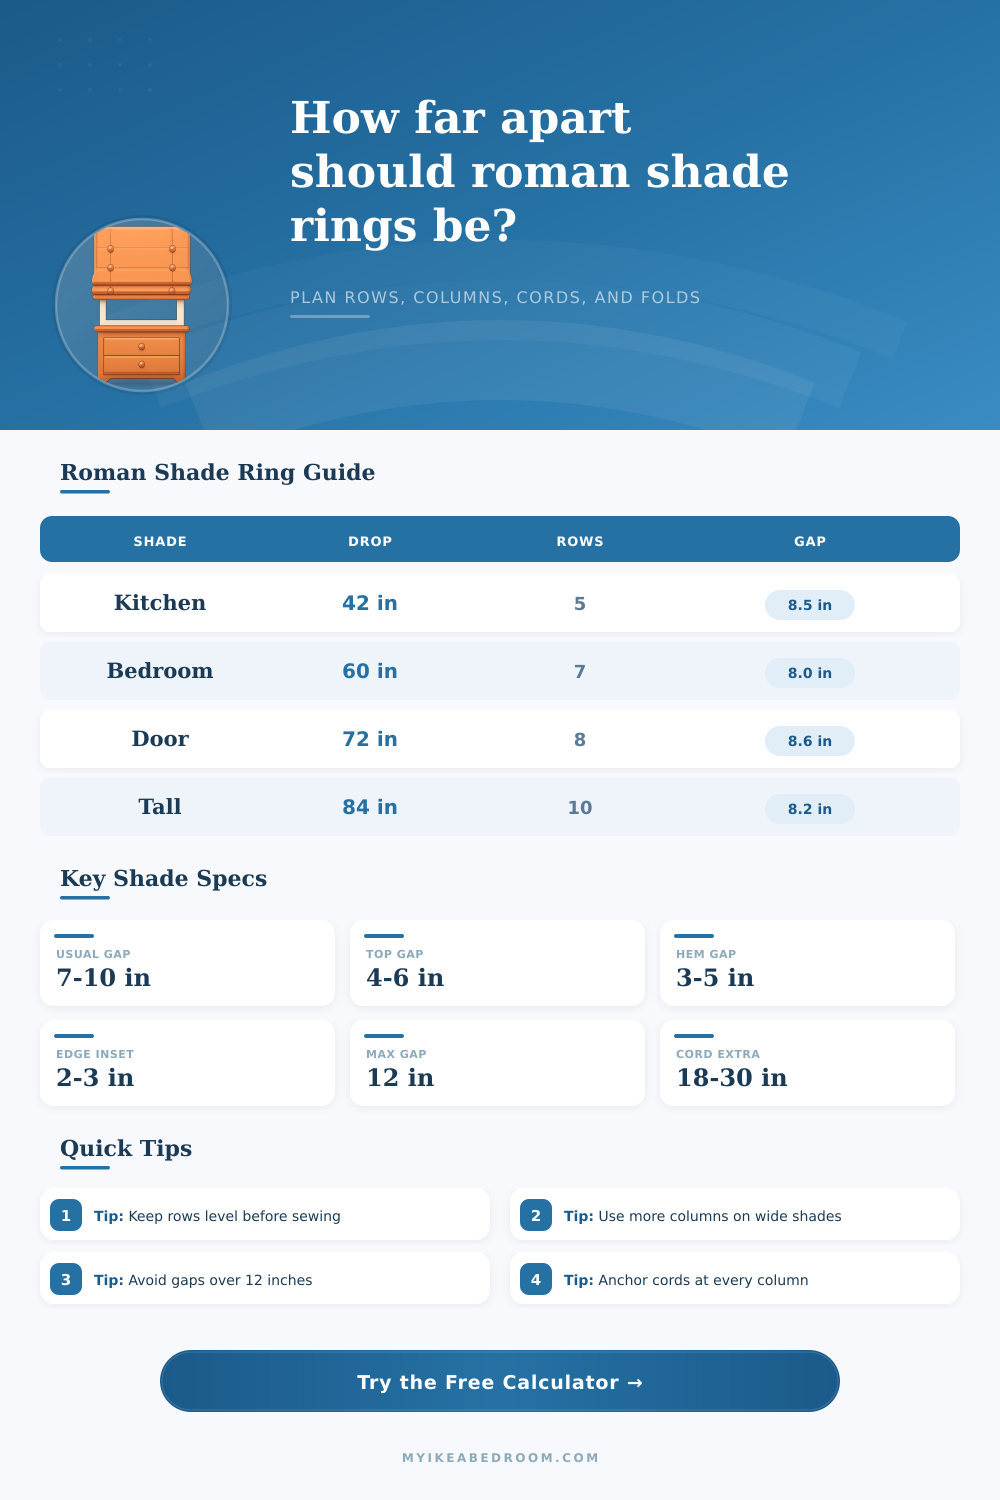
| Finished Drop | Suggested Rows | Typical Gap | Best Use |
|---|---|---|---|
| 30-42 in | 4-5 rows | 7-9 in | Small kitchen or cafe shade |
| 43-60 in | 6-7 rows | 7.5-9 in | Bedroom and bath windows |
| 61-72 in | 8 rows | 8-9.5 in | Door panels and long windows |
| 73-90 in | 9-11 rows | 7.5-9 in | Tall stair or patio glazing |
| Shade Width | Ring Columns | Side Inset | Column Spacing |
|---|---|---|---|
| 18-28 in | 2 columns | 2 in | 14-24 in apart |
| 29-42 in | 3 columns | 2-2.5 in | 12-19 in apart |
| 43-60 in | 4 columns | 2.5-3 in | 12-18 in apart |
| 61-78 in | 5 columns | 3 in | 14-18 in apart |
| Preset Window | Size | Rows | Ring Count |
|---|---|---|---|
| Kitchen sash | 30 x 42 in | 5 | 15 |
| Bedroom single | 36 x 60 in | 7 | 21 |
| French door | 25 x 72 in | 8 | 16 |
| Tall stair | 32 x 84 in | 10 | 30 |
| Cord Path | Allowance Formula | Use When | Check Point |
|---|---|---|---|
| Left lock | Drop per column plus width run | Lock sits left | Longest run crosses shade |
| Right lock | Drop per column plus width run | Lock sits right | Mirror the column order |
| Center pull | Drop per column plus half runs | Narrow shades | Keep cords balanced |
| Continuous loop | Maker hardware chart | Clutch systems | Use hardware limits |
⚖Roman Shade Style Comparison
Flat
Uses even rows and crisp folds. Good default for printed fabric, bedroom windows, and inside mounts.
Relaxed
Uses fewer side controls and softer lower curves. Keep row spacing modest so the center does not sag.
Blackout
Benefits from closer rings because lining adds weight. Use extra columns on wider panels.
Hobbled
Needs shorter intervals to keep each soft loop consistent. Choose a smaller preferred gap.
💡Sewing Layout Tips
Roman shades has the potential to have the fabric hang in straight lines when the Roman shade is in its lowered position. However, the Roman shades can also have the fabric form even fold when the Roman shade is in its raised position. The placement of the rings upon which the lift cords is placed determines the appearance of the folds created by the raised fabric.
If the rings are placed with the proper spacing relative to the drop, weight, and number of column of the Roman shade, then the fabric will rise even and level when the shade is raised. However, if the rings are incorrectly spaced, the fabric may sag on one side of the shade, or it may create even larger empty sections of the Roman shade. The distance between the rings cannot be randomly select for the Roman shade.
How to Place Rings and Cords on Roman Shades
The distance between the rings is related to the finished drop of the Roman shade, the weight of the Roman shade, and the number of columns that will be used in the Roman shade. For instance, Roman shades with a drop of forty inches may have only five rows of rings, but Roman shades with a drop of eighty-four inches may have ten row of rings. Roman shades with deeper drops require more row of rings to ensure that the gaps between the rings are small.
Small gaps between the rows of rings is required to prevent the fabric of the Roman shade from billowing out at fifty percent of the raise of the Roman shade. A maker may manufacture Roman shades by measuring the finished drop and finished width of the Roman shade. The finished width of the Roman shade will determine the number of vertical columns of rings that can be included in the Roman shade.
The finished drop will determine the number of horizontal rows of rings that are required for the Roman shade. The depth of the Roman shade will also help to determine how much clearance should be provided for the Roman shade at the top of the frame, the bottom of the frame, and the side edge of the frame. For example, the top of the Roman shade will require clearance so that the first row of rings do not interfere with the headrail.
The clearance at the bottom will ensure that the last row of rings does not land within the hem pocket of the Roman shade. Finally, clearance at the sides will prevent the outer lift cords from rubbing against the side edges of the window frame. The vertical gap between the rows of rings for a Roman shade may be difficult for many individual to determine.
For instance, if the gap is too wide, the Roman shade may collapse in certain area. If the gap is too narrow, the Roman shade may be too thick to properly fit within the window frame. Roman shades of different design may require different depths between the rows of rings.
For instance, flat shades may have gaps between the rows of rings that are wider than those of Roman shades with hobbled designs. Finally, Roman shades with blackout linings may require an increased number of columns of rings to evenly distribute the weight of the linen between the rows of rings. A calculator can assist in determining the number of rings that will be required in a Roman shade.
The calculator will consider the drop, width, clearance, and number of rows. Based off these measurements, the calculator can calculate the number of rows of rings that will be required. Furthermore, the calculator can calculate the drop distance between each row of rings, the total number of rings that will be required, and the length of each cord.
The total length of each cord will factor in the clearance that will be required at the top of the Roman shade, the length of each horizontal run of the cords, and the length of the tail of the cords. The total length of the cords is an important decision in the manufacturing of the Roman shade; if the total length is too short, the Roman shade will be impossible to raise. The same process that the width of the Roman shade are determined can determine the number of columns of rings.
For instance, Roman shades that are narrow may only require two columns of rings, but Roman shades that are wider may require three or four columns of rings. Each additional column will increase the total number of rings and the total length of the cords. Furthermore, adding an additional column will allow for the Roman shade to lift in a desired manner, and the Roman shade will hang in a desired way.
The measurements for the dimensions of the window can also impact the design of the Roman shade. For instance, bay windows and doors with divided lites may require additional clearance in the sides of the Roman shade to ensure that the cords do not interfere with the trim of the bay window. Additionally, if the headrail is close to the window, then the clearance at the top of the Roman shade may need to be increased.
These type of measurements cannot be seen with the calculator, so it is recommended that the maker tapes a sheet of paper to the window to determine if the rings will clear the trim of the window. Before the Roman shade is sewn together, the maker must mark the design decisions regarding the placement of the rings onto the Roman shade fabric. Many makers begin at the bottom of the hem of the Roman shade and mark each row of rings to the top of the shade.
Marking from the top to the bottom may lead to error in the placement of the rings. Furthermore, using a long straightedge will assist in creating even lines of the rings. One additional decision prior to sewing the Roman shade includes the routing of the cords.
Some Roman shades have the cords routed to one side of the shade, while other Roman shades may have the cords routed to the center of the shade. The total length of the cords will change based upon the routing of the cords. Therefore, the decision of the routing of the cords must be made prior to sewing the rings into the Roman shade.
Finally, a properly designed and manufactured Roman shade will raise even for the wearer, and the Roman shade will have an even hang when in use. By considering the different measurements of the Roman shade, the maker can save time in the manufacturing of the Roman shade.