Shaker Wall Paneling Calculator
Estimate rail and stile lengths, panel opening sizes, board stock count, waste allowance, paintable inset area, and cut quantities for a bedroom shaker accent wall or wainscot layout.
Start with a common headboard wall, half wall, closet surround, nursery grid, or tall accent wall, then adjust the exact dimensions and rail widths.
| Wall width | Grid choice | Best rail width | Typical reveal |
|---|---|---|---|
| 6 to 8 ft alcove | 3 or 4 columns | 1.5 to 2.5 in | 14 to 24 in panels |
| 9 to 12 ft bedroom wall | 4 to 6 columns | 2.5 to 3.5 in | 18 to 30 in panels |
| 13 to 16 ft wide wall | 6 to 8 columns | 3 to 3.5 in | 20 to 28 in panels |
| Partial wainscot run | 5 to 9 columns | 2 to 3 in | 12 to 26 in panels |
| Stock length | Linear feet per board | Linear meters per board | Useful planning note |
|---|---|---|---|
| 6 ft board | 6.0 ft | 1.83 m | Good for short rails and low wainscot sections. |
| 8 ft board | 8.0 ft | 2.44 m | Common for full-height vertical stiles in standard rooms. |
| 10 ft board | 10.0 ft | 3.05 m | Helpful for tall walls or fewer vertical seams. |
| 12 ft board | 12.0 ft | 3.66 m | Useful for long top and bottom rails when transport allows. |
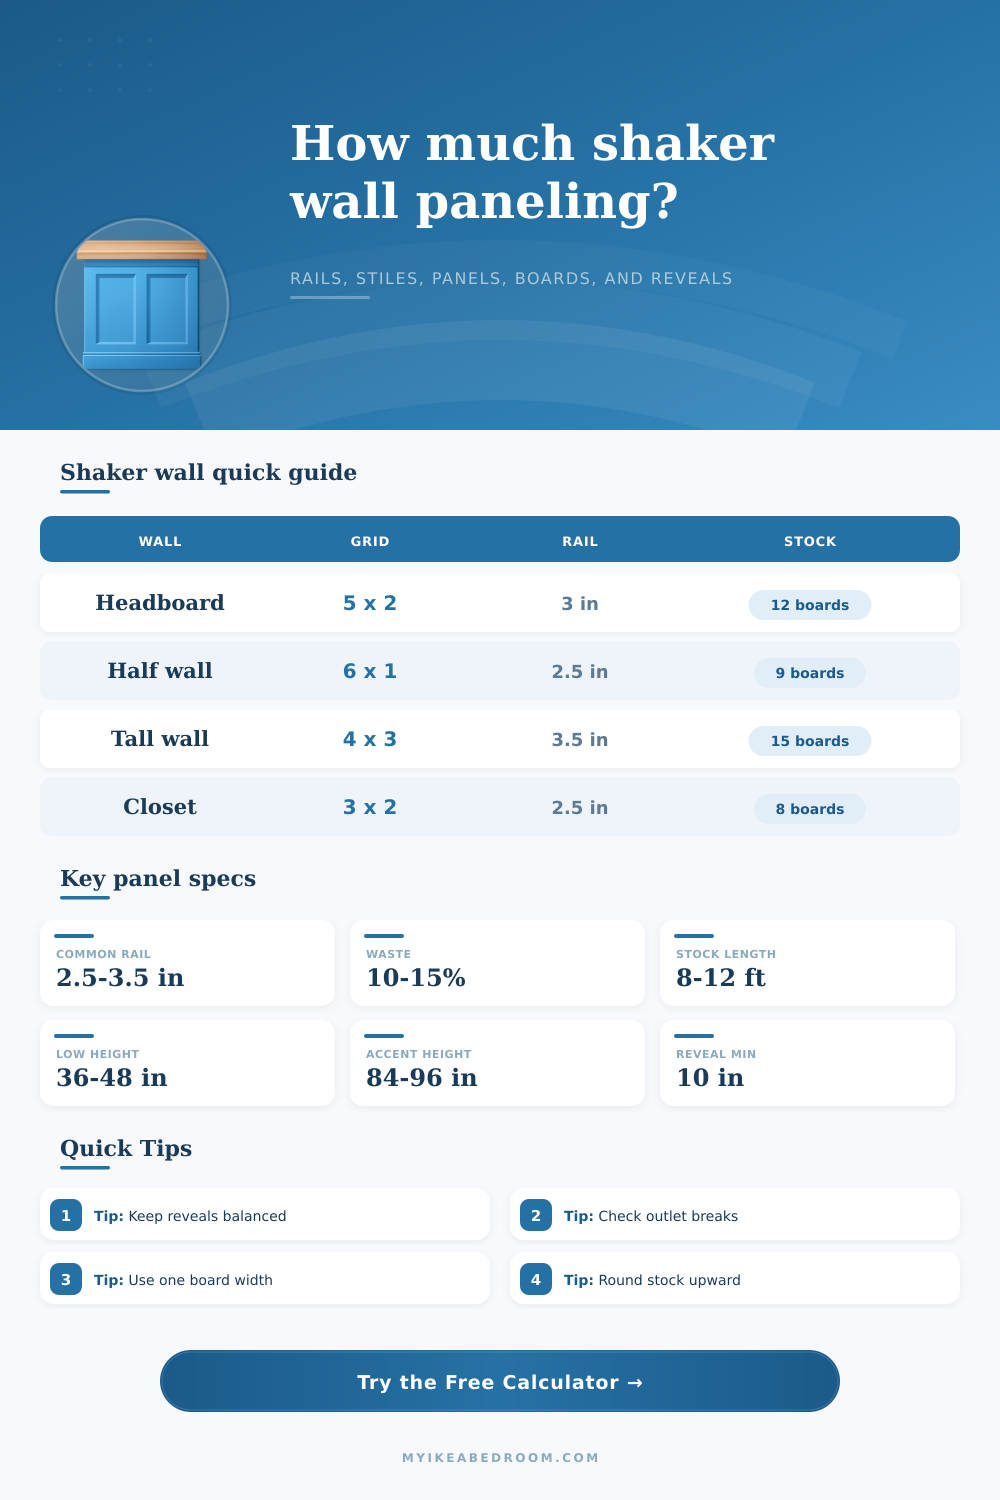
| Project type | Wall zone | Grid layout | Board reserve |
|---|---|---|---|
| Headboard wall | 10 to 14 ft wide, full height | 5 by 2 or 6 by 2 | 10% waste works for straight cuts. |
| Low wainscot | 34 to 48 in high | 6 by 1 to 9 by 1 | Use extra reserve for outlet breaks. |
| Closet wall | Door opening interrupts grid | 2 by 2 side zones | Add wrap frame if casing is included. |
| Tall feature wall | 9 to 10 ft high | 4 by 3 or 5 by 3 | Check stock length before choosing stiles. |
Best for: full-height accent walls.
Vertical pieces run long, while horizontal rails fit between them.
Best for: long wainscot runs.
Top, bottom, and cross rails run wide, while stiles are shorter.
Best for: applied molding looks.
Each panel is counted as a separate rectangle with more small cuts.
Best for: textured or uneven walls.
Use the paintable field result as the smooth sheet area reference.
Reveal check: If the inside panel opening drops below about 10 inches in either direction, reduce the grid count or use narrower boards.
Opening check: For closet doors, windows, outlets, and wall lights, choose the wrap option only when you want a visible shaker frame around that break.
Shaker wall paneling feature design element that use clean lines and rectangle to create a balanced design within the chosen room. Shaker paneling is often used for bedrooms because of it’s calm and non-busy design. Before installing Shaker paneling, you must determine the measurement for the paneling.
The width and height of the wall will provide the parameter within which the panel will be installed. Within those parameters, you will also have to determine the number of vertical and horizontal openings within the design. Using too many openings will create panel that appear small within the room.
How to Measure and Plan Shaker Wall Paneling
Using too few openings will make the panel for the room appear heavily. The calculator allow you to enter the width of the board to be used for the Shaker paneling and the number of openings that will be used within the wall to determine if the chosen widths for the board will allow enough space for the openings within the wall. Another important measurement to decide when installing Shaker paneling is the length of the board that will be used in the project.
For most bedroom, an eight-foot board will be sufficient for installing Shaker paneling on the bedroom walls. However, for those who would like to install Shaker paneling on taller accent walls within the bedroom, ten or twelve-foot boards may be needed. When using the calculator to determine the amount of Shaker paneling wood that will be needed for the room, you will also need to choose a percentage for the waste of the boards.
This percentage will account for any mistake or imperfections in the wood when sawing the boards. For example, an individual can choose a percentage to account for a board that will be cut incorrect or has a knot within the wood. A fifteen percent waste percentage will require more wood than a ten percent percentage.
Using more wood during the purchase stage provides more margin for the project and prevents the individual from running out of paneling during the installation process. Other feature within the room, such as window or closet doors may interrupt the paneling design. These interruptions may require a decision regarding whether the opening for the window or door will have a frame around it.
Many calculators allow for the selection of a wrap option around the opening for the window or door. Using the wrap option will ensure that the existing paneling style remain intact around the opening for the window or door. The reference table on the calculator may assist in determining the starting point for the number of vertical and horizontal openings for the Shaker paneling.
However, these table are not set rules for installation. For example, a narrow alcove in the bedroom may require only three or four vertical board for the paneling design. In contrast, a long wall may require six vertical boards of Shaker paneling.
The tables also include information regarding the size of the panels that will be created for the wall. For example, if the inside reveal size for the panels is less than ten inch in size, then the panels may appear too small within the room. In this situation, the individual will have to reduce the number of vertical board for the panels.
The backer material that is to be used for the Shaker paneling will impact the cost of the installation process and the finished paneling design for the room. Shaker paneling can be painted directly on the existing wall between the paneling boards to keep the cost of the installation process low. However, adding a sheet of smooth backer material to the wall will alter the cost of the project and the appearance of the paneling.
The calculator will show the area that will be painted between the Shaker paneling boards. This area is determined by subtracting the area that will be covered by the Shaker boards from the total area of the wall. Many individual will make mistake when installing Shaker paneling regarding the proportion of the different boards for the project.
For example, an individual may choose to use the same width for all of the board within the Shaker paneling. However, the width that looks good for a tall wall may appear too large for shorter walls in the same room. An individual can avoid a common mistake by using the calculator to determine different board width for the project so that an individual can see whether a certain width will appear good for both the tall and short walls within the same room.
Another choice to consider prior to purchasing the wood for the Shaker paneling is the join style for the paneling. For example, continuous vertical stiles will require fewer cut of long boards for installation than continuous vertical stiles. Another challenge of the installation of Shaker paneling is the presence of obstacle in the room.
The obstacles often include electrical outlet or air vent in the room that may interrupt the planned Shaker paneling for the room. In addition, the baseboards in the room may sit higher than the bottom margin for the Shaker paneling that is determined with the calculator. An individual will have to make some adjustment to the paneling plan with these obstacle in mind when the individual installs the Shaker paneling in the actual room.
Another factor that will be more important than a perfect layout for the Shaker paneling is that the layout is balanced within the area to be paneled. If the paneling that is calculated with the calculator does not appear correct for the individual’s vision for the Shaker paneling design within the room, the individual can shift the row or column of paneling boards that will be purchased with the material. By using a Shaker paneling calculator, the individual can remove the guesswork in determining the amount and size of the Shaker panels that will work for them and their room.
Thus, the individual can focus on the final appearance and design of their Shaker paneling design.