T Shirt Quilt Calculator
Plan a memory quilt from real shirt graphics, finished quilt size, panel grid, sashing, borders, stabilizer, backing, batting, and binding before the first shirt is cut.
Start with a common memory quilt layout, then tune the shirt count, panel size, and extra materials for your own stack of shirts.
| Quilt type | Finished size | Grid | Panel finish | Shirt sides |
|---|---|---|---|---|
| Memory pillow pair | 18 by 18 in each | 1 by 1 each | 14 to 16 in | 2 to 4 |
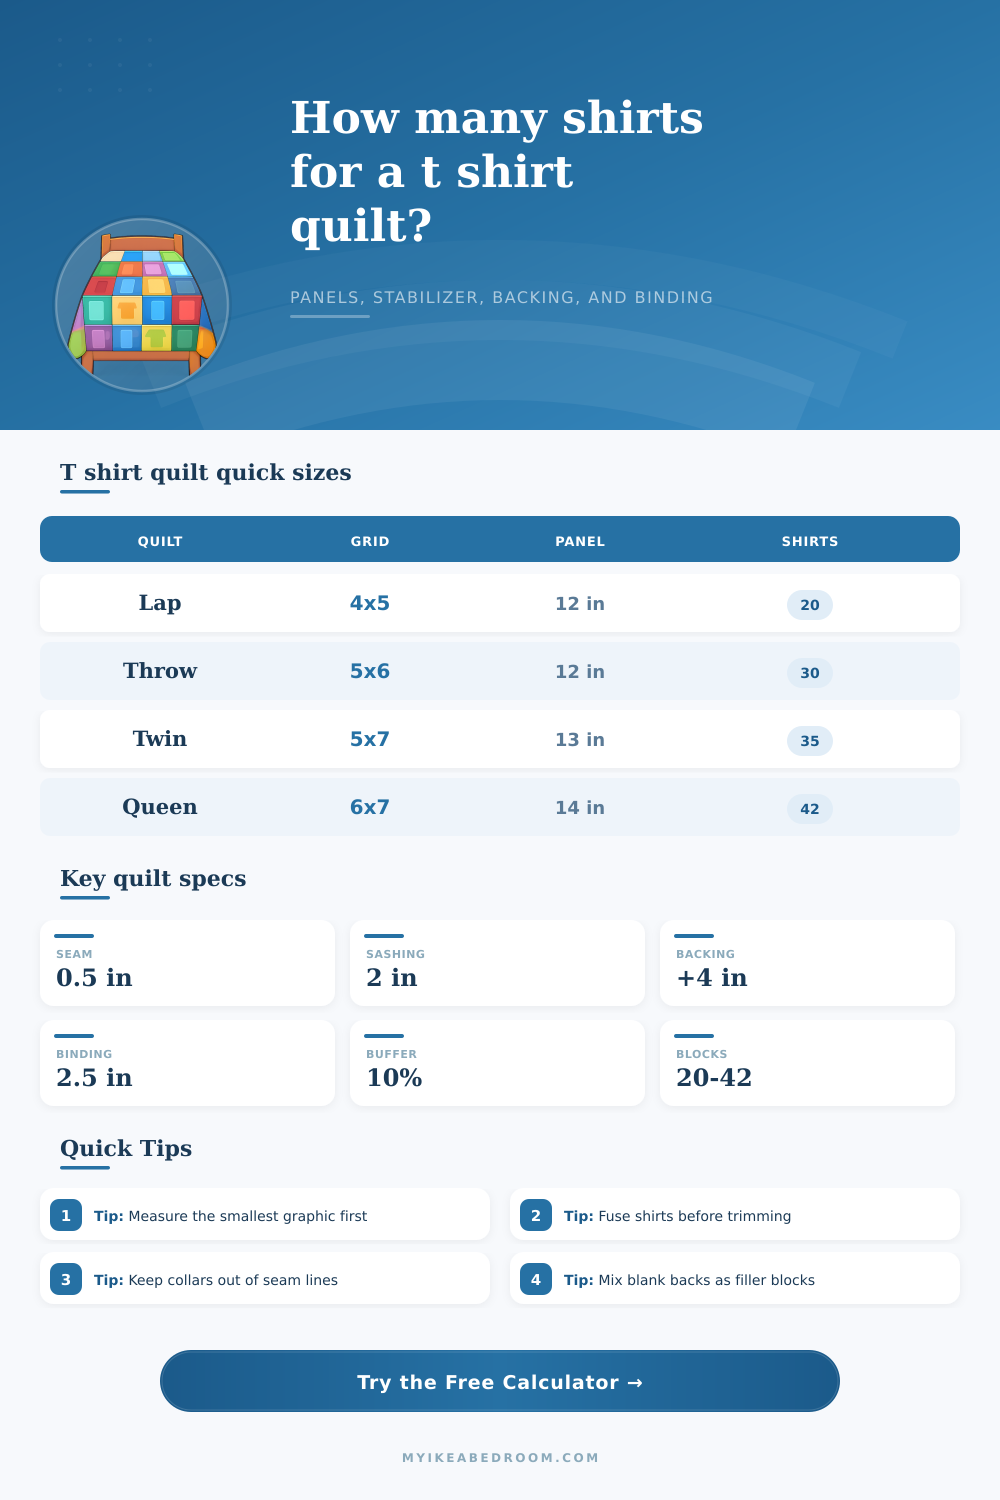
| Lap keepsake | 48 by 60 in | 4 by 5 | 10 to 12 in | 20 |
| Classic throw | 60 by 72 in | 5 by 6 | 10 to 12 in | 30 |
| Twin bed | 66 by 88 in | 5 by 7 | 12 to 14 in | 35 |
| Queen memory quilt | 84 by 96 in | 6 by 7 | 12 to 14 in | 42 |
| Cut panel | Finished panel | Best graphic area | Typical shirt type | Metric cut |
|---|---|---|---|---|
| 10 by 10 in | 9 by 9 in | 7.5 by 7.5 in | Youth shirts, pockets | 25.4 by 25.4 cm |
| 12 by 12 in | 11 by 11 in | 9.5 by 9.5 in | Adult small graphics | 30.5 by 30.5 cm |
| 14 by 14 in | 13 by 13 in | 11.5 by 11.5 in | Sports and school shirts | 35.6 by 35.6 cm |
| 16 by 16 in | 15 by 15 in | 13.5 by 13.5 in | Concert or jersey prints | 40.6 by 40.6 cm |
| 18 by 18 in | 17 by 17 in | 15.5 by 15.5 in | Oversize statement shirts | 45.7 by 45.7 cm |
| Material | Formula base | Added allowance | Why it matters | Output |
|---|---|---|---|---|
| Fusible stabilizer | Cut panel area times panel count | Selected buffer | Each knit panel is fused before trimming | Linear yards or meters |
| Sashing strips | Internal strip lengths plus seams | Selected buffer | Separates stretchy shirt blocks cleanly | Linear inches and yards |
| Backing | Quilt size plus overhang | Piecing style factor | Allows basting and quilting take-up | Backing size and yardage |
| Batting | Backing size rectangle | Overhang included | Batting should match or exceed backing | Square yards and square meters |
| Binding | Quilt perimeter plus join allowance | Strip rounding | Whole strips are easier to cut and join | Strip count and fabric use |
| Source plan | Panels per shirt | Best use | Watch point | Calculator setting |
|---|---|---|---|---|
| Fronts only | 1.0 | Most memory quilts with meaningful graphics | Needs one shirt per block | One panel from each shirt |
| Fronts plus selected backs | 1.5 | Fewer shirts, mixed logos, blank fillers | Color balance may need sorting | Some backs used as filler |
| Front and back from most shirts | 2.0 | Small collections or repeated team shirts | Back print may be lower on shirt | Front and back from most shirts |
| Jerseys and large prints | 1.0 | Oversize blocks and bold bedroom throws | Check mesh stretch and numbers | Increase graphic margin |
Use more: when shirt colors are busy or blocks vary slightly.
Use less: when the quilt should read like a tight collage.
Use more: when the panel grid is smaller than the target bed size.
Use less: when shirts should fill the whole top.
Larger: keeps big graphics intact and reduces total shirts.
Smaller: works for youth shirts and dense memory layouts.
10 percent: suits most cut and fuse plans.
20 percent: helps with directional prints or fragile shirts.
Graphic fit: The calculator compares the finished panel opening with the print size plus margin. If it warns you, increase the quilt size, reduce sashing or borders, or use fewer columns.
Stabilizer first: Fuse the shirt section before final trimming so stretchy knit edges stay square while you cut, sash, and assemble the memory quilt top.
Making a quilt from old shirts require planning ahead because the shirts may come in different sizes and from different materials. Planning is necessary for two main reasons: because the graphics on the shirts may not be the same size, and because knit fabrics tend to stretch in ways that other fabrics do not. A planning tool help with these issues because it allows the quilter to measure their materials prior to cutting the fabric from the shirts.
Thus, using a planning tool will help the quilter to avoid guesswork with the project, and it will ensure that the quilter understand the mathematics of the project prior to beginning the project itself. Each shirt may behave differently when it is cut from the garment. Knit fabrics tends to be stretchy, and the stretch in the fabric may cause issues when quilting the fabric.
Plan a Quilt from Old Shirts
Additionally, some graphics may be located at odd heights upon the chest, or the graphics may be too large to fit within a standard block of the quilt. In order to design the quilt with the shirts, the quilter must tell the software planning tool how many shirts they have, what size they would like each panel of the quilt to be, and how much space they would like around each graphic from the shirts. These answers will force the quilter to make a decision about which parts of the shirt they would like to use prior to using a rotary cutter to cut the fabric.
The size of the panels from the shirts is another decision the quilter must make. A twelve-inch panel may work for most graphics from adults shirts, but may not work for youth shirts or concert shirts that may be unusually oversized. The planning tool can help the quilter to test various widths of shirts panels to ensure they will encompass the smallest graphic they would like to use; if the software indicates that the graphic will be squeezed within the panel, then the quilter can make a decision to either enlarge the quilt, remove a row or column of panels from the quilt, or to use some shirts as accent blocks within the quilt.
Another aspect of the planning software is its determination of the amount of sashing and borders that will be required for the quilt. Sashing and borders can aid in the visual separation of the graphics from the shirts. The planning tool can determine the cost of the sashing and borders, which will help the quilter to ensure that they have enough fabric within their existing stash to create the desired quilt.
Quilt layouts require some breathing room for the shirts graphics, and the planning tool makes it easy for the quilter to determine how much breathing room is required. An additional aspect of the planning tool are the calculations of the amount of stabilizer required for the project. Because the fabric of the shirts is stretchy, it is necessary to fuse a knit interfacing fabric to the back of each panel of shirt.
The planning software can determine the amount of stabilizer that is required to complete the project, which will ensure that the quilter does not buy too much stabilizer for the project, nor too little to be able to complete the project. The software also includes a buffer for the amount of stabilizer required in case some panels must be recut, or if some shirts do not cooperate with the cutting plan that the software devised. The software performs the calculations for the backing and batting for the quilt in the same manner as the calculations for the amount of stabilizer required.
In addition to the shirts, more fabric will be required for the backing and batting of the quilt to allow for even basting and quilting. Furthermore, the number of yards of fabric that will be required will change according to the type of piecing that the quilter would like to use for the quilt. The planning tool will help to ensure that, when complete, the quilt will not be too small once it is squared and bound.
Finally, the estimate of the amount of binding for the quilt also utilizes this same logic to arrive at the amount of binding required for the project. A table within the software provides examples of the different types of quilt layouts that can be made with the software. For instance, a lap quilt may be made with twenty shirts, but a twin quilt may require thirty-five shirts.
These numbers are only suggestions, and the quilter can decide to use both shirt fronts and backs, or even blank shirts as filler blocks for the quilt to reach the desired shirt and area count. Furthermore, the planning software can also alter the number of panels that can be made with each shirt. One aspect of the software that the software cannot perform is capturing the emotional part of the shirts.
For instance, it is possible that the quilter may decide that certain shirts should have larger panels than others, or that some shirts should be featured in the center of the quilt. While the software can help to plan and calculate the logistics of the project, it does not account for the emotional reasons for which the quilter would like to begin the project. Some common mistakes that people can make with the software are due to the fact that some people measure the wrong part of the shirt.
For instance, most people will measure the entire shirt front rather than the portion of the shirt that contains the graphic that they would like to use. Furthermore, most people will not account for the fact that the graphic will be cut with a seam allowance that removes fabric from each side of the graphic. Some people will not use the stabilizer for the project, which can cause the blocks to not maintain their desired shape.
Thus, using the planning software prior to cutting the fabric will allow for people to avoid these mistakes. The same logic helps the software decide the types of fabric to use for the sashing, backing, and binding of the quilt. For instance, sashing fabric should be relatively stable and not too busy.
Backing fabric should be wide enough to avoid odd seams on the quilt. Finally, binding fabric of a specific width can help to alter the appearance of the quilt, as well as the amount of fabric that will be required. These design elements are easy to decide once the planning software is seen, but those who rely upon their memory to remember the amount of fabric that will be required for each aspect of the quilt can easily under estimat them.
This planning software can perform the job of determining the amount of fabric that will be required for the project. It will ensure that the quilter does not run out of stabilizer, nor will it make sure that the amount of backing fabric is too small for the shirts. Once the logistics of the project are settled, it is time to create the quilt itself.