Drawer Height Calculator
Split a cabinet, wardrobe, closet, dresser, or built-in opening into drawer front heights, box side heights, reveal gaps, rails, slide clearances, and usable storage height.
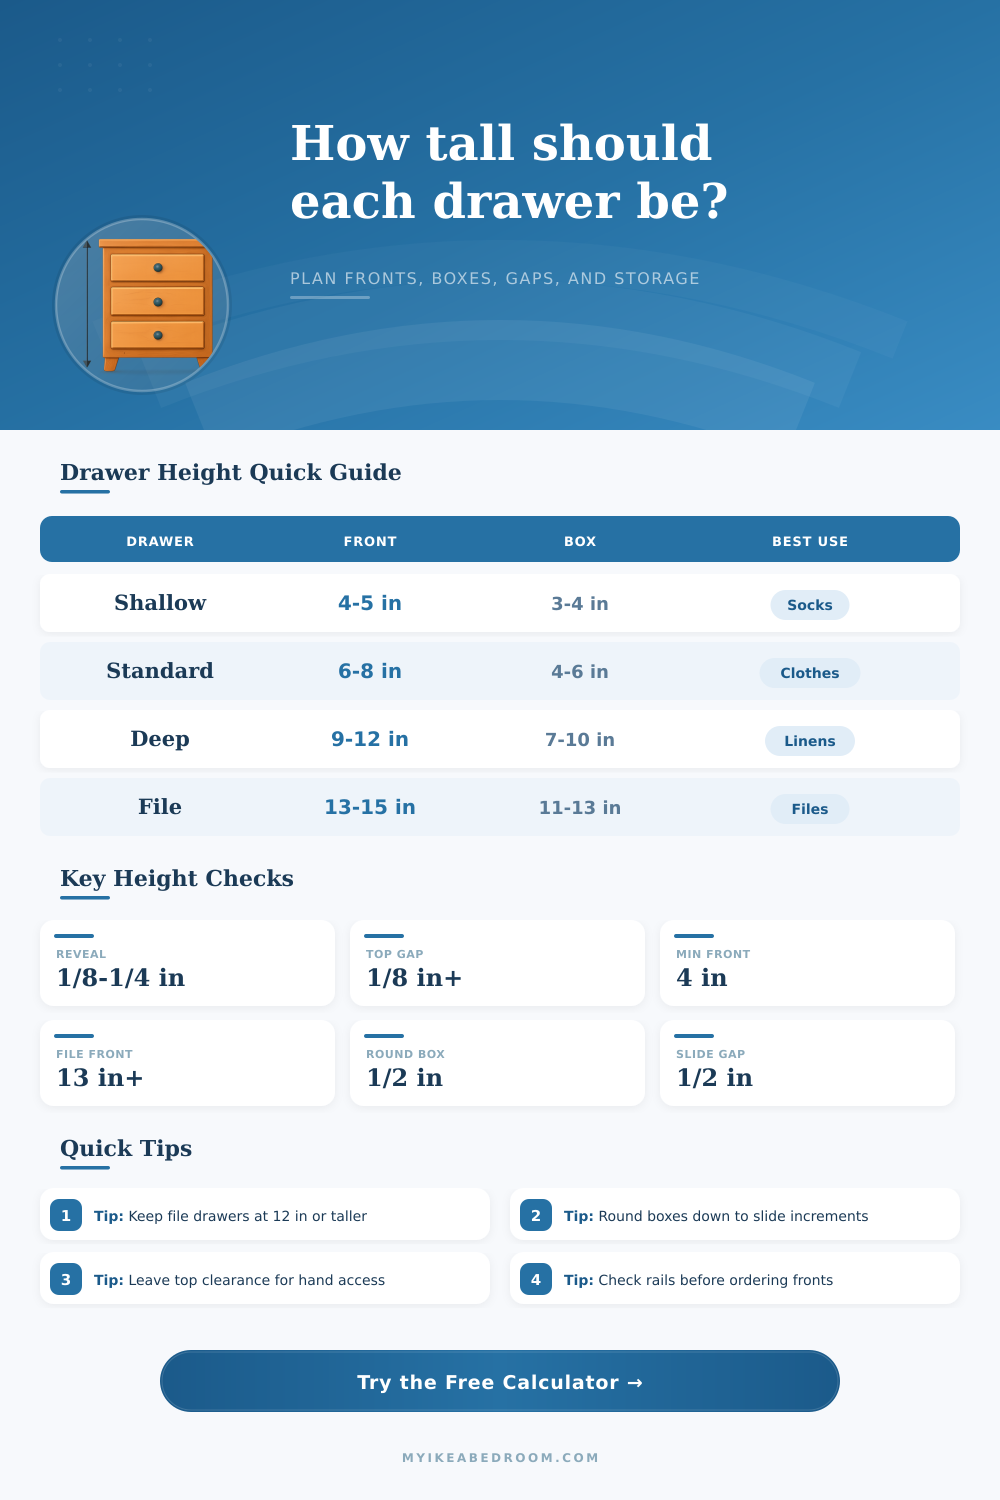
Drawer height plan
| Front height | Box side target | Common use | Watch point |
|---|---|---|---|
| 4 to 5 in | 3 to 4 in | Accessories, socks, stationery | Check hand access under the top rail. |
| 5.5 to 8 in | 4 to 6.5 in | Clothing, desk, vanity, media | Good general-purpose drawer height. |
| 8.5 to 12 in | 6.5 to 10 in | Linens, sweaters, pots, hobby bins | Deep boxes can get heavy when fully loaded. |
| 12.5 to 15 in | 10.5 to 13 in | Hanging files, tall pantry, bedding | Verify slide rating and interior clear height. |
| Construction | Top or bottom | Between fronts | Rail allowance |
|---|---|---|---|
| Overlay frameless | 1/8 to 1/4 in | 1/8 to 1/4 in | Usually 0 in |
| Inset face frame | 3/32 to 1/8 in | 3/32 to 1/8 in | Actual rail height |
| Internal wardrobe | 1/2 to 1 in | 1/2 to 1 in | Shelf or rail thickness |
| Push-open fronts | 1/8 to 3/16 in | 1/8 to 3/16 in | Leave push travel space |
| Stack type | Opening height | Drawer count | Suggested front pattern | Typical storage |
|---|---|---|---|---|
| Nightstand | 24 to 28 in | 2 to 3 | Equal or small top | Books, accessories, sleepwear |
| Dresser bay | 40 to 55 in | 4 to 6 | Graduated lower drawers | Clothing sorted by bulk |
| Closet tower | 30 to 45 in | 3 to 5 | Small top, deep lower | Folded clothes and linens |
| Desk pedestal | 24 to 30 in | 2 to 4 | File bottom layout | Stationery plus hanging files |
| Bench storage | 12 to 20 in | 1 to 2 | Deep equal fronts | Shoes, bags, seasonal items |
| Slide type | Height deduction | Box side habit | Best fit |
|---|---|---|---|
| Undermount concealed | 1 to 1.5 in below front | Round side down to 1/2 in | Bedroom, closet, vanity drawers |
| Side-mount ball bearing | 3/4 to 1.25 in below front | Leave screw and slide clearance | Utility, desk, heavy everyday drawers |
| Wood runner | 1/2 to 1 in below front | Keep top access generous | Light furniture and traditional builds |
| Push-open concealed | 1 to 1.75 in below front | Allow push travel at the face | Handle-free wardrobes and media cabinets |
The heights of each of the drawers within the cabinet or built-in determines the function and a appearance of that cabinet. If the height of a drawer is too high, it will interfere with the drawer above. If the height of a drawer is too low, it will waste the available spaces within the cabinet.
The difference between a drawer stack that functions correctly and sticks is usualy in the small measurements that is calculated prior to cutting any wood. Each of the inputs that are requested of the person using the calculator are the decisions that a person makes when building the cabinet. The opening height is the first of these inputs.
How to Measure and Plan Drawer Heights for Cabinets
The opening height is the height of the opening within the case or between the rails of the face frame. You can find the opening height by subtracting the thickness of the top and bottom clearances, any gaps between the drawer fronts, and any horizontal rails from the height of the opening. The result is the net height.
The user will divide the net height by the height of each of the drawer fronts. This net height is the number that will enable all other calculation within the tool. Another of the inputs is the division of the net height amongst the items that will be stored in the cabinets.
The decision of dividing the height of the fronts equally will result in a more uniformly looking cabinet. Allowing for some drawers to have more room than others for items of certain types will allow for greater ease of access of those items. For example, having a file drawer with a large depth at the bottom of the cabinet will require the drawer to have a greater height of the front to allow the hanging files to clear the sides of the cabinet.
The layout option within the calculator allows individuals to test each of these scenario to determine the impact upon the height of the drawer fronts. The construction style of the drawers impacts the depth of each of the front openings. For example, fronts that are to be layered onto the drawers will reveal less of the items within the cabinet than front pieces that are to be inset onto the sides of the box.
Additionally, face-frame construction will require the thickness of the rails to be subtracted from the opening height to determine the height of the drawers within the cabinet. Internal wardrobes may require clearances of the bottom and the top of the drawers to allow individuals’ fingers to pass the items on the shelf within the cabinet. The tool considers these variables and will account for them when the user chooses a construction style.
The type of slide for each of the drawers will impact the height of the sides of each of the box. Undermount slides will require the sides of the boxes to be of a lower height than side-mount slides, as the undermount slides will be seen through the front of the cabinet. Push-open hardware will require the slides to have depth within the cabinet to allow the hardware to open the drawer.
These variables will impact the height of each of the sides of the boxes, which the tool will calculate. The usable interior height will help in the decision of what type of items are to be stored within the drawers. The tool will calculate the usable interior height by subtracting the thickness of the bottom panel of the drawers from the rounded height of the sides of the boxes.
The usable interior height will determine the items that are allowed within the cabinet. If the depth of the item to be stored within each of the drawers is found to be greater than the usable interior height, the front of each of the drawers will have to be deeper or the layout altered. Common mistakes include the skipping of one of the early inputs.
For example, the thickness of the rails is often forgotten for face-frame construction. If an individual forgets the thickness of the rails, the fronts of the drawers will be too tall. An individual may use the same height for each of the sides of the boxes and the same depth for each of the drawers regardless of the different types of slides.
Using the same height for each side will result in error in the function of the drawer fronts. An individual may also fail to remember the required space for the top clearances for the individuals fingers. Forgetting the need for this clearance will result in the drawers binding to the sides of the cabinet.
The same logic can be applied to nightstands, dressers, closet towers, and media cabinets. Drawers with shallow depths will be used for items like socks and electronic device chargers. Standard depths will be used for folded clothing.
Deep drawer fronts will be used for items like linen and other bulky items in the drawers. File organizers will require the fronts of the drawers to be of a certain height to allow visibility into the files. The tool considers each of these options to allow individuals to determine the height of each of the front.
When the measurements are finally determined, the individual will order the parts. The fronts of the drawers will be ordered first. The individual will order the sides of the boxes afterwards, after the fronts of the drawers are determined.
This order prevents errors in building the boxes such that the fronts of the drawers will bind to the sides of the boxes. Each of the drawings within the cabinet allow for adjustments to be made to each of the fronts or depths of the box. For example, adjustments to the depth of the drawer fronts will allow the appearance to look even and intentional.
Adjustments to the depth of the boxes allows for the slide hardware to have enough space to open and close the drawers. The individual can make these adjustments when planning the project, as it is much less costly to make such adjustments when the wood for the drawers is already cut. The opening measurement will determine if the piece will fit into the area within which it is to be placed.
Each of the other measurements is determined through the opening measurement. Thus, running the numbers for each of the measurements will both save an individual time and guarantee that the cabinet will function as the individual has planned and imagine.