Crown molding is a type of trim that is used along the edge where the wall meet the ceiling. Crown molding is used to create a visual transition between the wall and the ceiling, as well as to provide a finished appearance to a room. People dont typically notice the crown molding in the room if it are installed correctly.
However, people will notice the lack of crown molding in a room that does not has it as the room will not appear finished without it. The profile of the crown molding is the shape that the molding take, and the shape of the crown molding will determine how noticeable the molding will be within the room. There are many different profile for crown molding that can be used in a room.
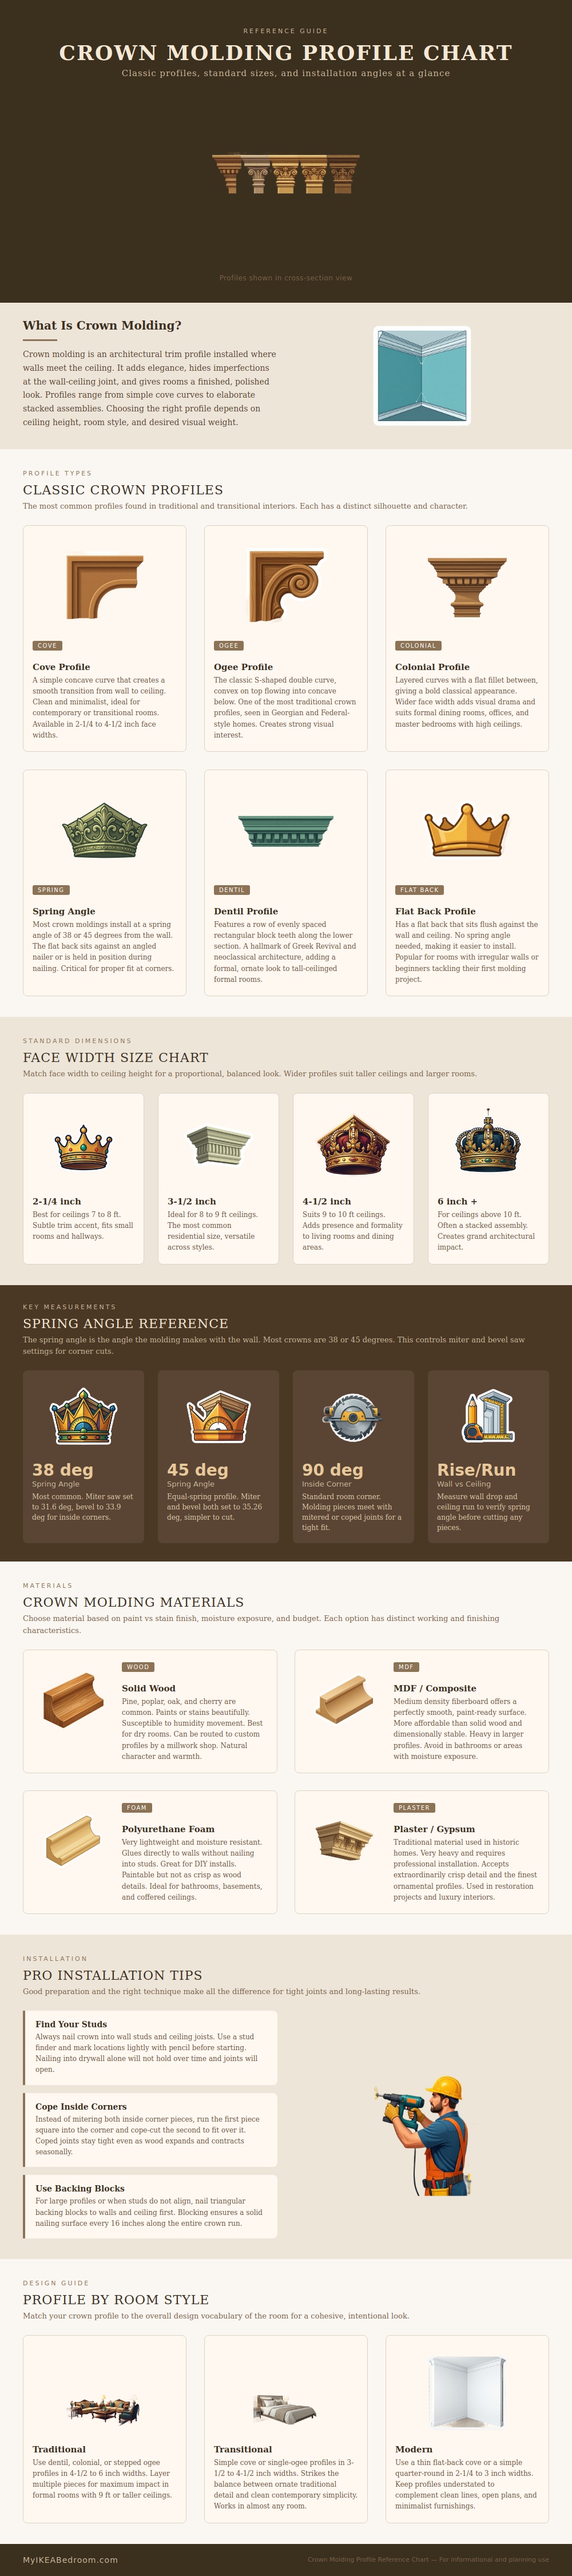
How to Choose and Install Crown Molding
Some of the most common profiles for crown molding include the cove profile, the ogee profile, the colonial profile, the dentil profile, and the flat back profile. The cove profile is a simple shape that creates a scoop in the corner where the wall and ceiling meets. The ogee profile is an s shape that has been used in homes for many years.
The colonial profile includes steps and fillets that create more light and shadow within the room. The dentil profile is comprised of a series of small rectangular shapes that create an illusion of teeth. This profile is typically used in formal rooms within the home.
Lastly, the flat-back profile does not have a spring angle to the molding. This type of crown molding will be flush with the wall, and it is recommended for those who are just beginning to work with crown molding as it does not require any compound cut to install. Another thing that must be considered when purchasing crown molding is the height of the ceiling in the room.
For instance, if the ceiling in the room is low at 7 feet, then the molding should be narrow to avoid crowding the space. However, if the ceiling is 9 feet high, it will be able to accommodate for a wider molding profile. In both instances, crown molding should be selected according to the size chart recommended for crown molding to ensure that the molding looks good in the room and is not an afterthought in its installation.
The installer must also take the spring angle of the molding into consideration before beginning the installation process for crown molding. The spring angle is the angle at which the molding is placed against the wall. The spring angle will determine the settings for the miter and the bevel on the saw that will be used to cut the molding.
Most crown molding will have a spring angle of either 38 degrees or 45 degrees. Ensuring that the saw is correctly set to the spring angle will ensure that the corners of the molding are evenly matched when the crown molding is installed. If you do not use the correct spring angle for the crown molding, the molding will have gap in the corners of the joints between the crown molding and the wall.
These gaps will be visible even if you caulk the joints between the crown molding and the wall. In addition to choosing the spring angle, you must choose the material for the crown molding. Factors that will affect your choice of material include both how the molding is supposed to look and how long it is supposed to last.
If you choose solid wood for your crown molding, the solid wood will accept stain well. However, solid wood will move when the humidity change in the room, which could lead to the joints in the wood opening up. If you choose MDF for your crown molding, the MDF will have a smooth surface that accepts paint well.
Additionally, MDF is generally less expensive than solid wood. However, MDF will swell if it get wet. If you choose polyurethane foam for your crown molding, the foam will be very light and is often used in bathrooms.
However, the detail on polyurethane foam pieces will not be as much detail as solid wood. Finally, if you choose plaster for your crown molding, the plaster will allow for very fine detail. However, plaster is heavy and generally requires professionals to move the crown molding.
Most crown moldings have inside corners in them. Inside corners are generally more difficult to finish than other parts of the molding installation. For inside corners, you can use a miter joint.
However, miter joints may open up if the temperature of the room change. You can also use a coped joint for inside corners. For coped joints, you cut the first piece of crown molding to go into the corner, then cut the second piece of crown molding so it fits over the first piece.
The advantage of using coped joints is that they do not open up when the crown molding expands or contracts. Additionally, you can use backing blocks to install the crown molding into the studs in the walls. Using backing blocks allows the crown molding to have a solid surface to attach to, rather than relying on the drywall to provide the support for the molding.
The style of the room will help determine the profile of the crown molding that you use. For traditional room styles, profiles like colonial or dentil are used, as most traditional rooms can accommodate the wider profiles. For transitional rooms, an ogee or cove profile can be used, as transitional rooms generally have space for these simple profiles.
For moddern rooms, narrow flat-back or quarter-round profiles are used; modern room designs typically do not want the molding to be overly decorative. Once you have chose a crown molding profile and made the required cuts to the molding, the installation of the crown molding is complete. You should of checked the measurements twice.
Its important to get the right look. Making sure youre happy with the result is alot of work.
