Low Voltage Landscape Lighting Calculator
Size a low-voltage outdoor lighting run from transformer tap, fixture load, wire gauge, main and branch distances, voltage drop allowance, zones, LED margin, and layout style.
Load a realistic lighting layout, then adjust fixture watts, transformer tap, wire gauge, branches, zones, and driver margin.
14 AWG
Current run check.
12 AWG
Drop comparison.
12 V
Recommended tap band.
Daisy
Run style factor.
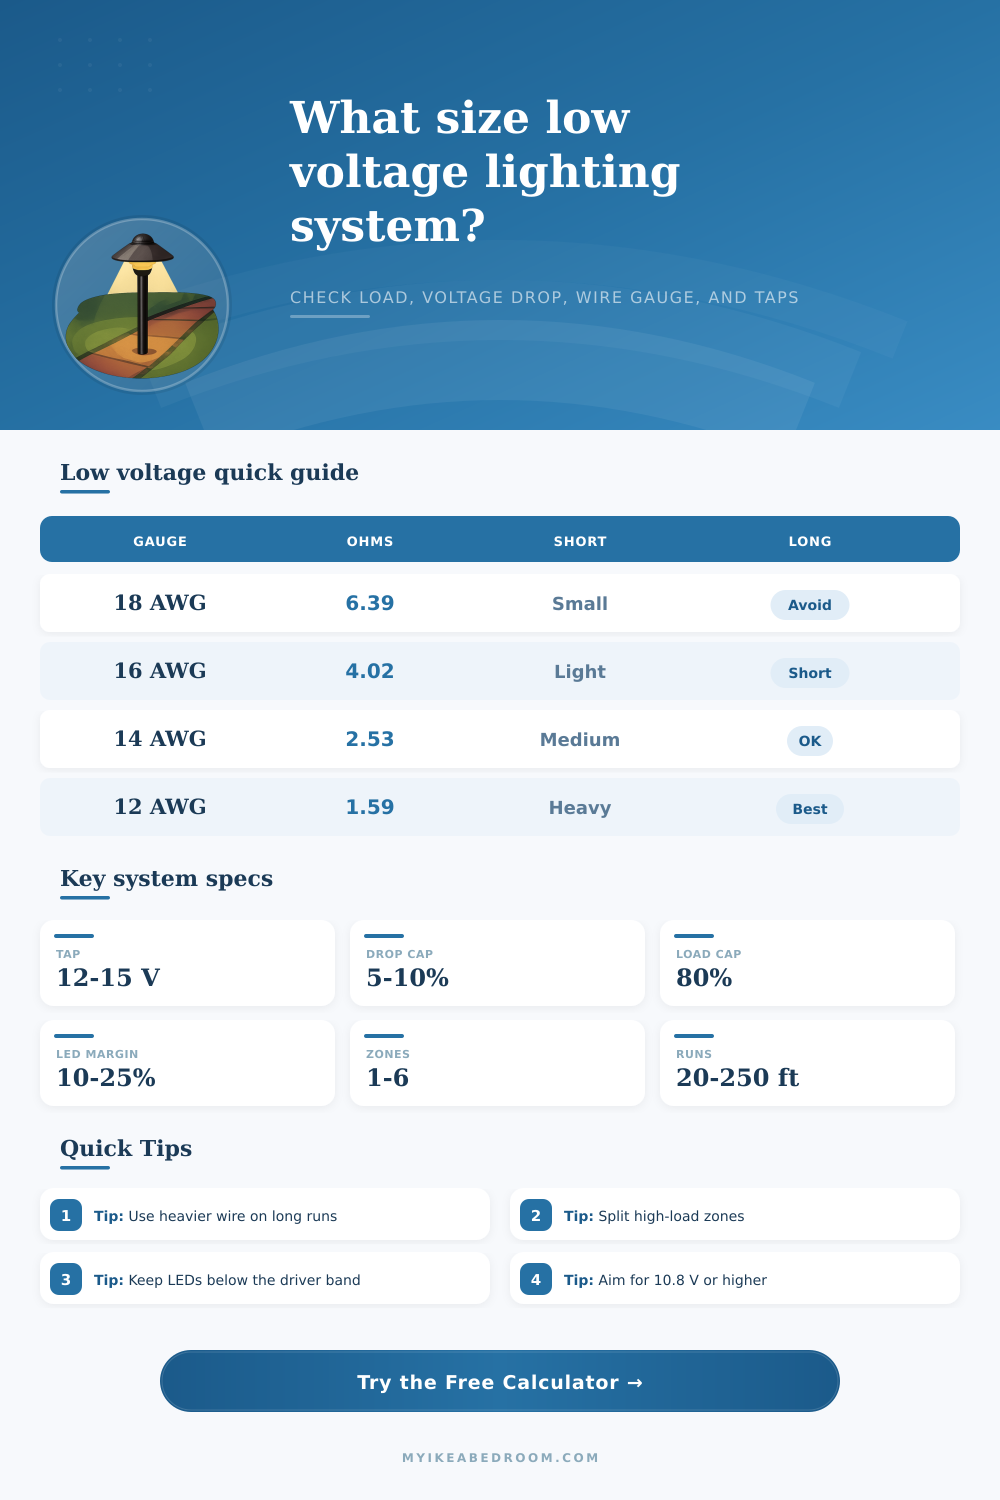
| Wire gauge | Ohms per 1000 ft | Best use | Planning note |
|---|---|---|---|
| 18 AWG | 6.385 | Very short LED spurs | High drop on long landscape runs |
| 16 AWG | 4.016 | Short step or deck groups | Works best with low fixture watts |
| 14 AWG | 2.525 | Common residential runs | Good middle choice for modest zones |
| 12 AWG | 1.588 | Longer main runs | Reduces voltage drop noticeably |
| 10 AWG | 0.999 | Heavy or extended runs | Useful before raising tap voltage |
| 8 AWG | 0.628 | Very long feeders | Often used as a main feed only |
| Transformer tap | Typical use | Target far end | Watch item |
|---|---|---|---|
| 12 V | Short balanced runs | 10.8 to 12.0 V | Best when drop is low |
| 13 V | Moderate drop runs | 10.8 to 12.5 V | Check fixture voltage rating |
| 14 V | Longer feeders | 11.0 to 13.0 V | Use with listed multi-tap units |
| 15 V | High drop correction | 11.0 to 13.5 V | Confirm LEDs can accept input |
| Fixture type | Common watts | Common voltage | Load behavior |
|---|---|---|---|
| Path light | 2 to 5 W | 12 V AC/DC | Many fixtures spread across a run |
| Deck step light | 1 to 3 W | 12 V | Low load, often many short spurs |
| Garden uplight | 4 to 9 W | 12 V | Fewer fixtures with higher watts |
| Wall wash bar | 5 to 12 W | 12 to 24 V | Can load one branch unevenly |
| Well light | 5 to 10 W | 12 V | Check long branch voltage carefully |
| Layout style | Drop tendency | Best for | Calculator factor |
|---|---|---|---|
| Daisy chain | Highest at last fixture | Short paths and simple edges | Full run load |
| Split tee | Moderate | Two-sided paths and patios | Shared main load |
| Hub and spokes | Lower per branch | Courtyards and grouped beds | Branch-weighted load |
| Loop-assisted | Lower if connected well | Perimeters and closed borders | Reduced effective run |
| Multi-zone homeruns | Lowest per zone | Large mixed systems | Split by zone count |
Voltage tip: If farthest-fixture voltage falls below the allowance, first split the run or use heavier cable; then consider a higher transformer tap within the fixture rating.
Load tip: LED drivers and low-voltage transformers behave best when the calculated lighting load stays below the rated watts after the selected margin.
Installing low voltage lighting in your yard allow you to illuminate areas after dark without the need for heavy conduit to bury under the ground or calling in professional electrician for every lighting fixture that you wish to install. However, prior to burying any wire in the ground, a person must lay out an electrical system for the lighting fixture. The way in which the load of the lights, the wire that will transmit the electricity to the lights, and the voltage of the lights can impact whether the lights remain bright to the observer at the end of the lighting system’s run of cable.
If the voltage drop too low to the last light fixture in the system, the lights will become dim. To plan the system for the yard, many people begins with determining the number of lighting fixtures that will be utilized in the yard. In addition to the number of fixtures, the total watts of each lighting fixture will reveal the size of the transformer that is required to power those light.
How to Plan Low Voltage Yard Lighting
However, the total watts of each light does not indicate the voltage that will reach the last light in the system. A voltage calculator can reveal the voltage at the last light if a person enters the number of fixtures, the watts of each light, the length of the main cable that run throughout the yard, and the lengths of any branch lights into the calculator. Each of these variable impact the voltage levels that are delivered to the lights in the system.
One of the variables that can be adjusted is the gauge of the wire that is used in the lighting system. Thickened cables have the ability to lower the resistance in the circuitry of the lights. Additionally, the thicker the cable, the less voltage that the lights lose before they reach the light fixture.
However, the cost and the difficulty of handling heavier gauge wire increases with the gauge of the wire. Many people use 14 or 12 gauge wire for the main lights in the yard, but use lighter gauge wires for the spur lights that may illuminate other areas in the yard. Should the voltage of the last light in the system be found to drop to a voltage that is below the target voltage of the system, using a heavier gauge wire is one fix to implement.
Another variable to adjust is the transformer taps. For short lights and balanced lighting system runs, a 12 volt tap can be used. For longer distances or greater loads of lights, a 13 or 14 volt tap will provide the power to each light in the system.
However, you must take care to ensure that LED light drivers are not exposed to the voltages of the top of the voltage window of the system. A voltage calculator will track the LED driver margin which ensure that there is enough power for the lights with their labels, plus any additional lights that may be added to the system in the future. Another layout of the lighting system that can be created is a daisy chain or a hub and spoke system.
With a daisy chain system, each light is in series with the other lights in the system. In contrast, a hub and spoke system split the load of the lights into different branches that radiate from the main lighting fixture. A person can choose the layout of the system prior to the lighting of the system; the electrical path of the lights is not necessarily the same as the physical path of the lights in the yard.
Another option is to divide the system into zones. Each zone will only manage its own load. Because each zone will only manage its own load, the current and the voltage loss will be minimized.
A lighting system calculator can help to reveal how dividing the system into zones will impact the voltage of the last light in each zone. Additionally, using a lighting system calculator will reveal the maximum load for each zone which allow a person to determine if one transformer will manage the yard lights or if two transformers will be needed. Another physical obstacle to consider is the physical features of the yard.
Any number of obstacles to the path of the cable will require the cable to detour around those obstacles. The longer the cable, the greater the resistance in the system. A person can enter the actual length of the cable into the lighting system calculator.
Using the length of the cable rather than the distance between lights in the system will help to avoid having the lights be dim at the far corner of the yard after installation. Common mistakes include underestimating the total load that the system will have. For example, one might calculate the wattage of the lights in the system, but often people ignore the wattage of the LED drivers.
Additionally, the transformer rating for the lights is often considered to be the maximum power that the lights will use, but most LED light fixture manufacturers recommend against using the entire rating of the transformer in order to avoid prematurely failing the lights. A lighting system calculator will display the utilization of the system, the headroom for the lights, and the voltage of the last light in the system. The goal of the system is to evenly distribute the light to each area in the yard.
For LED lights, the voltage at the last light should be above 10.8 volts. Additionally, the voltage should remain within the margin for the transformer that is set by the designer of the system. As long as the voltage of the last light in each zone is above 10.8 volts and within the transformer margin, the voltage drop from any change in the gauge of the wire or the voltage of the transformer tap will not be critical.
Using a lighting system calculator allow a person to make adjustments to the system based off the actual distances between the lights in the yard.